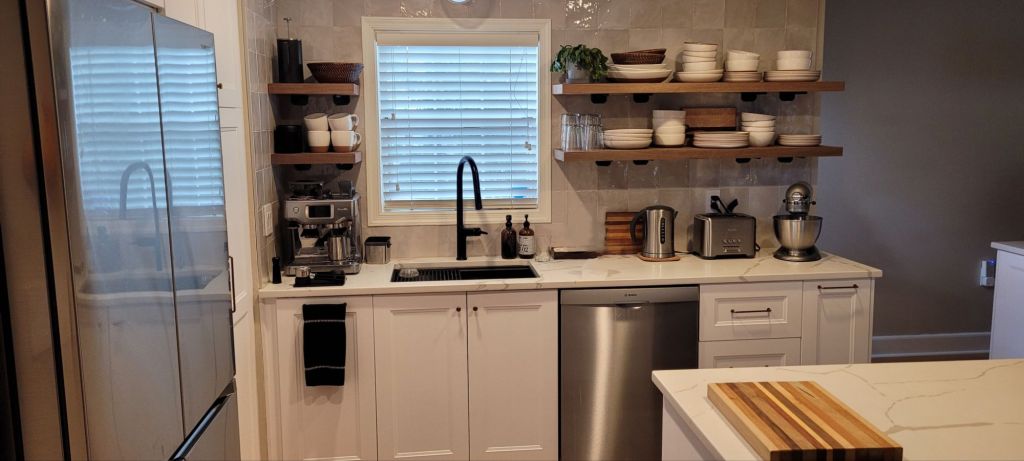
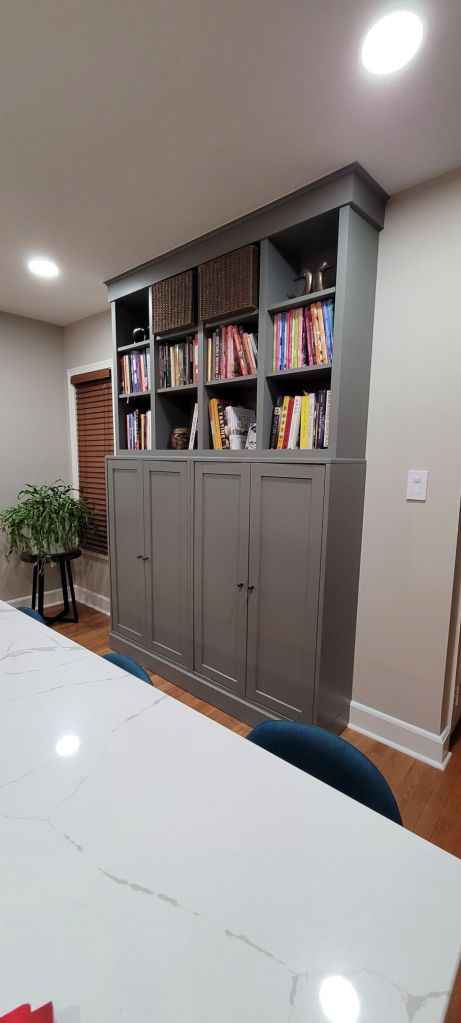
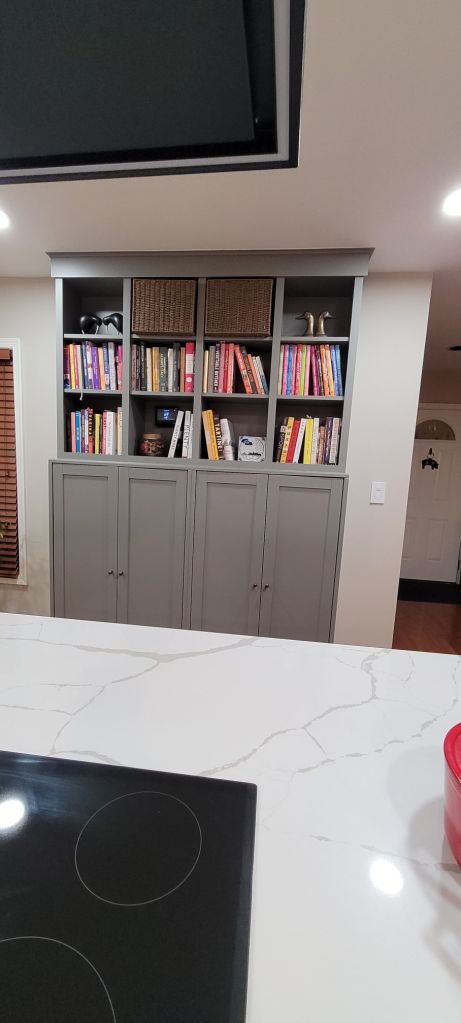
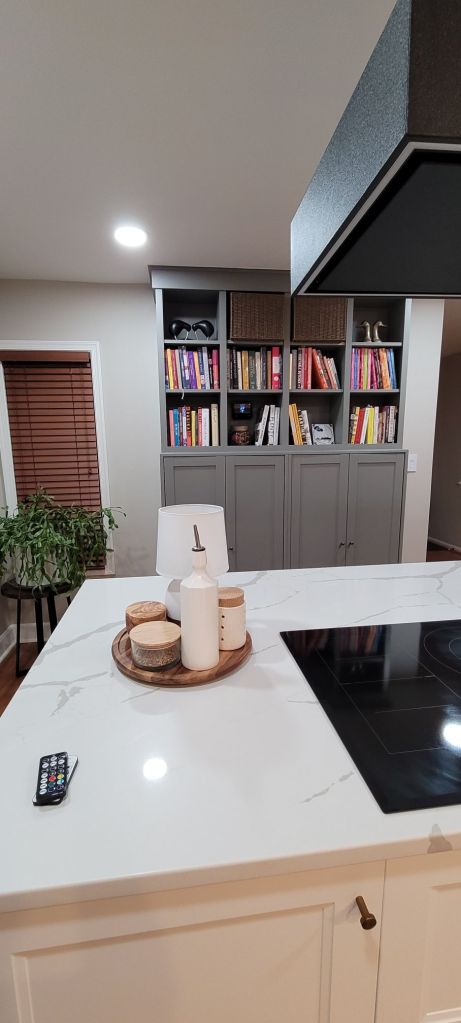
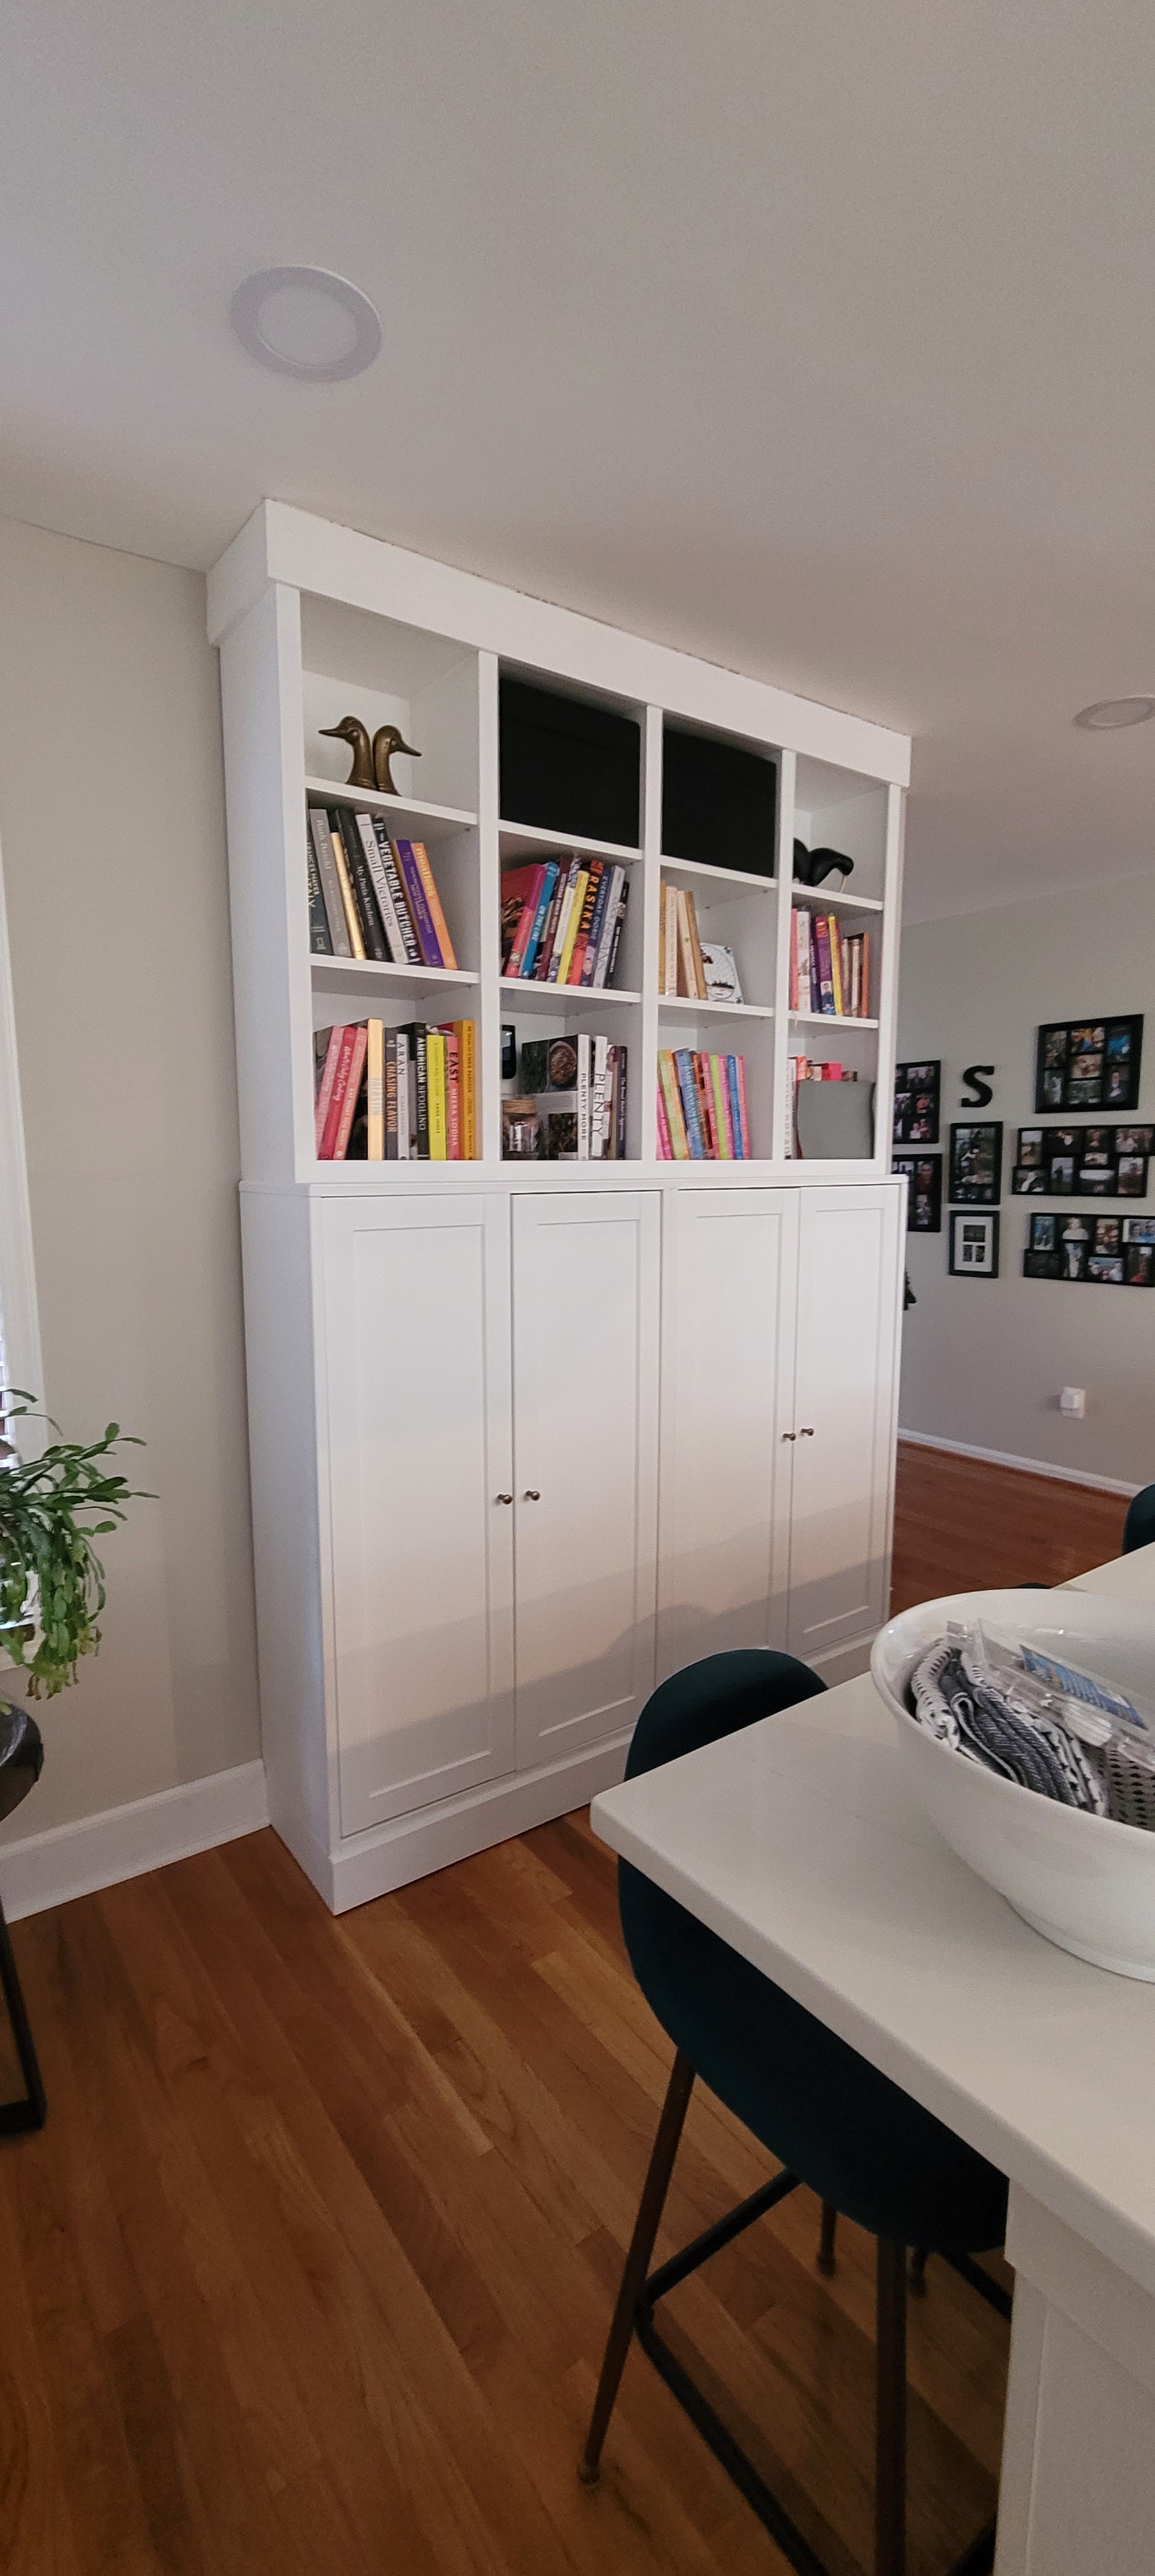
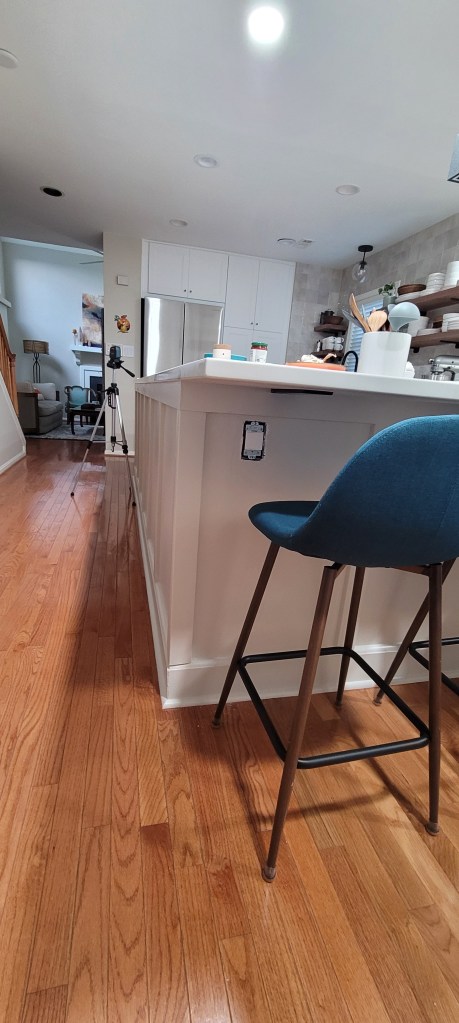
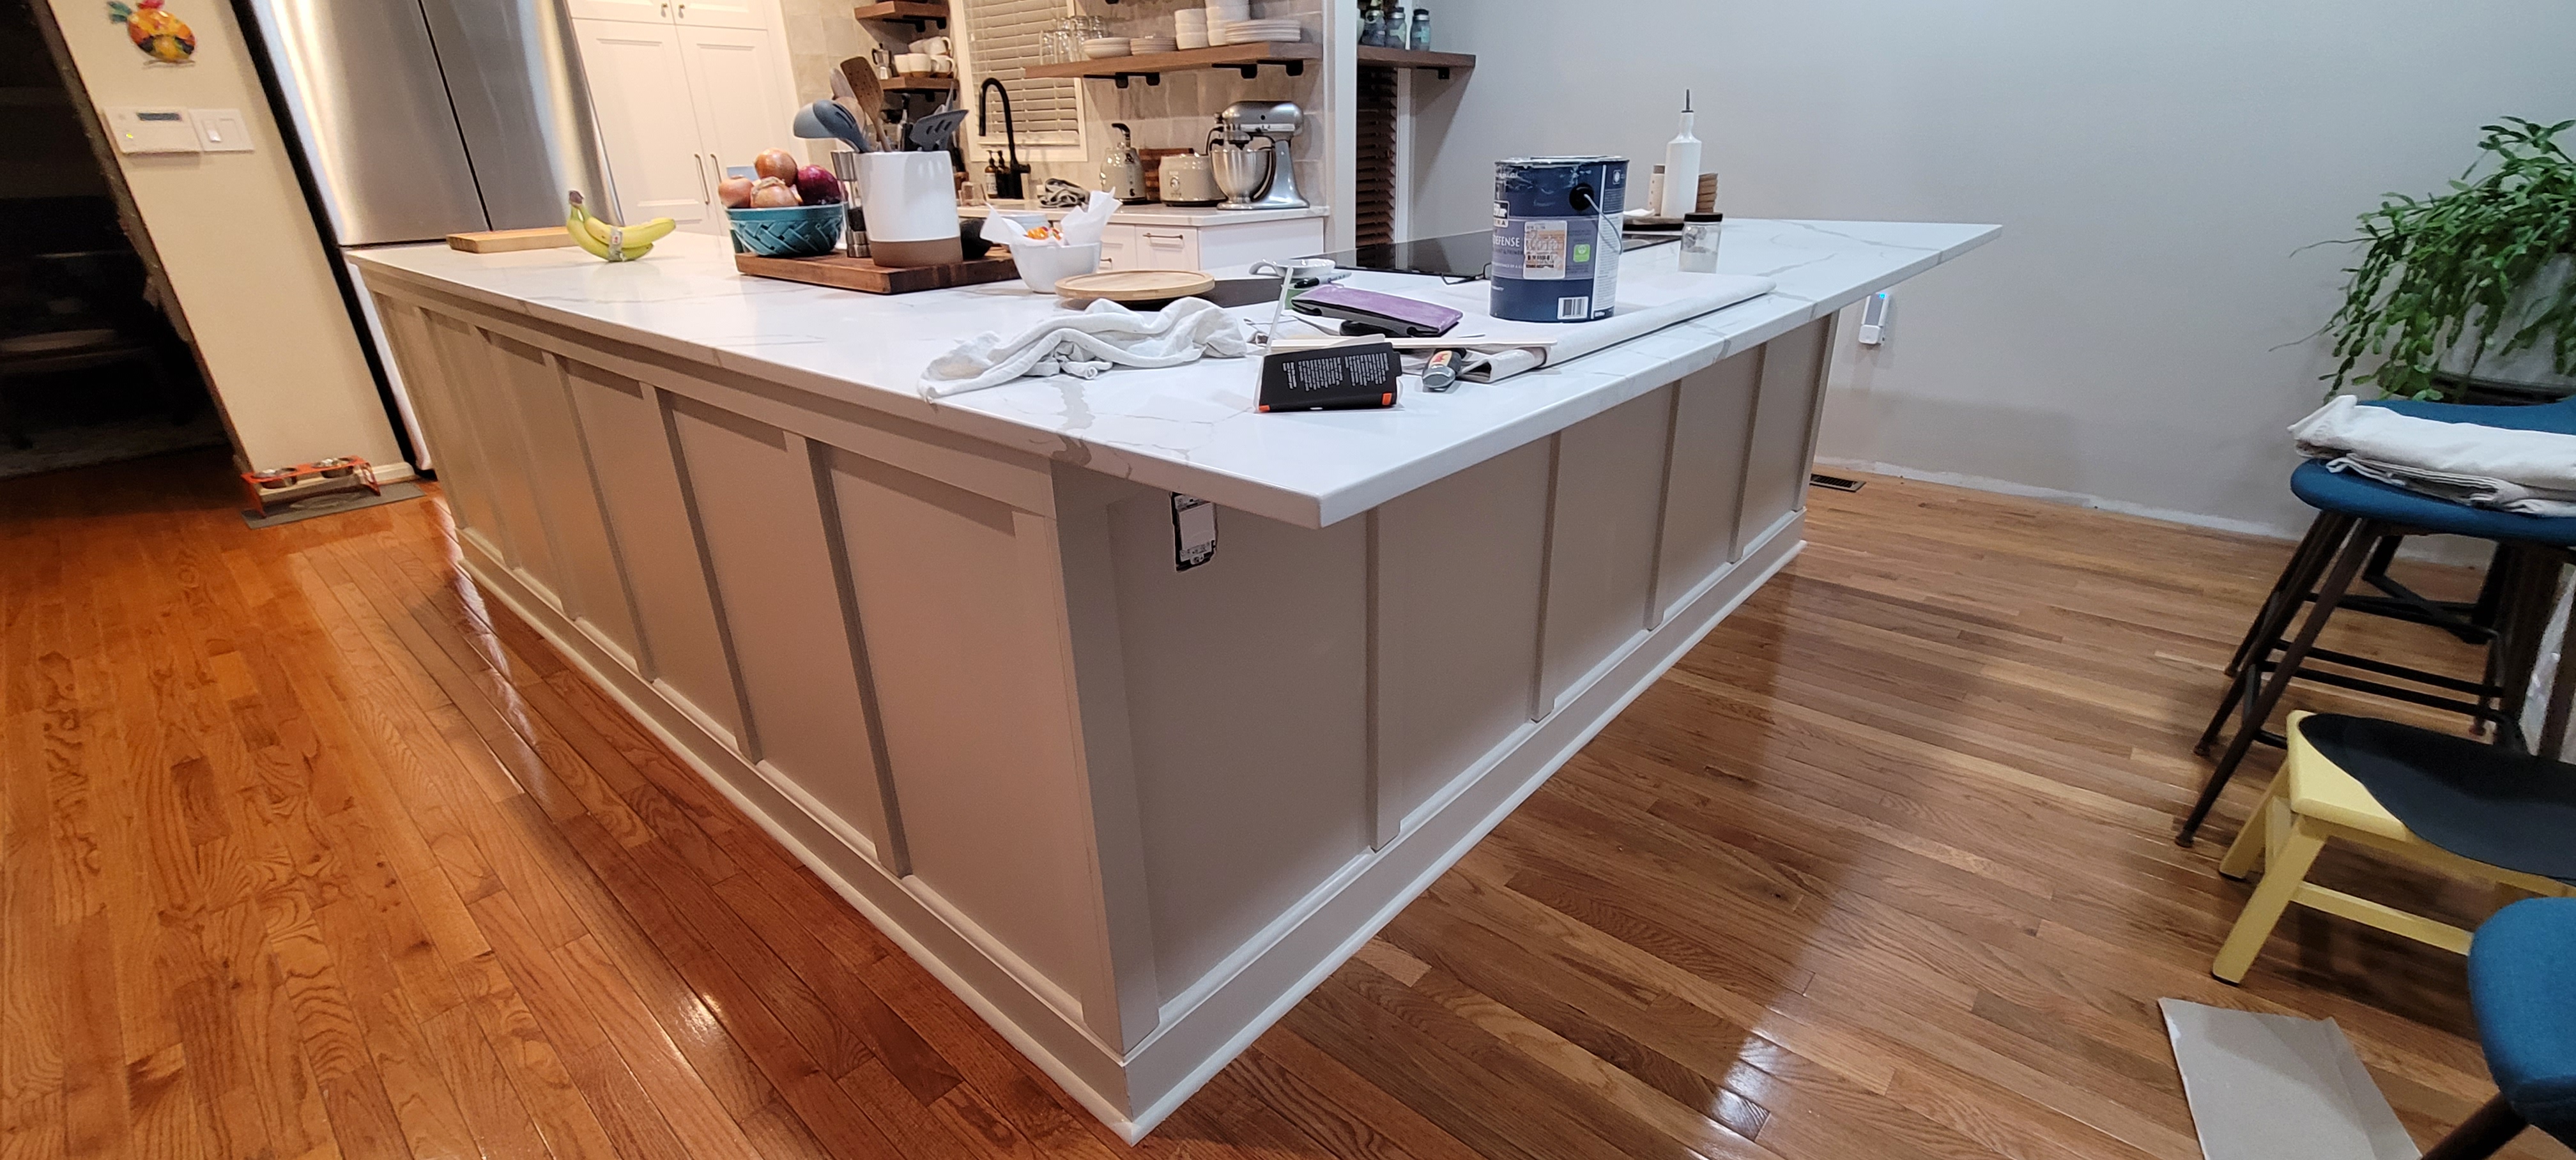
We just weren’t happy with our initial color choice on this floor-to-ceiling cabinet that sits at the back of our kitchen.
Even though our kitchen cabinets are white and our quartz countertops a creamy white, we have lots of pops of warm walnut open shelving and putty grey veining in the quartz that helps keep the kitchen from looking too sterile and cold.
But, even though we tried to keep things light by choosing white for this substantial piece, it took all the focus in the room. It was so bright and so white, that it started to annoy me.
With baseboards left to caulk and paint and a bunch of other punch list items staring us down, repainting the entire cabinet just seemed like a distant chore nobody wanted to do.
But, the cabinet sits directly in front of the island, so it taunted me every time I used our cooktop. One day, somewhere in the middle of boiling pasta and making sauce, I decided I couldn’t take it anymore and began looking at color swatches.
I had already purchased a gallon of paint for our guest bedroom upstairs and when I put those swatches on the wall to see if I liked it up there, something clicked.
“I think it’s the perfect color for our kitchen utility cabinets!” I said to no one in particular. (I was definitely excited.) Could it possibly be an exact match of the veining in our quartz? Why, yes, it could, as a matter of fact.
The color, Benjamin Moore’s Chelsea Grey, is a muddy warm grey and it was either going to be perfect or an unmitigated disaster.
Spoiler alert…
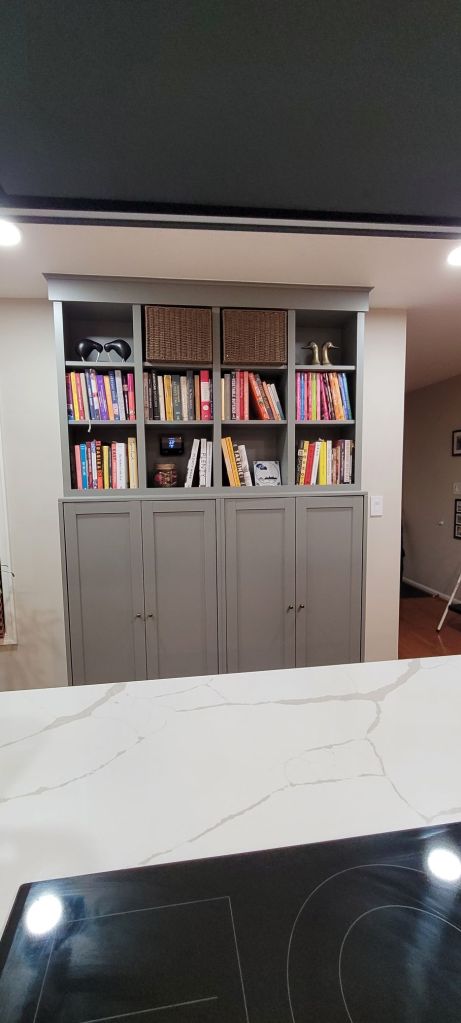
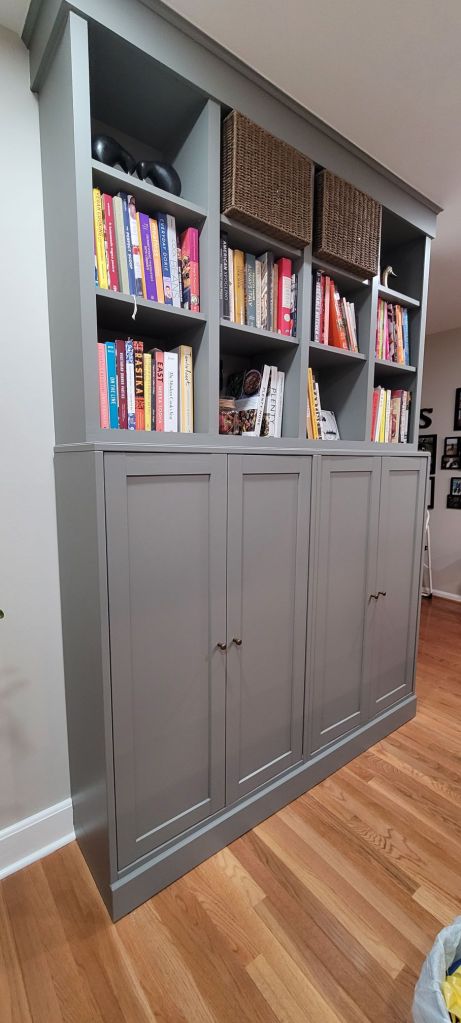
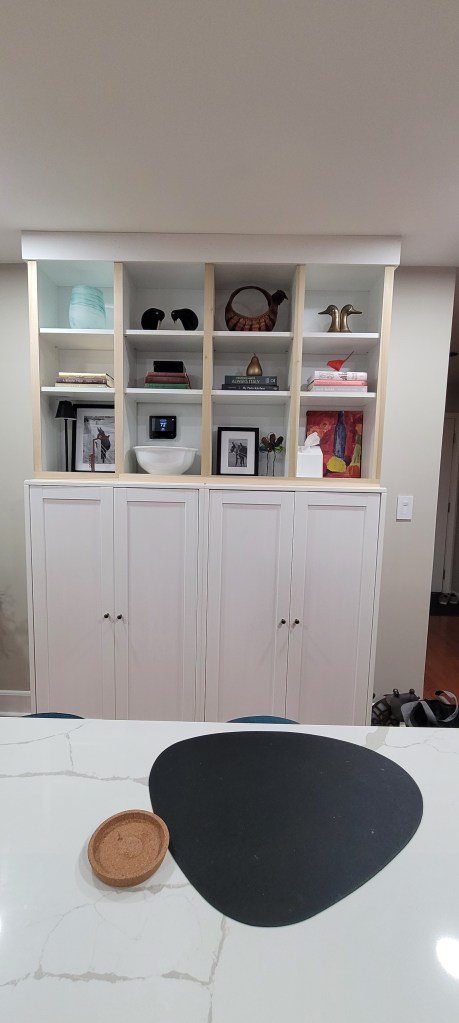
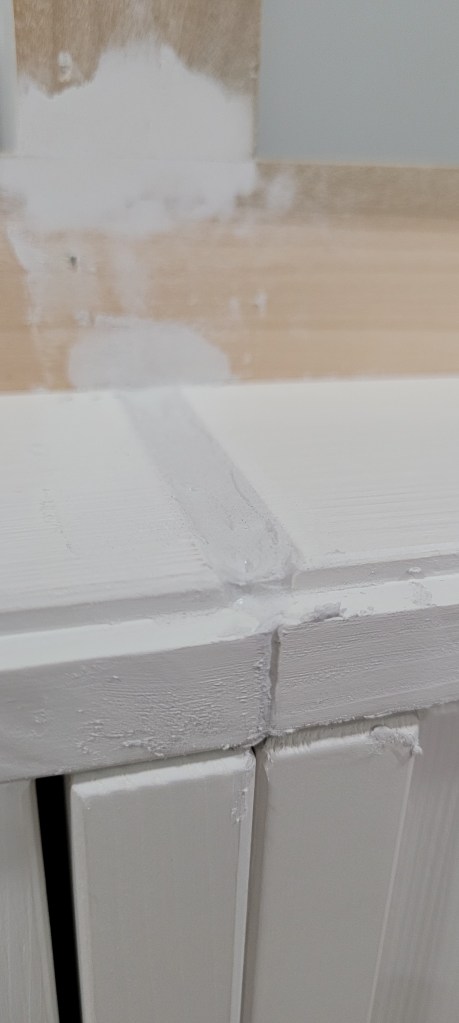
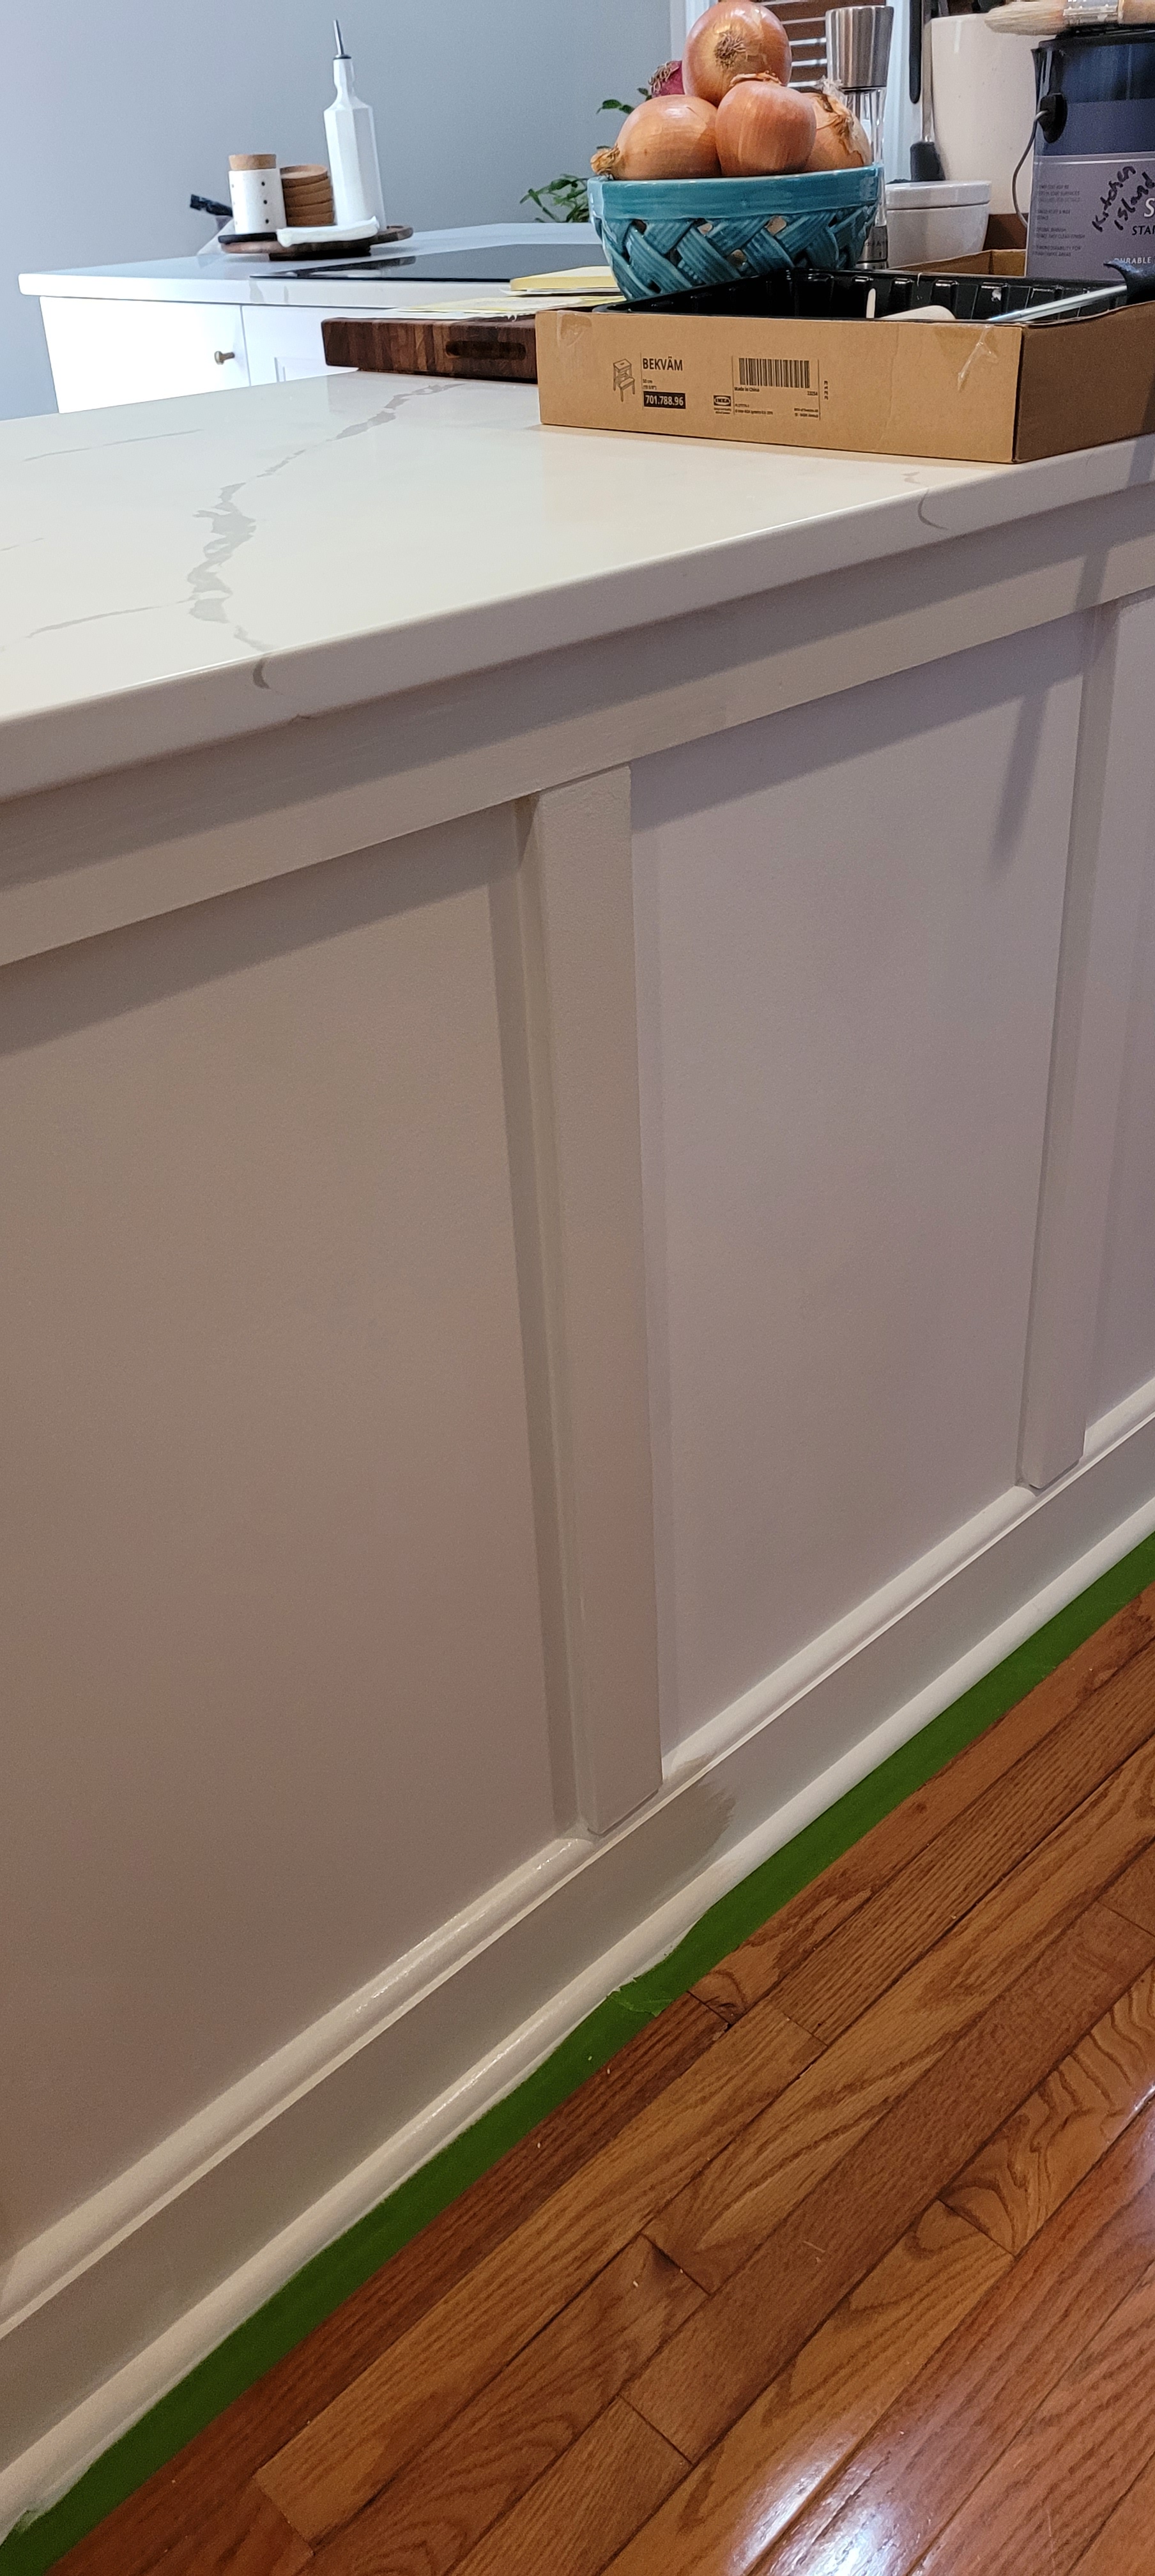
It is perfect. A testament to always waiting until you get the second coat on, if I’m being honest, after the first coat I thought we had made a big mistake.
The undertones were greenish and dull. But, the second coat brought the whole thing to life and we couldn’t be happier!
The color really picks up the veining in our countertops and adds a whole other level of warmth to the room.
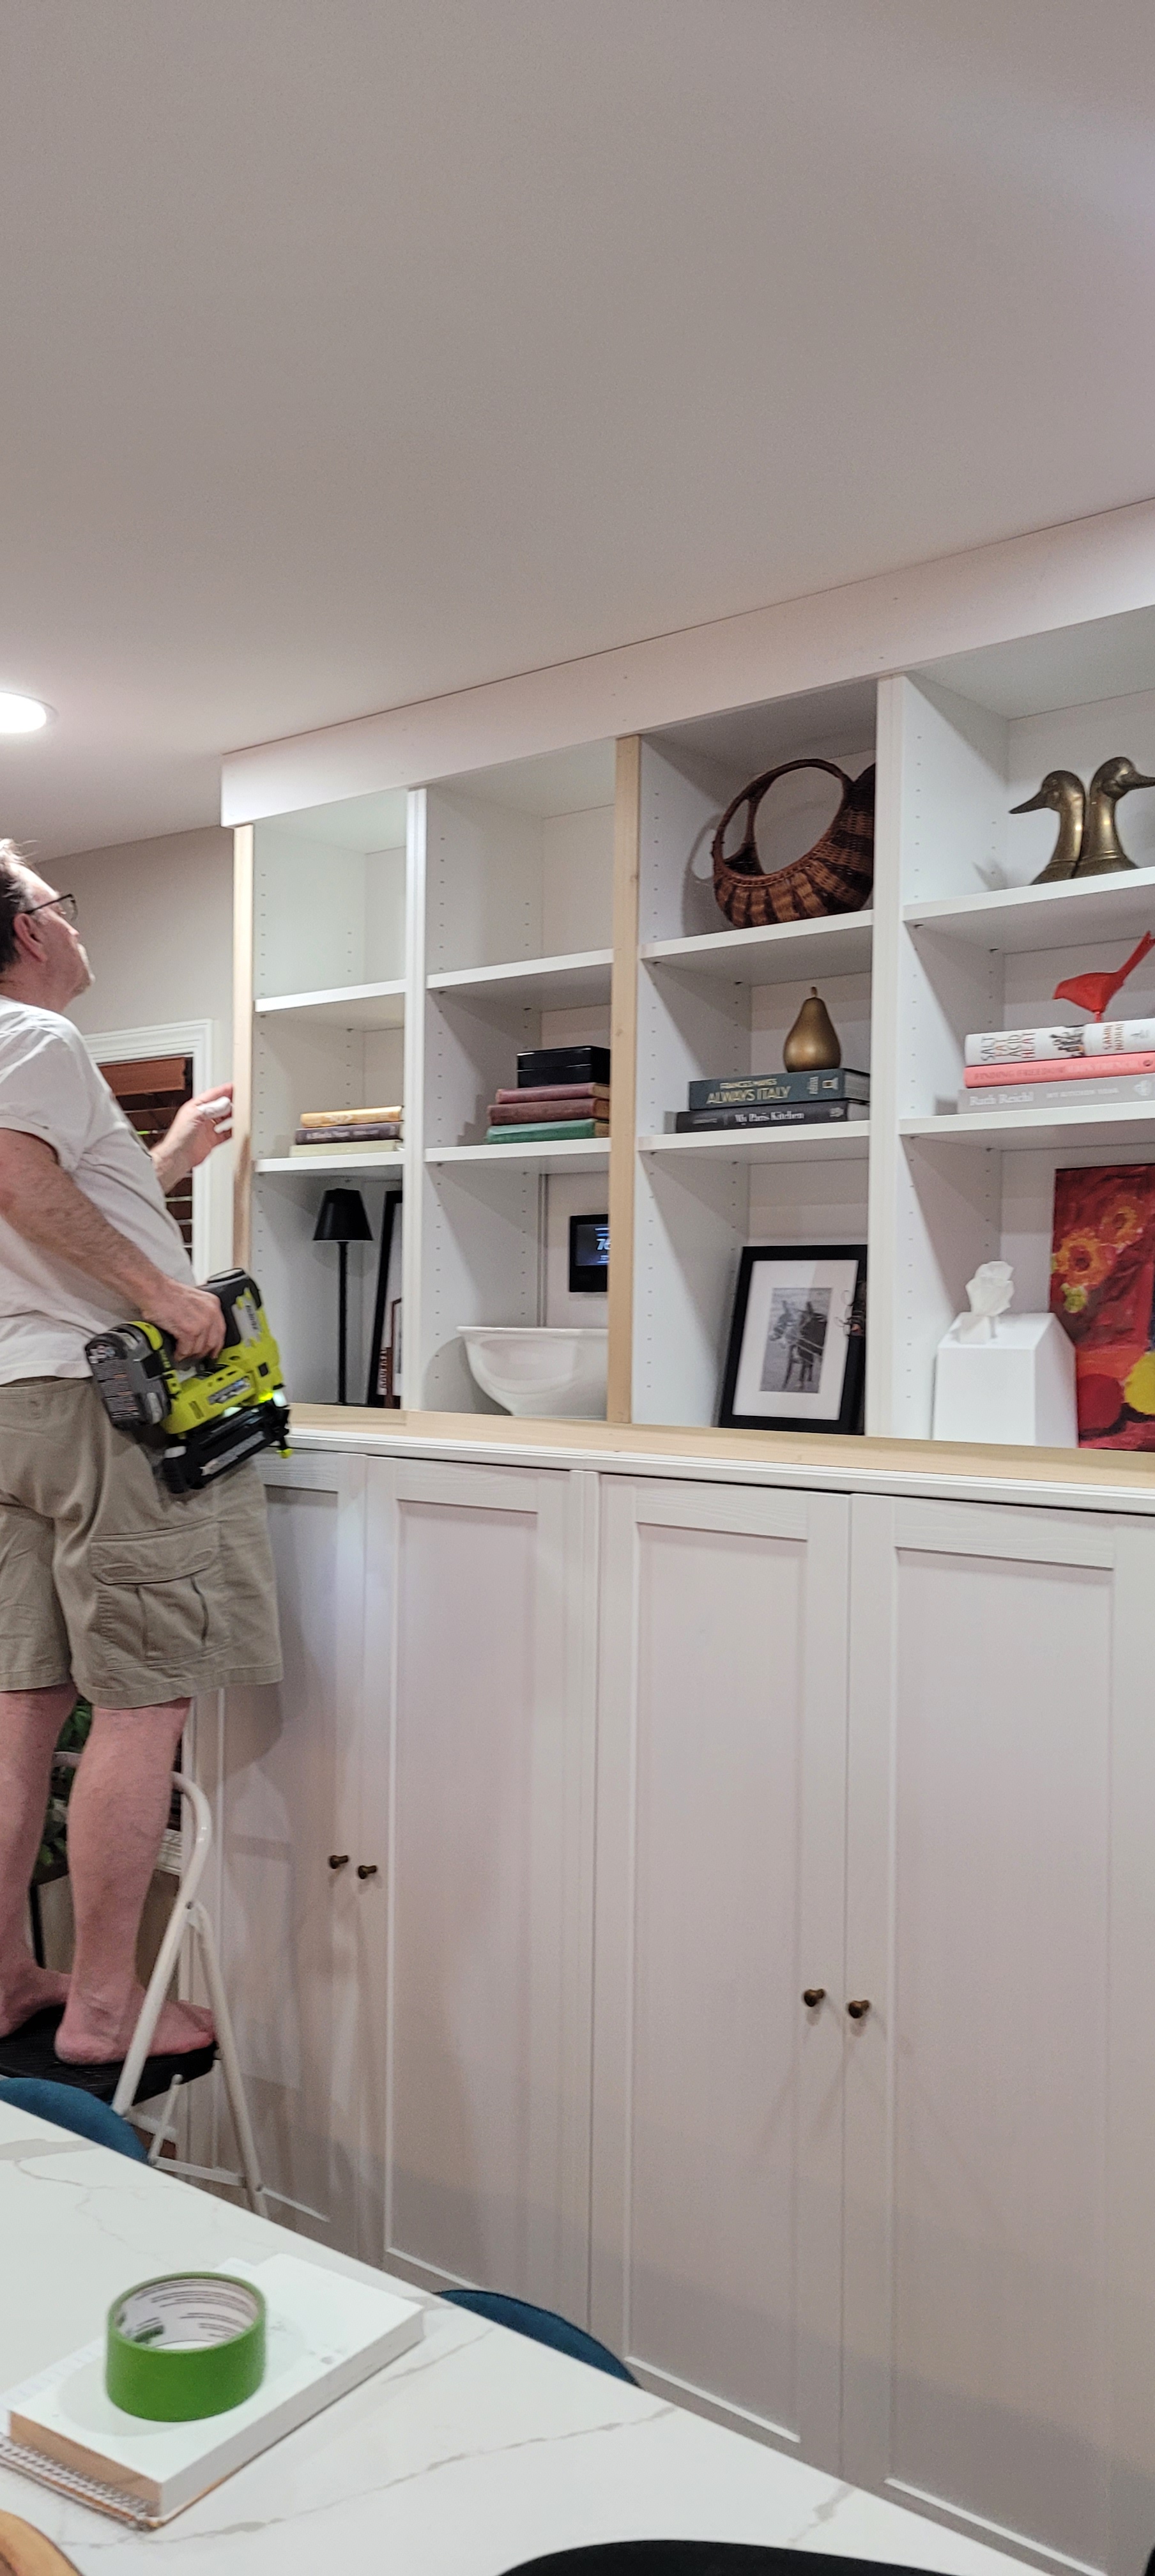
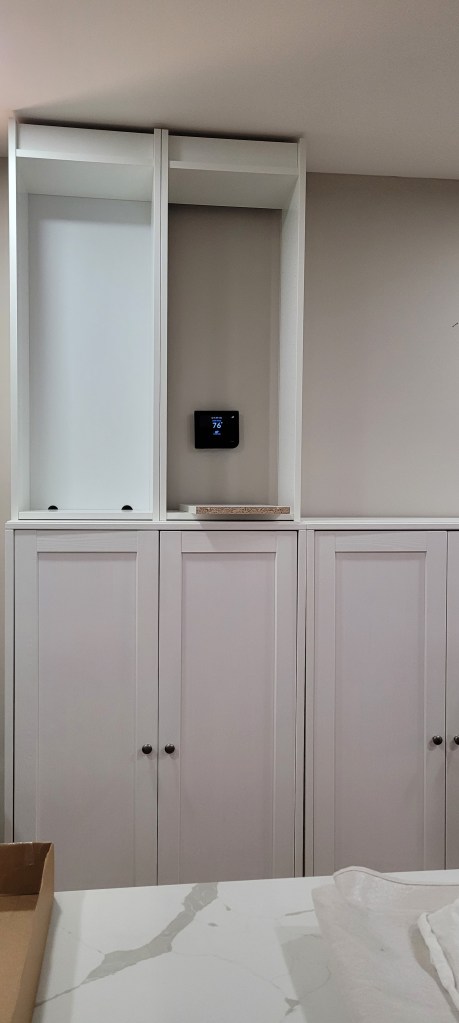
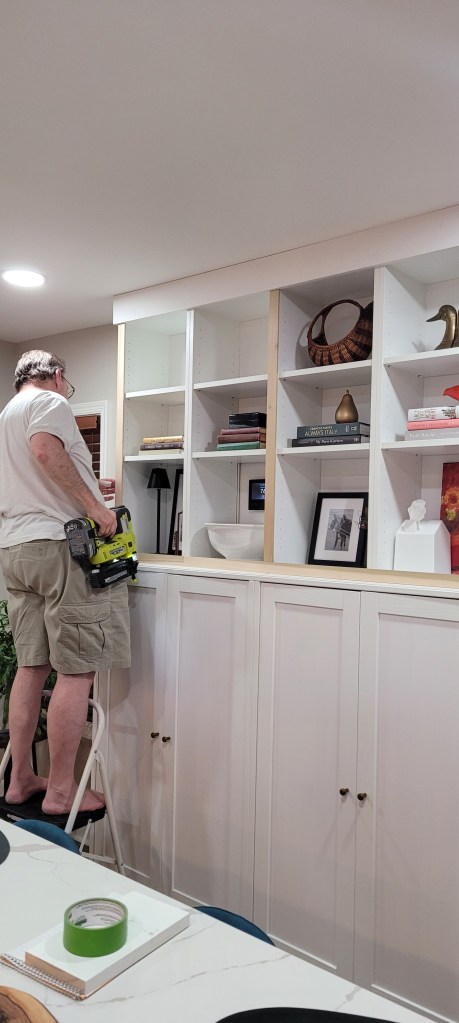
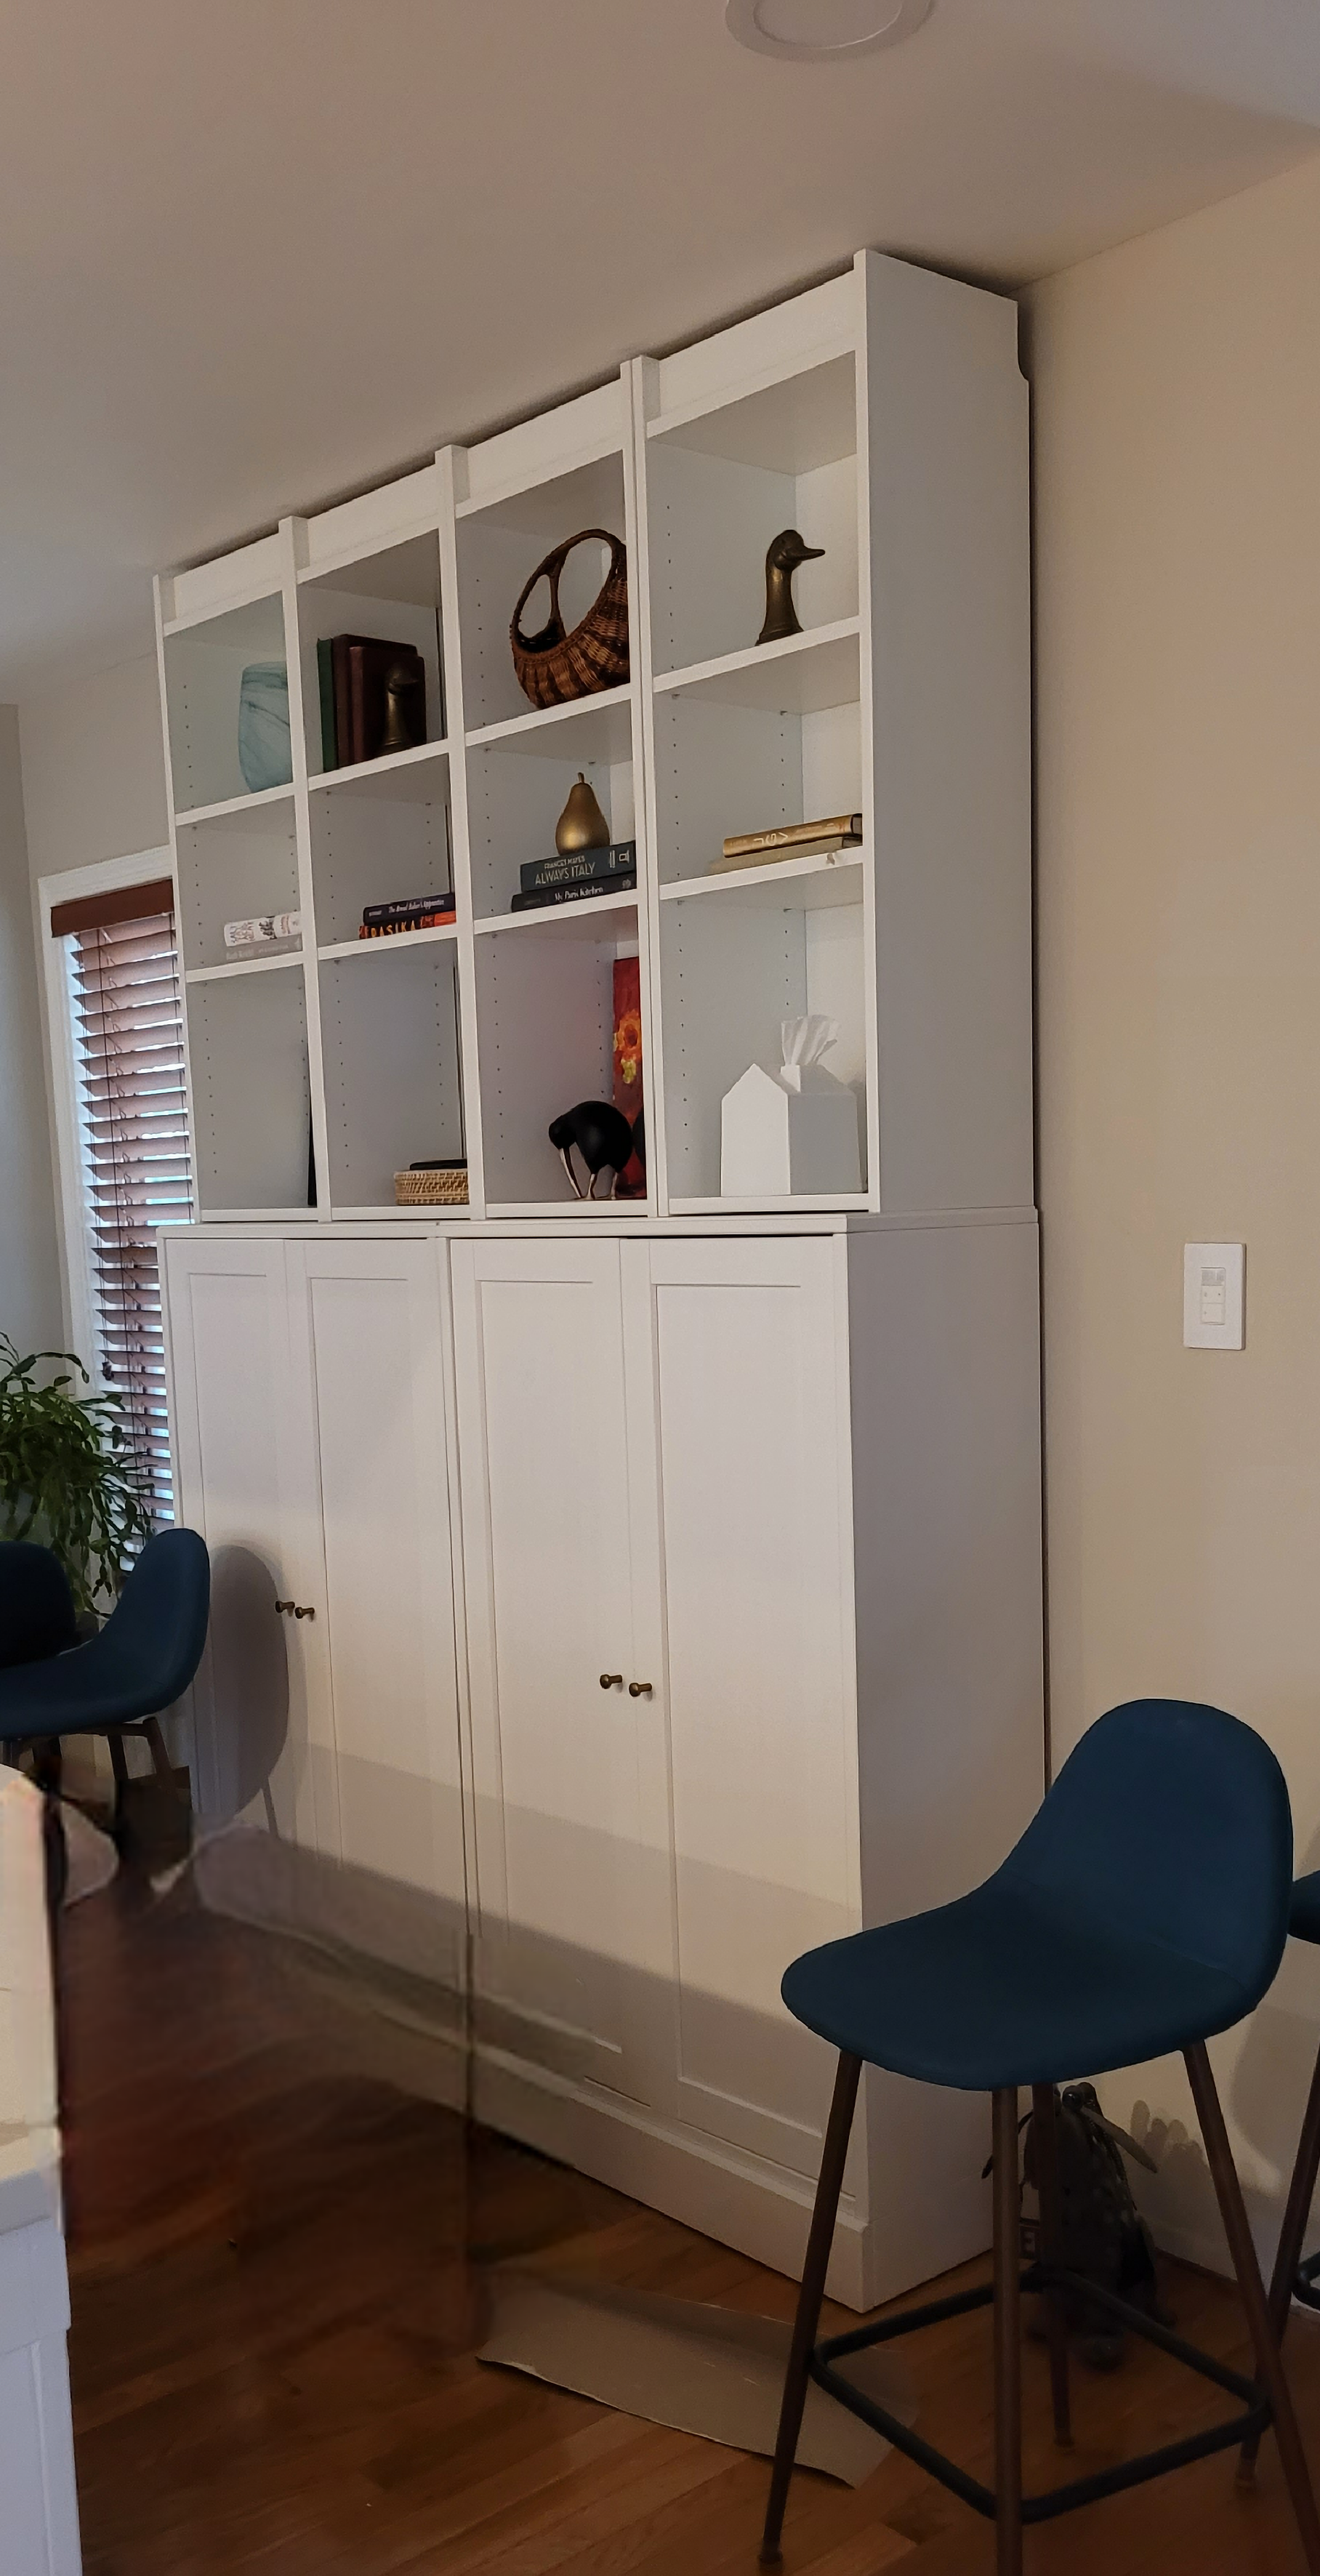
So, late last summer, we began building The Beast out — the affectionate name we’ve given for the pantry cabinets at the back of our kitchen.
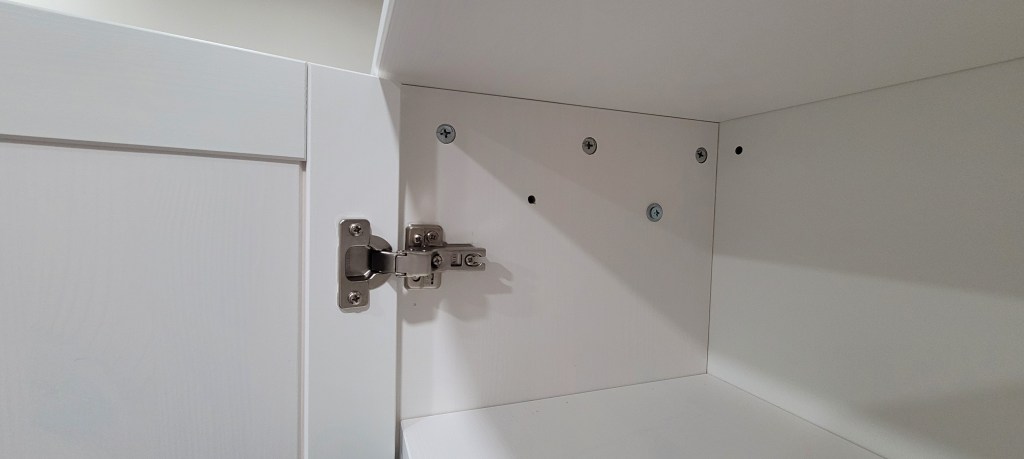
We used Ikea all-wood Havsta lowers and then added the ubiquitous Billys at the top
When all was said and done, it seemed like a no-brainer to paint the cabinets white to match the rest of the kitchen cabinetry and keep things in the low-contrast zone we find ourselves most comfortable. Muddy grey, white, and an occasional pop of black is our jam, baby.
Ikea, for some unknown bizarre reason, does not make matching cabinetry paint. If you get a nick on your cabinet, or if you are trying to match filler pieces to your cabinet, good luck with that. If you have cabinets with color other than white, you may be be able to do a solid color match at your paint store. But, white is a notoriously difficult color to match, even if you bring the whole drawer front into the store.
Never fear, though, we are fortunate to have a consultant on call for just these kinds of dilemmas. His name is Dr. Google and from what we could gather from our research, we are the one billionth person to have this issue. The consensus on the interwebs was to use Behr Premium White in Matte for the closest match possible.
Welp, not the first time Dr. Google has led us astray [remembering that rash on my left ankle which ended up not being early onset malaria, but rather a simple mosquito bite]. To be fair, the color does match fairly well, but the sheen and the finish is all wrong. No one is going to mistake The Beast for something that was factory finished, lemme tell you.
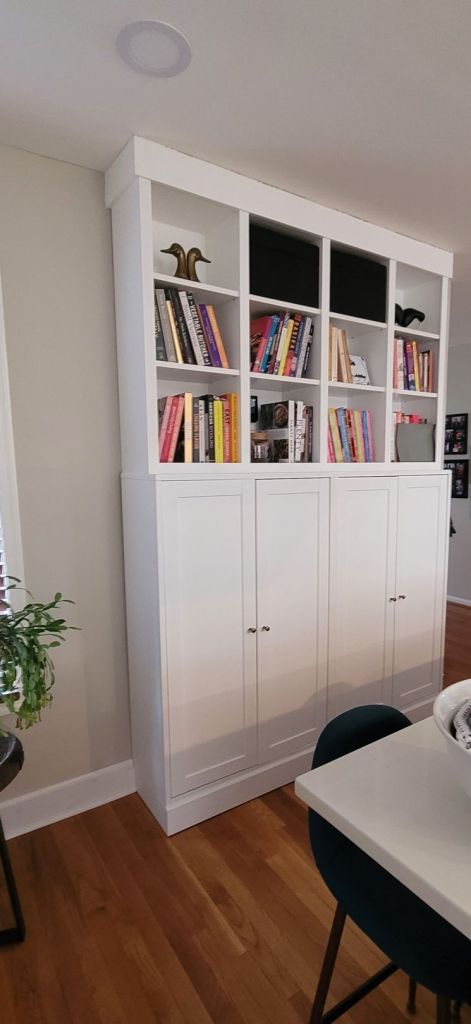
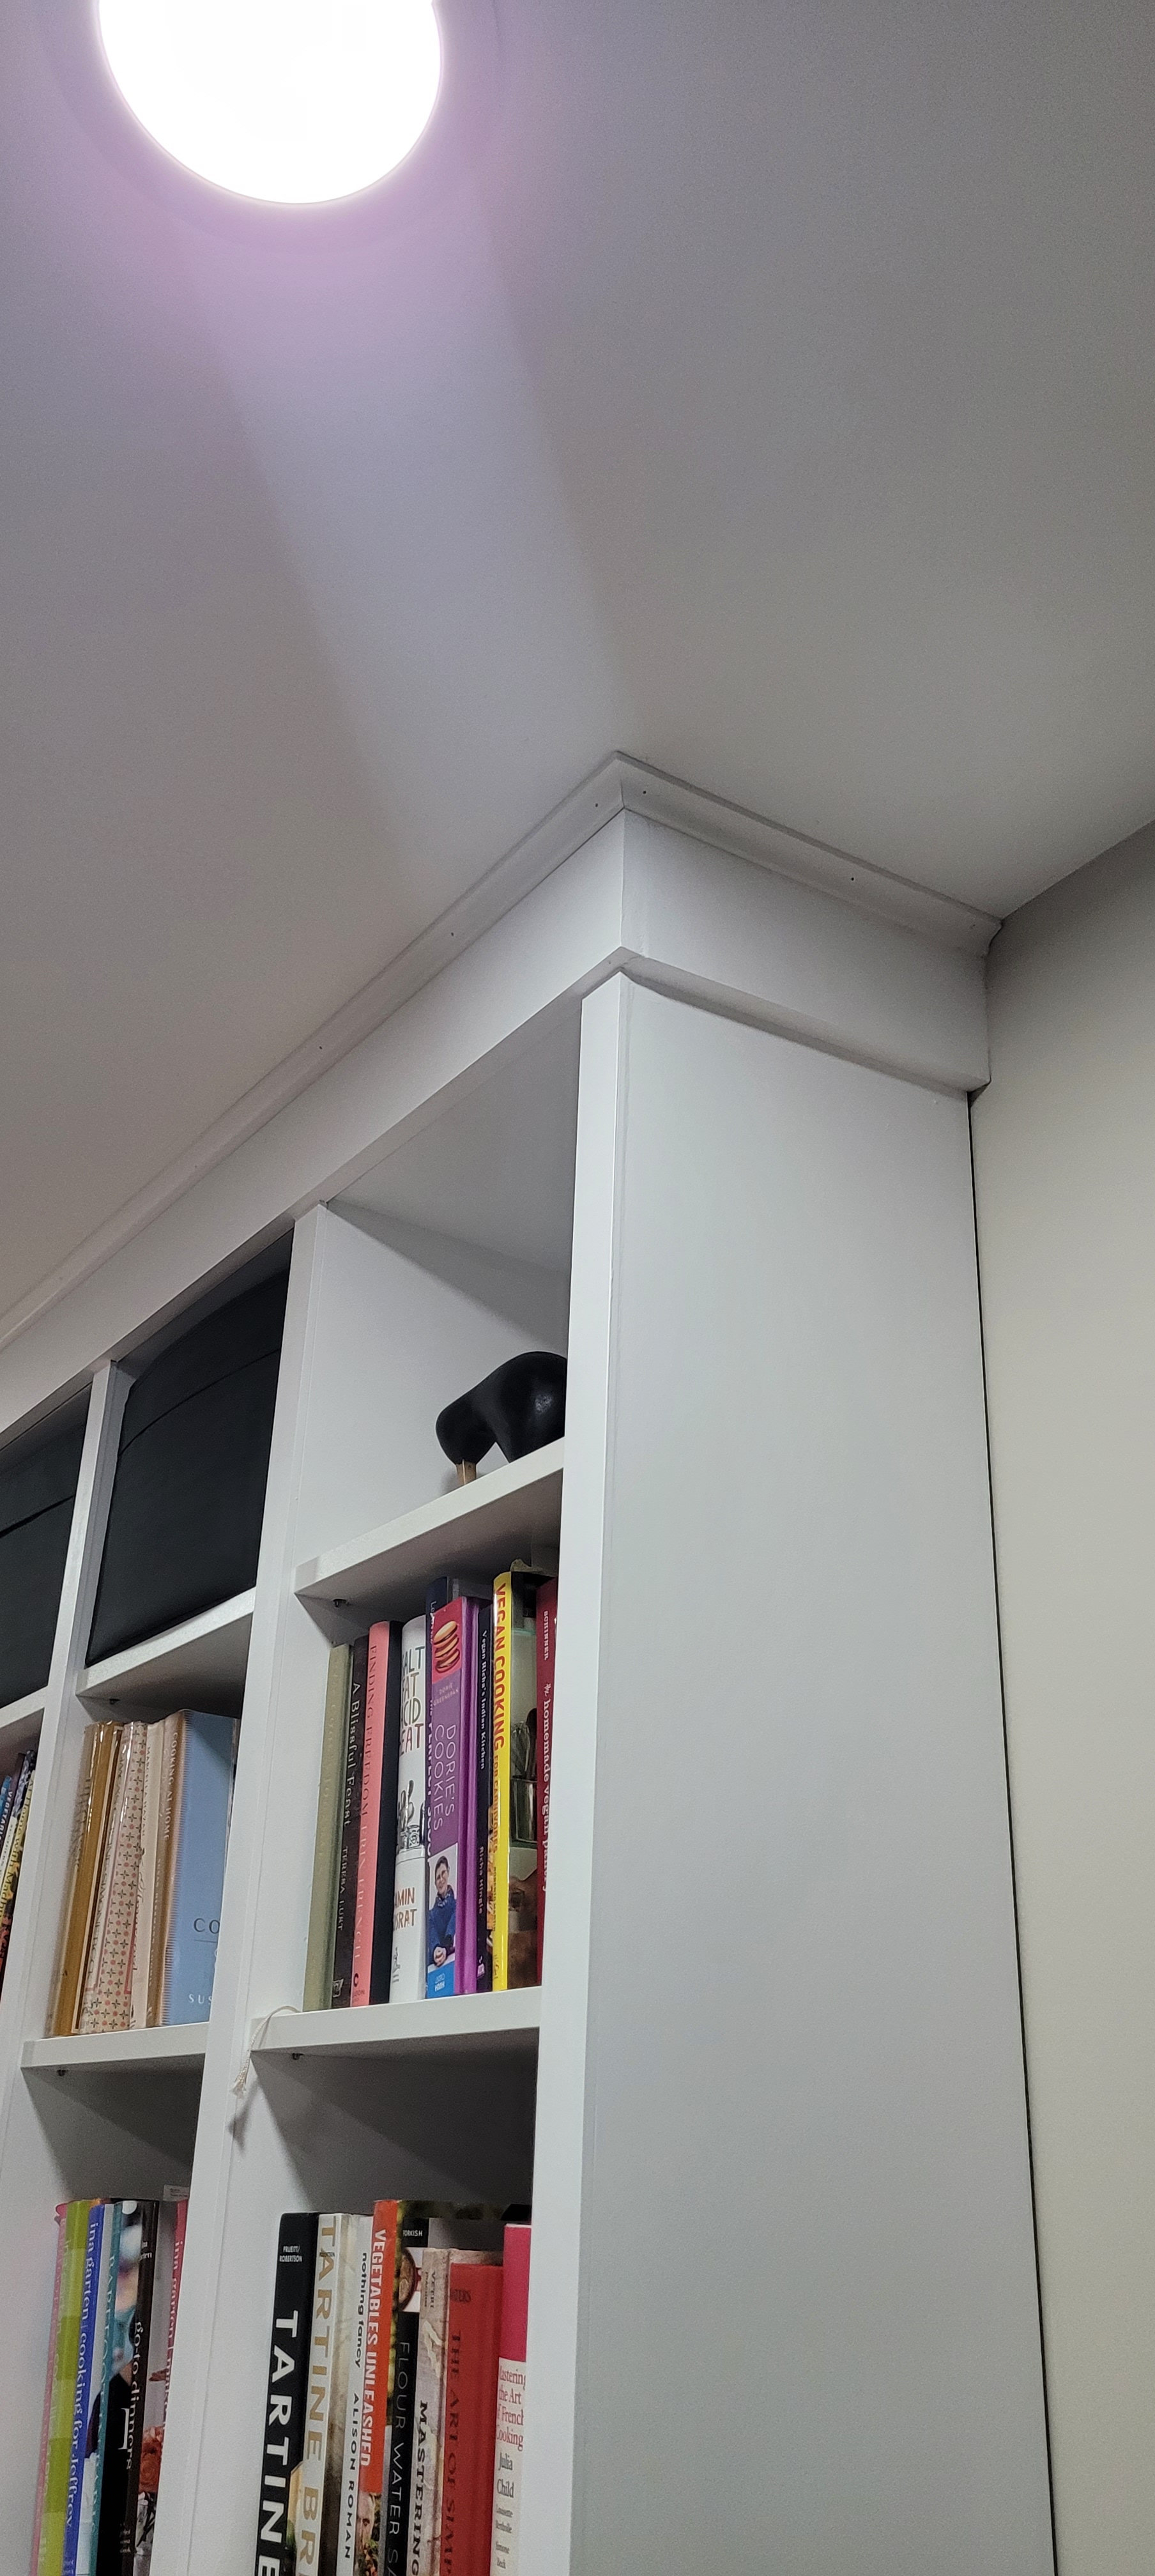
Here she is, all trimmed out andpainted
While it doesn’t look too shabby, if we do say so ourselves, something just wasn’t quite right. We couldn’t put our finger on it and decided, since this was the last big thing we had to check off our list for the kitchen reno to be done and dusted, we would live with it for a hot second and see if it grew on us.
So, here we are, many months later, and I think we have figured out the disconnect. The piece is chalky (hello paint), and too white. I mean, the thing could bring home ships in the dark of night. It also gives off hospital clinic vibes – not exactly the aesthetic we were shooting for.
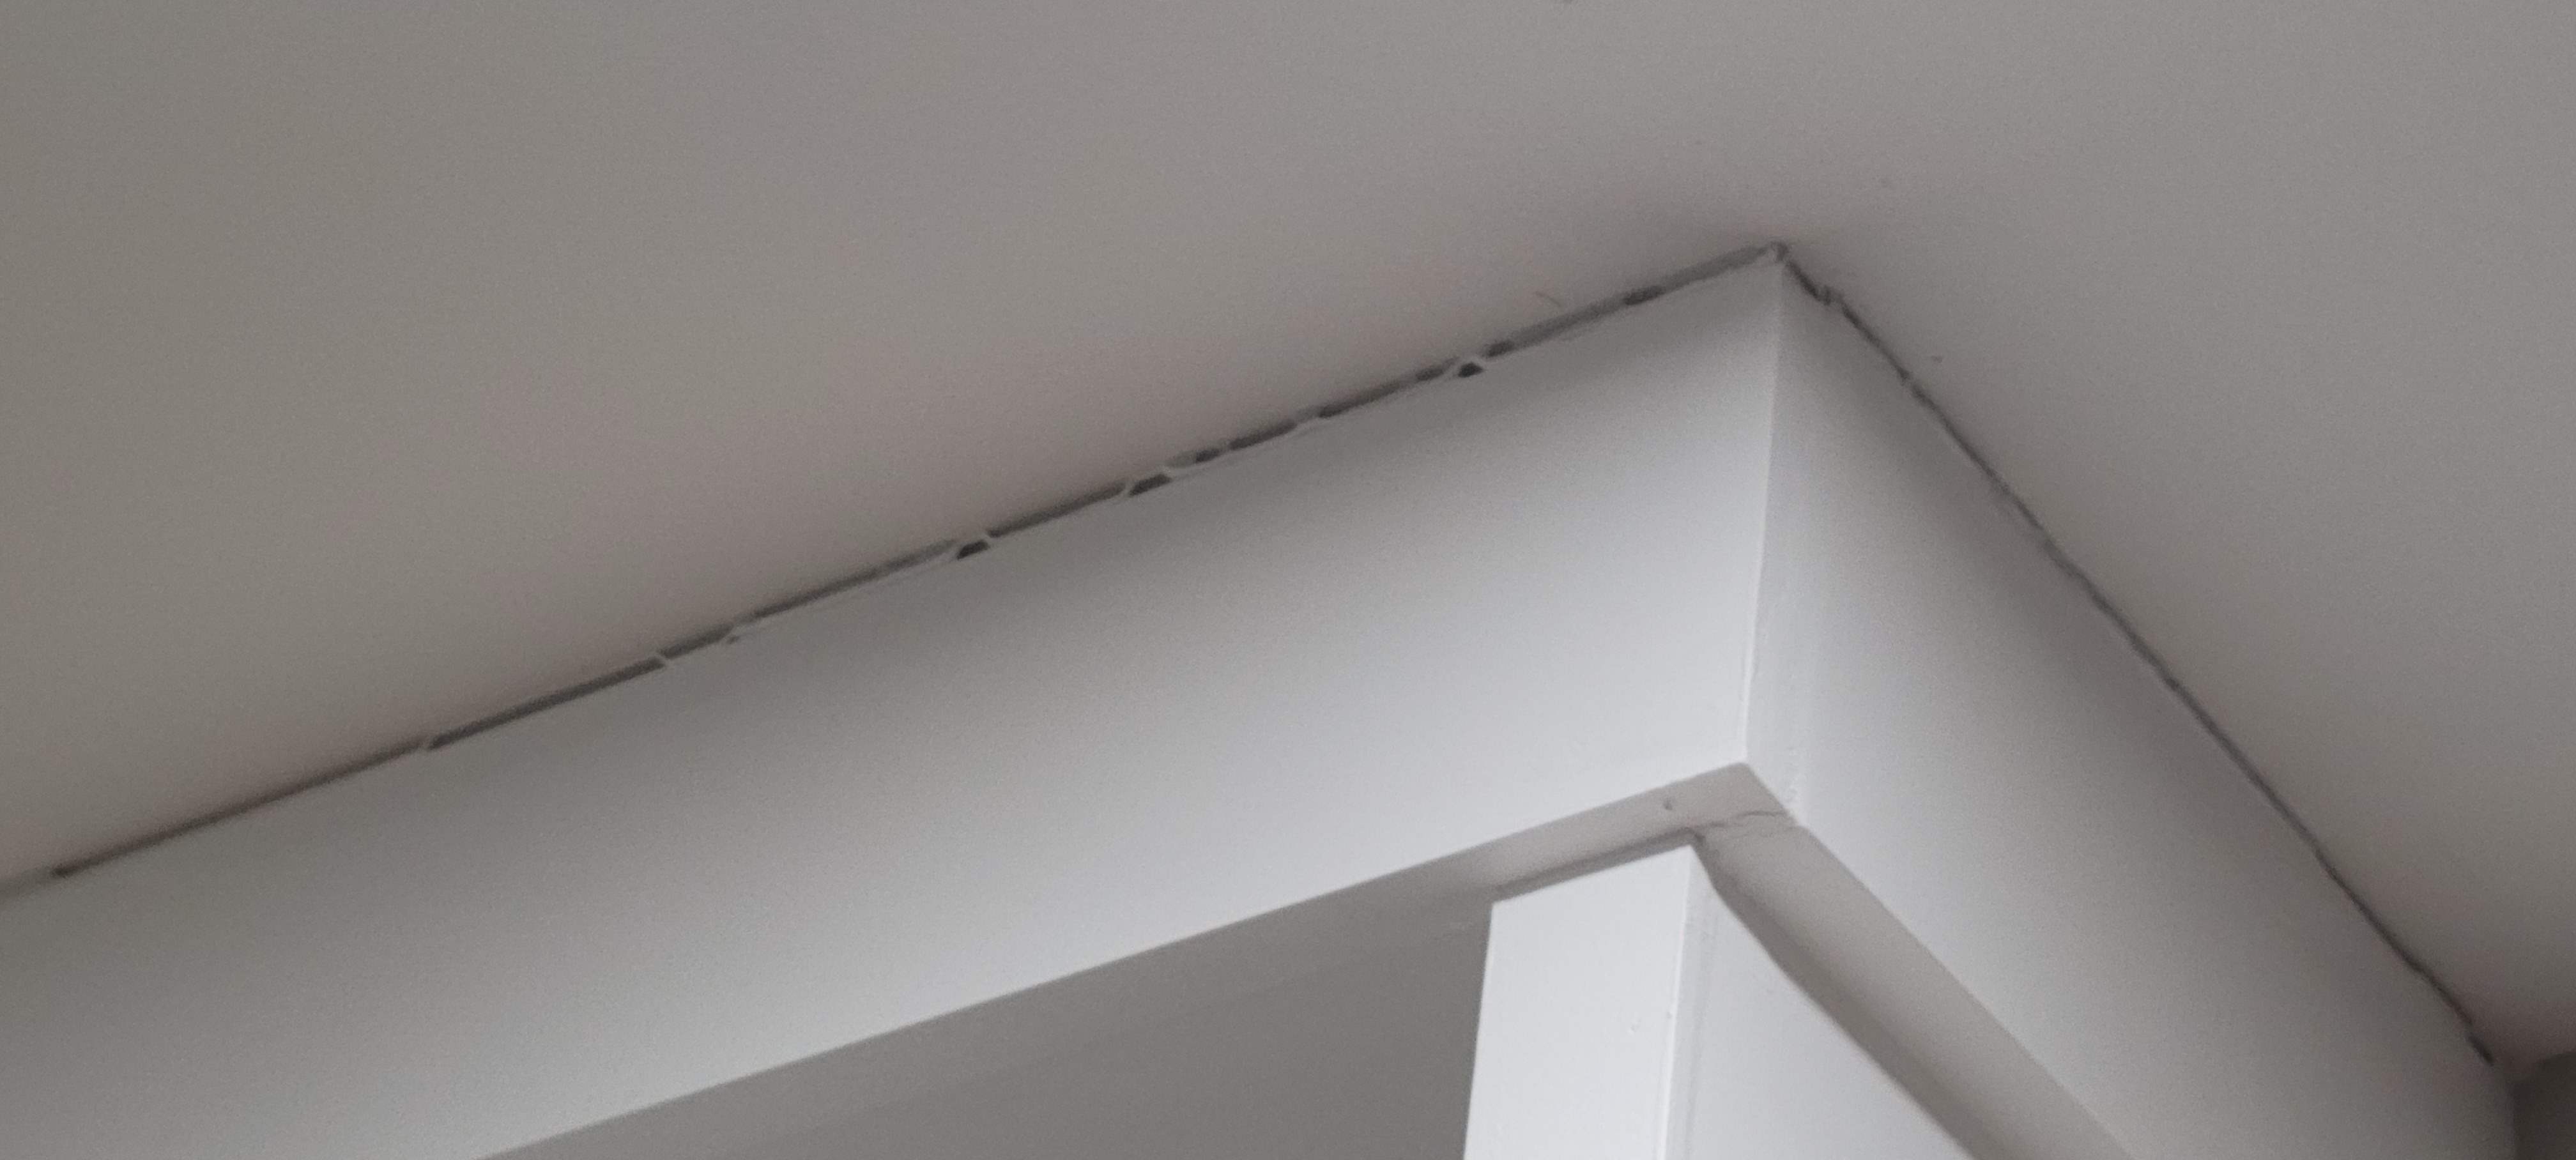
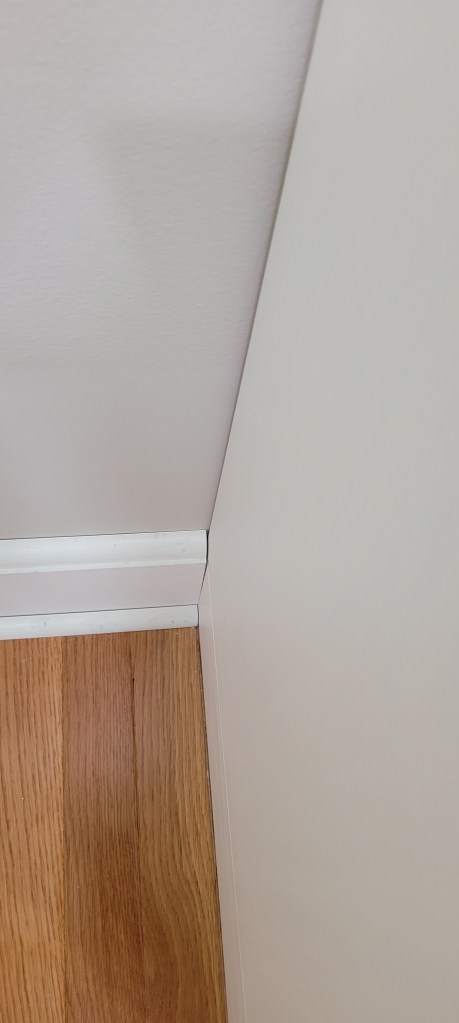
To be honest, we were so tired after a year of reno that we probably would have lived with it forever. But, then, a bad thing happened that ended up being just the catalyst we needed to get back on the reno horse and give it another go. The crown moulding that we had affixed to the top of the unit for that quintessential built-in look started separating from the ceiling!
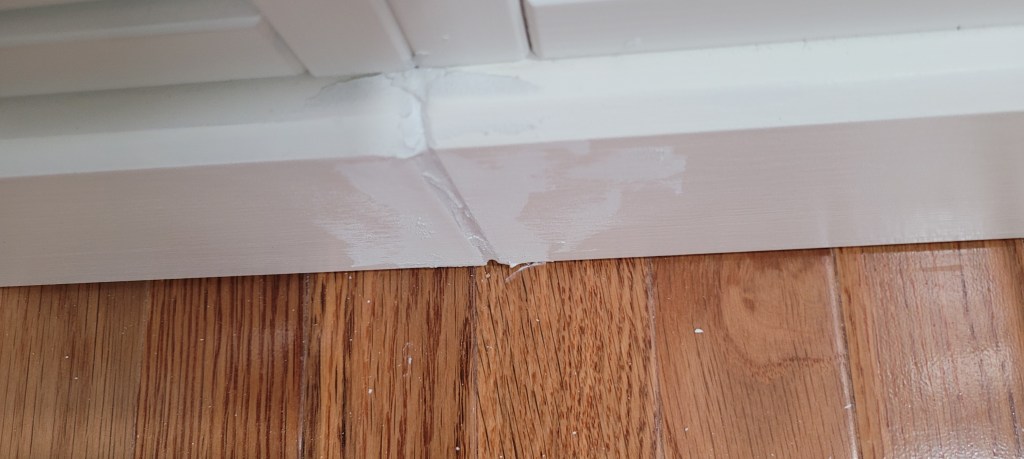
The unsightly black line where the crown separated from the ceiling was our first clue that something was wrong
We had used our go-to stretchy caulk that has always worked wonders for us — and seemingly lasts for years without cracking or splitting. We soon realized where things went south on this piece, though — if you scroll back to the original pictures above, you will see the first easter egg (clue) to what likely caused this blessing-in-disguise tragedy.
When the piece was originally finished, painted and caulked, we got to work loading it up with all the fun stuff it was meant to house. In the interior cabinets were small appliances and pantry items like canned and jarred goods. In the upper open shelving were a ton (remember that word, your second easter egg of this debacle) of books in my cookbook collection.
And that led us to the culprit.
We loaded this thing up after we caulked, and naturally — because gravity — the weight pulled the entire unit down, hence the separation between crown and ceiling.
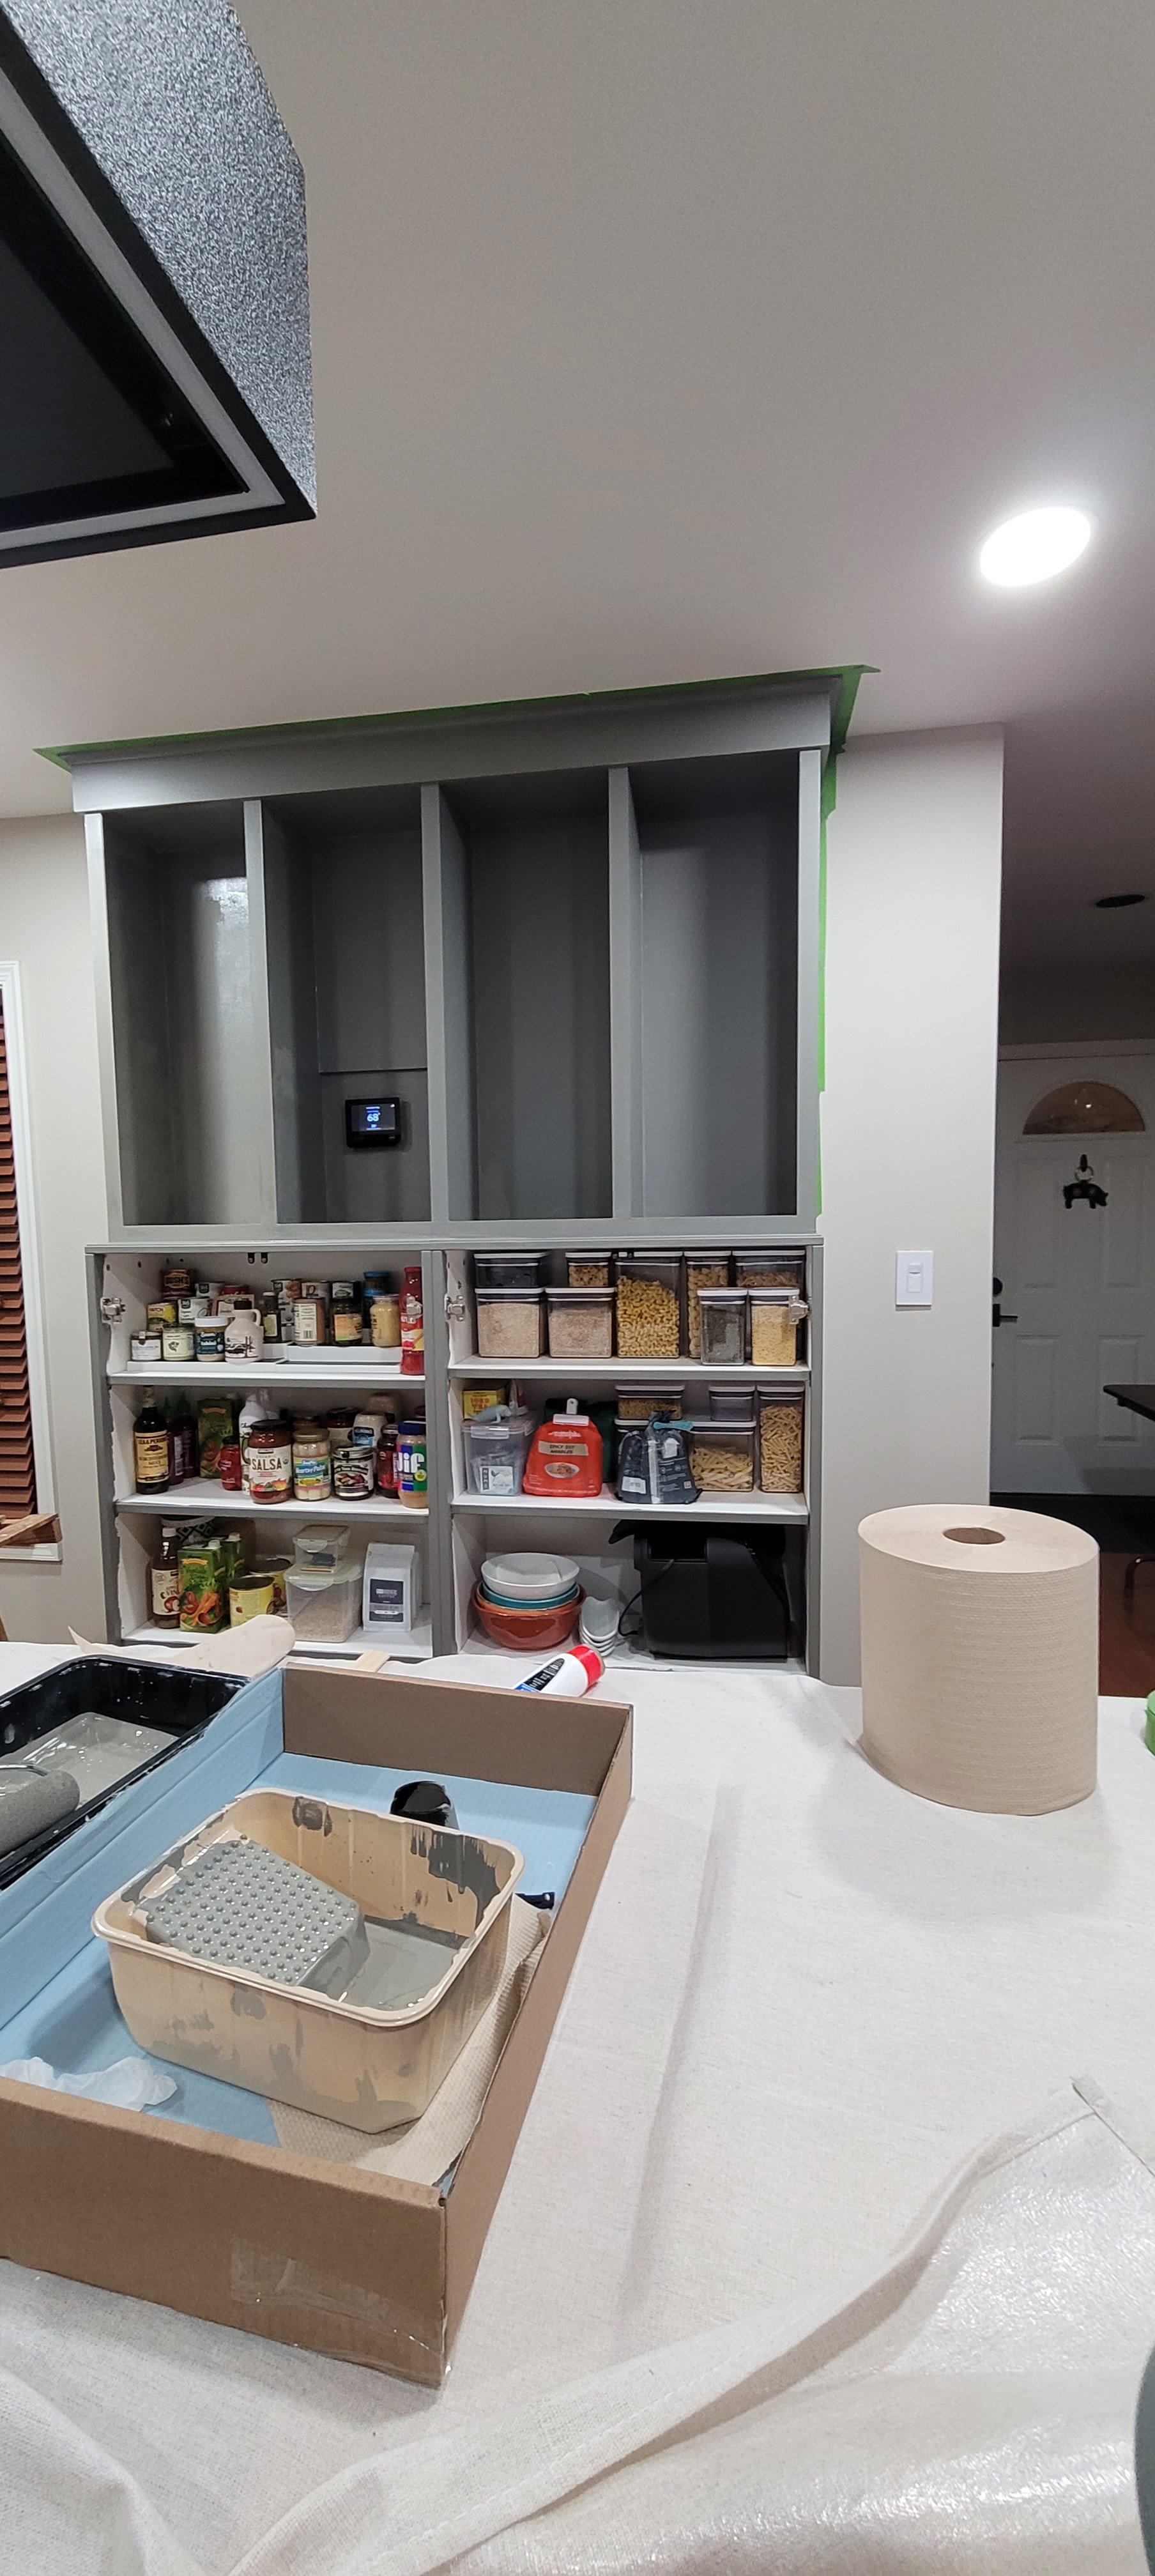
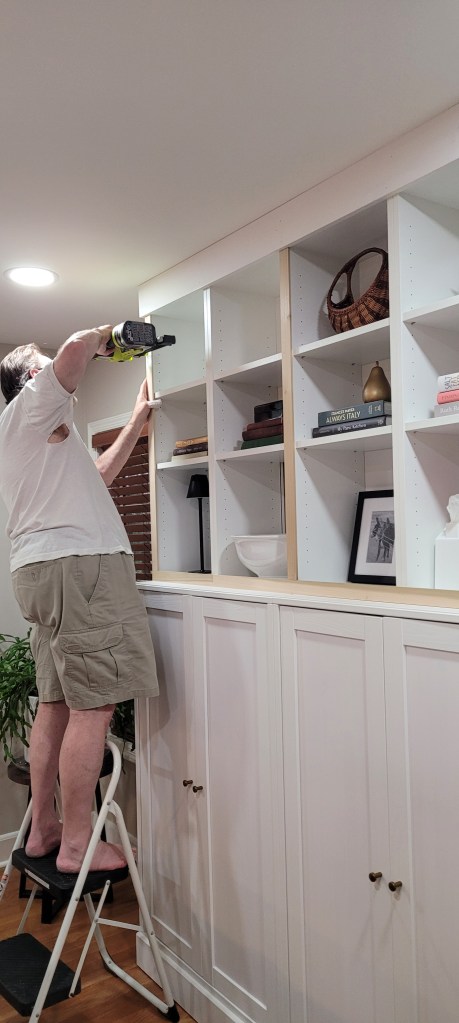
Because we knew we wanted to change the color on the unit anyway, we used the opportunity to add some additional trim to the crown to hide the separation, and then set about to painting the whole shebang, once again. Big sigh.
What we didn’t do was caulk the piece of crown trim to the ceiling prior to finishing. Once we get the thing painted out (I’m going to hyperventilate if I keep these big sighs up), we will load all the books and appliance back in and THEN caulk the ceiling.
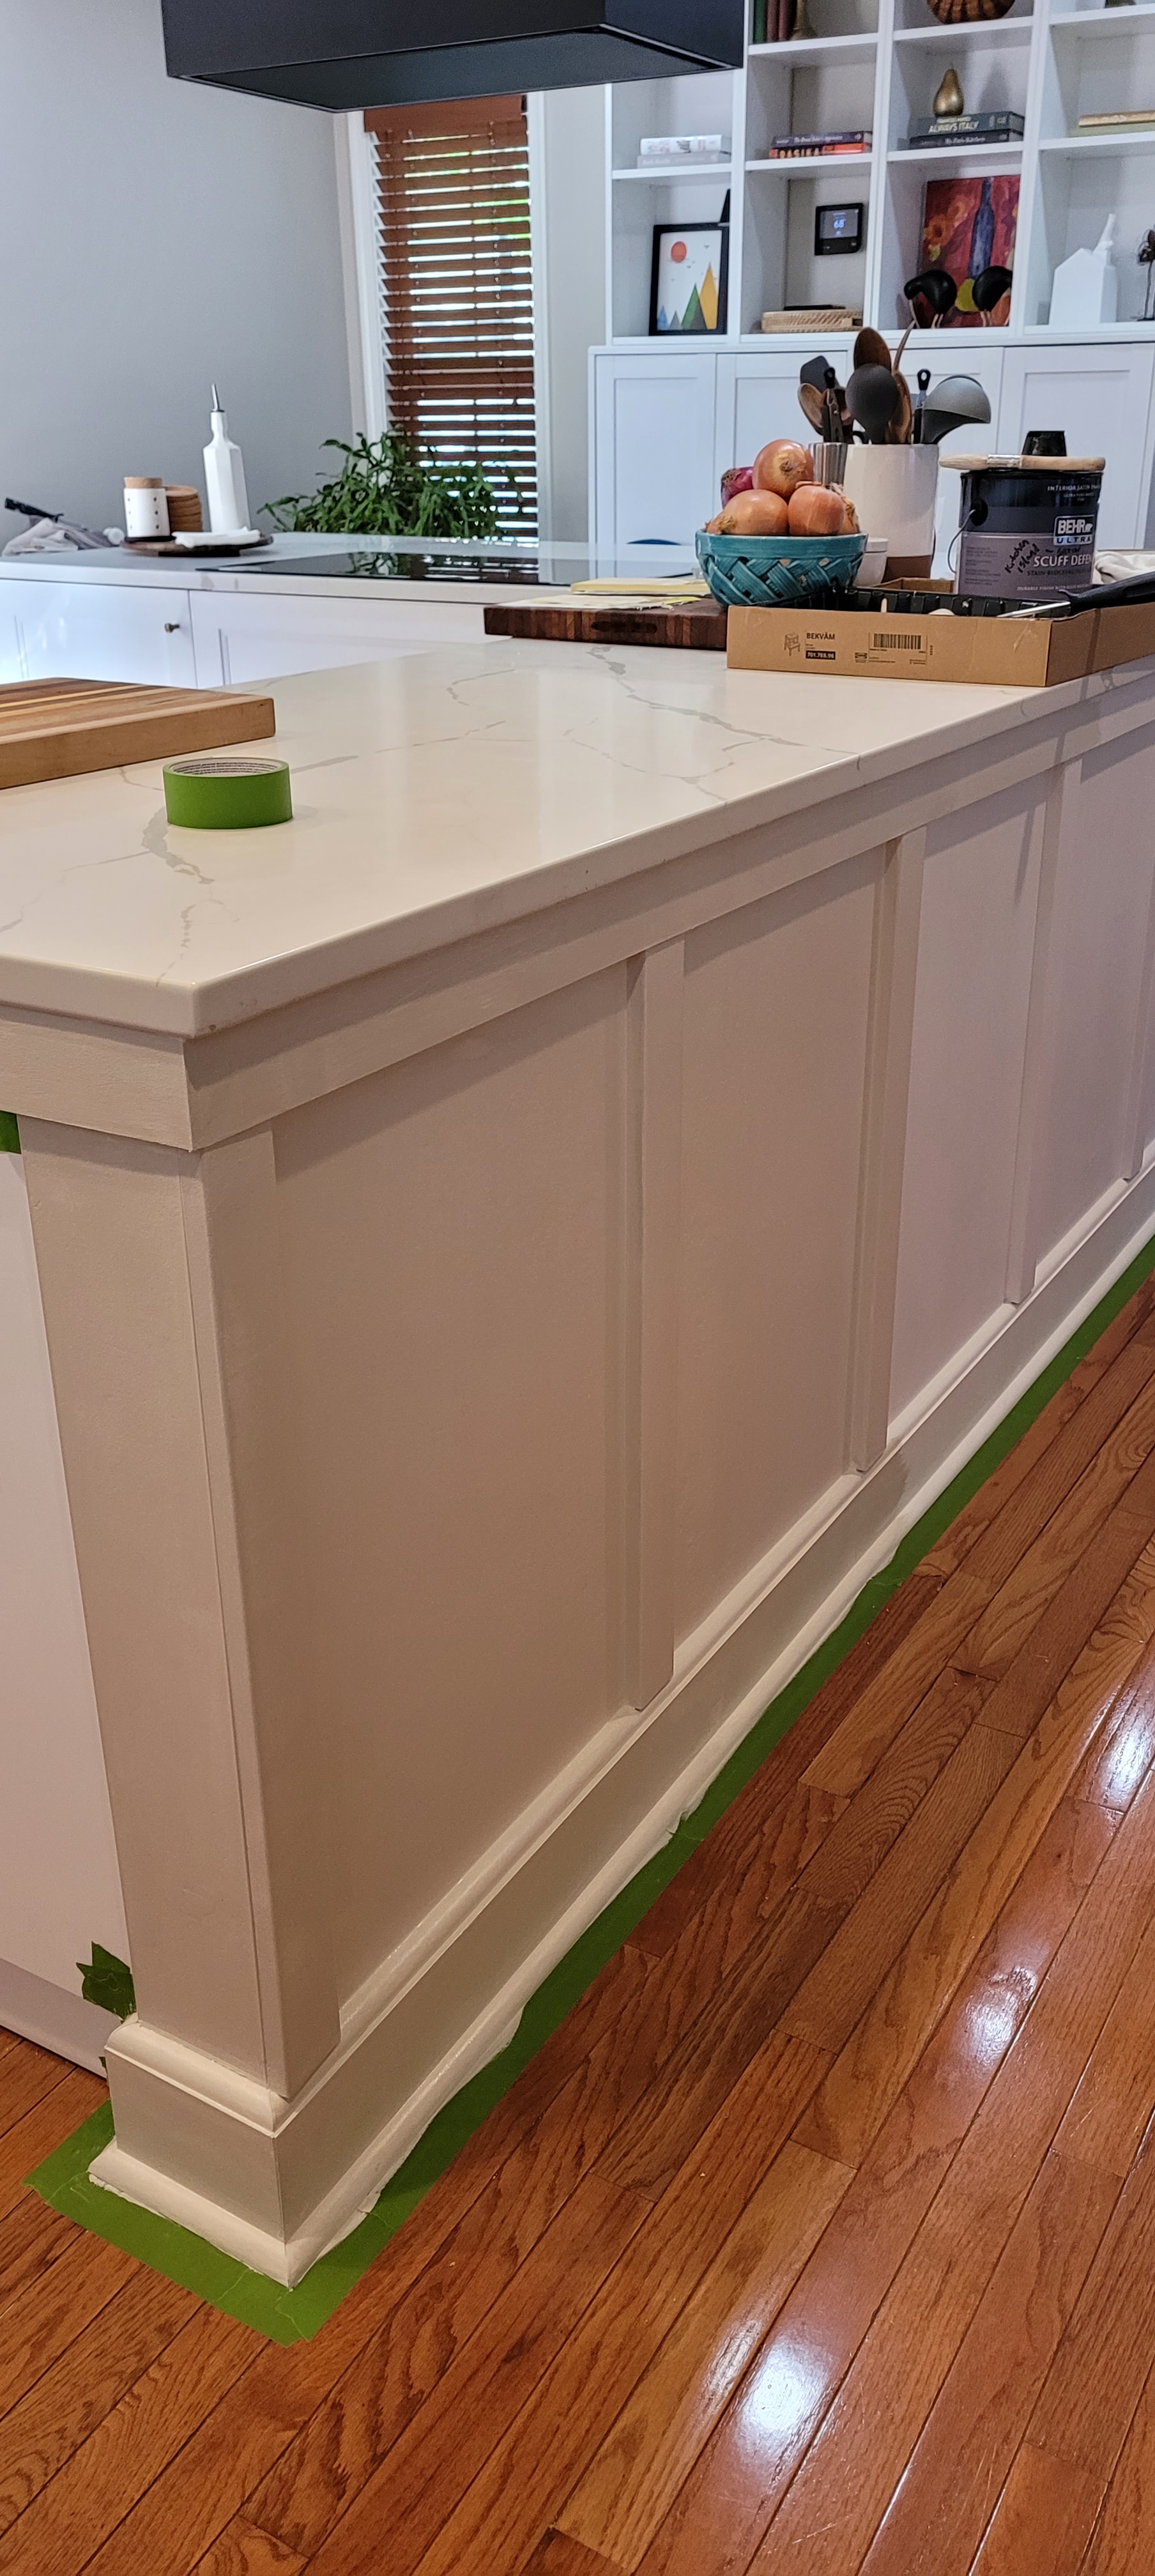
We struggled to choose a color that would blend with the kitchen and not be too much of a distraction. We originally set our sight on black, but then thought it might scream, “Look at me!” from the back wall of our kitchen. Because our kitchen walls (along with the whole house and the walls of the massive island) are painted Benjamin Moore’s Edgecomb Grey (a soothing, beigey/grey — the kids call it ‘greige’ these days), Ben (Moore, that is) recommended a number of complementary colors that go with Edgecomb Grey, including a navy blue and a deep putty grey. Navy blue, especially on islands, has been done to death — similar to its ship-lap cousin in popularity, it was a little too on-trend, and besides, all the TikTokers tell us the navy island era has passed.
So, we went with…drumroll, please! Benjamin Moore’s Chelsea Grey! It is exclamation-point-palooza over here with that decision behind us. Seriously, you don’t really want to know how long it took us to choose the color. When we saw it weirdly, and identically, matched the veining in our quartz countertops, we were flipping sold.
Here she is, with the first coat on. So far so good, but keep in mind, I said the same thing when we got the first coat of white on her, now many moons ago. We also changed sheens from a Matte to an Eggshell, so we’ll see if we can contain our excitement (and use of exclamation points) when we see that gloss-up happening on the second coat.
We should be done soon — the only motivation I have is that our kitchen once again looks like a construction zone. We could open a small paint supply store with all the bins we have of painting supplies. “Oh, look, they’re giving away free paint stirrers!”
With just 30 days left, give or take, before we hit the year** mark on our kitchen renovation project, we are scrambling to finish the last item on our checklist.
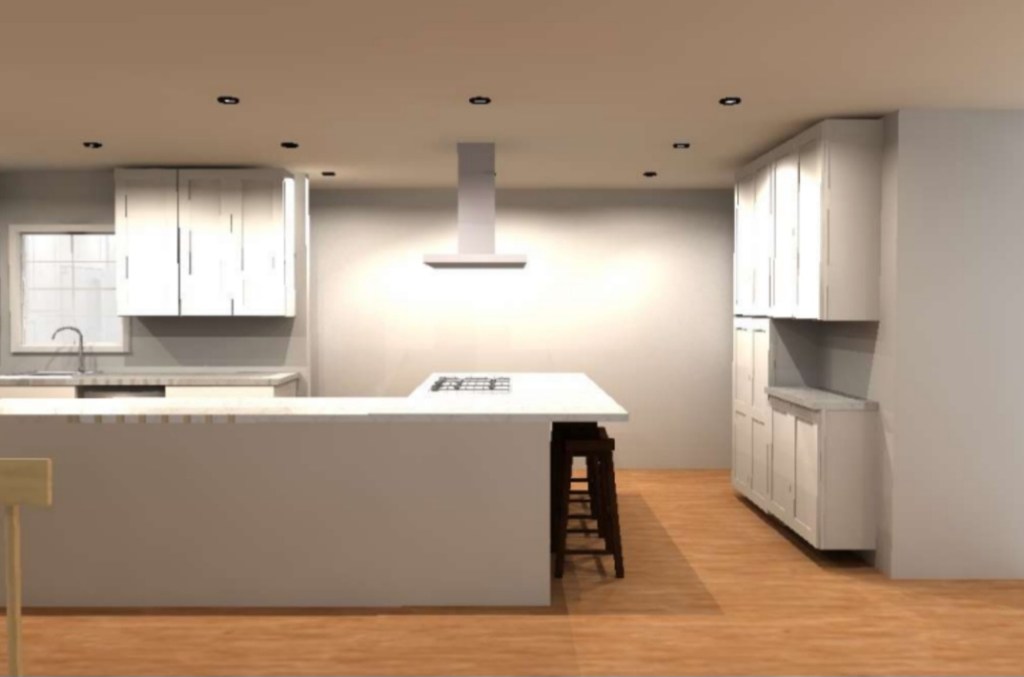
We lovingly call this unit the beast, and the nickname has proven true to form with all of the steps (and time) involved in getting this thing built. These utility cabinets were in the original renderings for the kitchen, but we always knew we would wait until everything else was completed to tackle this baby.
The rendering above is of the far end of our kitchen, which included the utility cabinets, albeit in a different configuration than we ultimately landed on.
Rather than go with the same cabinetry we chose for the rest of our kitchen, we wanted to hold off purchasing these utility cabinets until we saw what kind of space we would have left after the massive island was set in place.
We weren’t sure whether we could do a full 24-in depth on the utility cabinet, a 16-in depth, or even less. What we did know was that we wanted plenty of walkway space behind the stools that faced the rest of the kitchen. Nothing makes a room look smaller than inadequate space to walk! And, nobody loves being stuck at the far end of a counter, not being able to squeeze by others who are sitting there.
So, we wanted to leave a full 3 to 4 feet of walkway space and just couldn’t get picture what that would feel like until the kitchen was relatively finished.
We are so glad we waited because the configuration changed, as did the depth of the cabinets, once we got a glimpse of what we had to work with in terms of space. In order to accommodate the spacious walkway behind the stools, we ended up with a 15-in utility cabinet depth, something we would never have considered had we ordered cabinets all at once.
We found the idea/hack from a bunch of different DIY bloggers to use several different IKEA pieces to form built-in cabinetry using solid wood IKEA Havsta cabinets topped with less expensive Billys.
The beast sits at the far back of our kitchen and because we considered it bonus space, it fell way down on our to-do list. Even though we didn’t think we needed the extra cabinet space, we are not surprised we have found a way to fill them up!
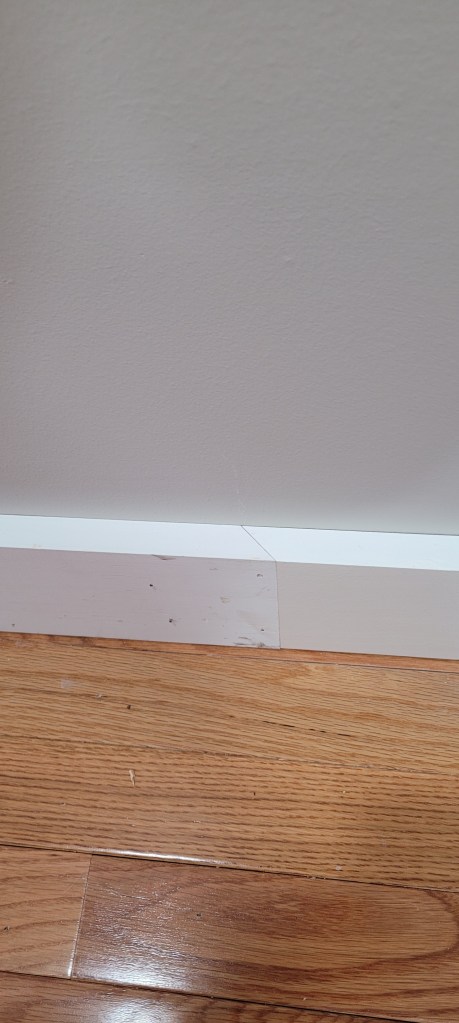
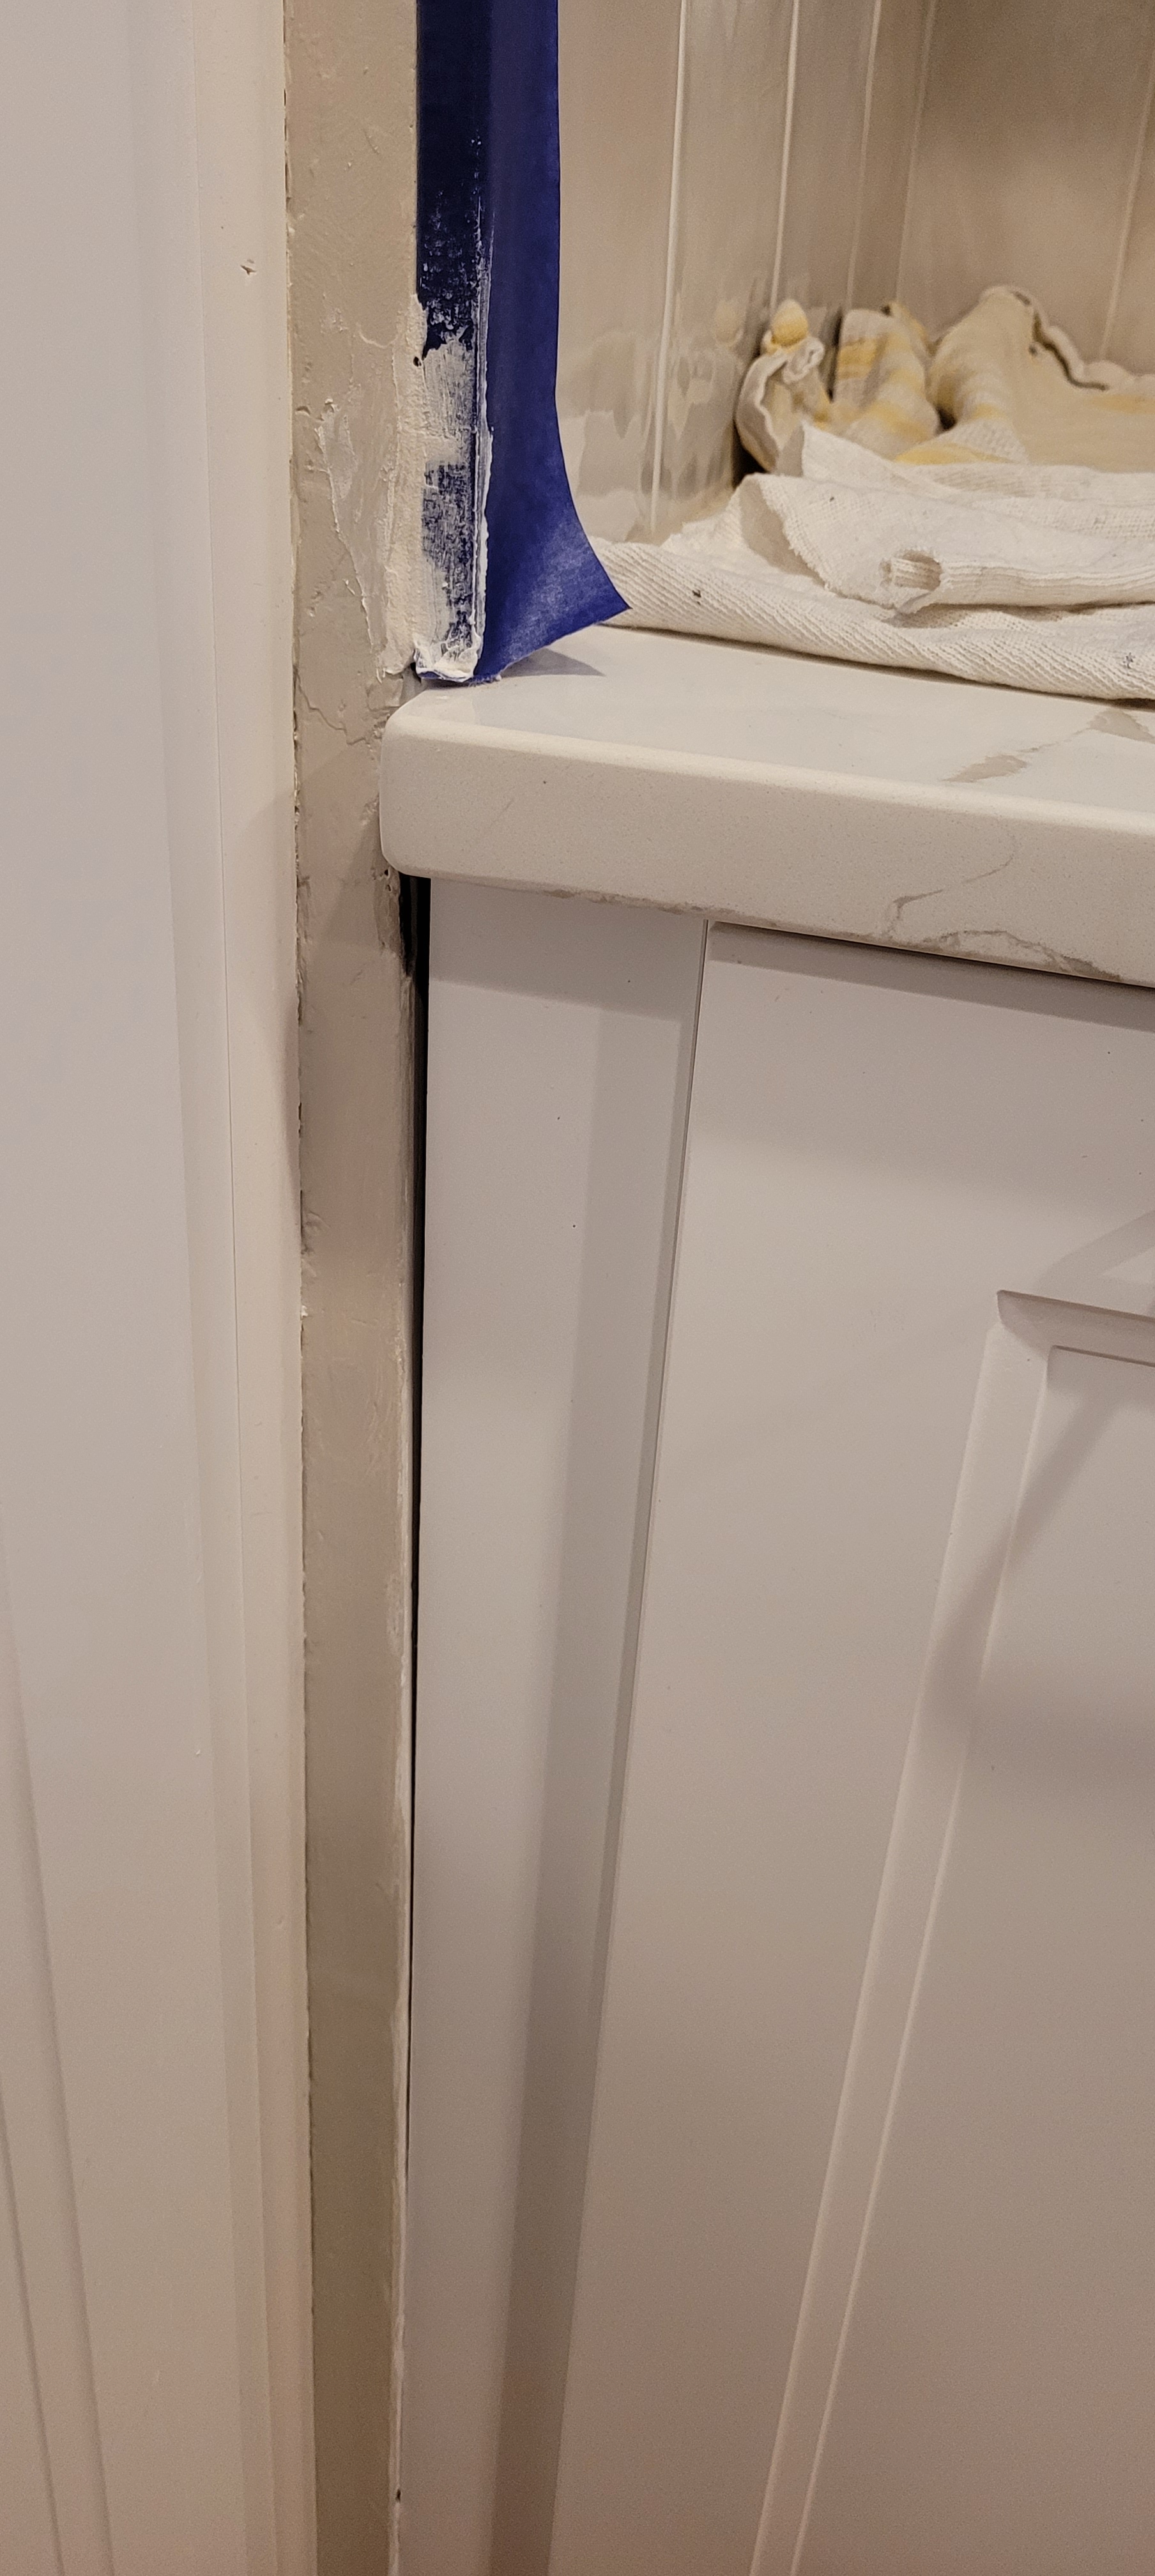
Once we set the cabinets in place — we used two Havsta cabinets and four Billys — we knew we would have to complete the baseboards first. In order for these to look as “built in” as possible, we removed the baseboards behind the cabinet so they could fit snug against the wall.
“Snug” would be actually be a luxury as we have very crooked walls, but we accommodated their quirkiness as much as possible, knowing caulk will solve the rest.
Next, we turned the Billy cabinets upside down so their bases would form a nice backing to attach some crown molding, and then bolted everything together from the inside. (Scroll up a few photos to see the upside down Billys before they got crowned.)
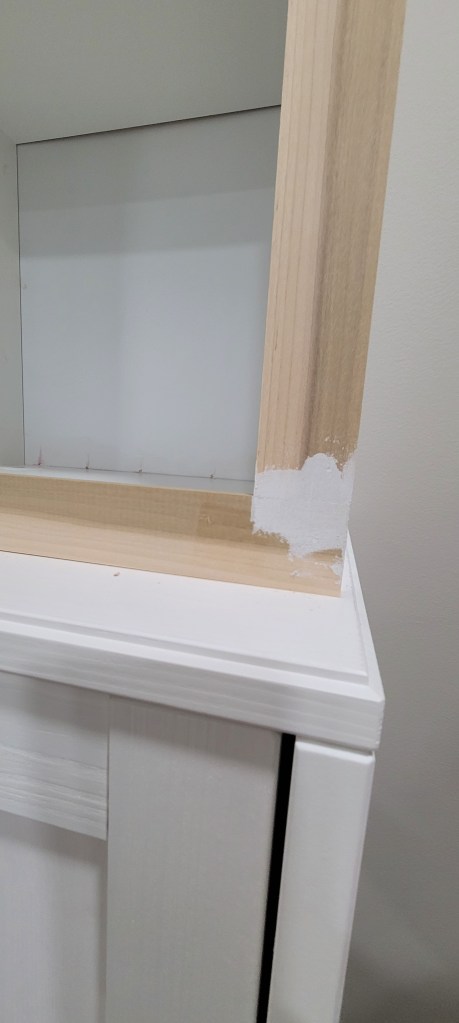
The next step was adding trim which really helps drive home the built-in look. We used 2-in wide unfinished pieces of oak which we found online.
Yes, one of us just had to “style” the shelves for impending company — even though they were far from done at this stage!
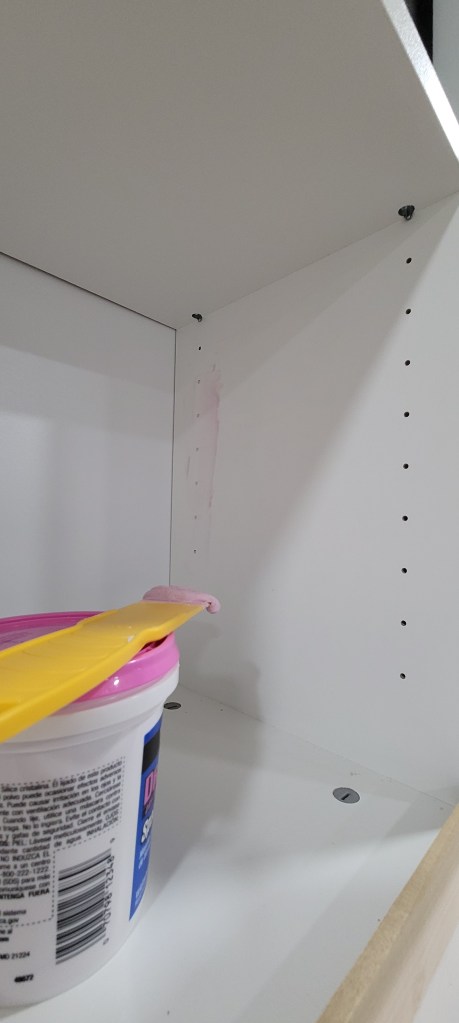
Then, it was on to using wood filler to fill in all the spaces where wood met wood, spackling all of the shelf holes which took weeks, if we are being honest. Not the favorite task of the project, but one that also will help visually declutter the look of the unit.
We also spackled the deep crevices which were created when we smushed the two base cabinets together. Again, this is to make a seamless built-in look. In the photo below, you can see that we filled it partially. Let it dry for a day or so, sanded, and then came back and filled it again with spackle. We repeated that process until the seam was…seamless 🙂 I forgot to snap a photo of that, but the proof will be in the pudding when the finished cabinet is revealed. Fingers crossed.
Because these crevices were so deep, we would apply a coat, let it cure for a day or two, sand, and repeat. For days…
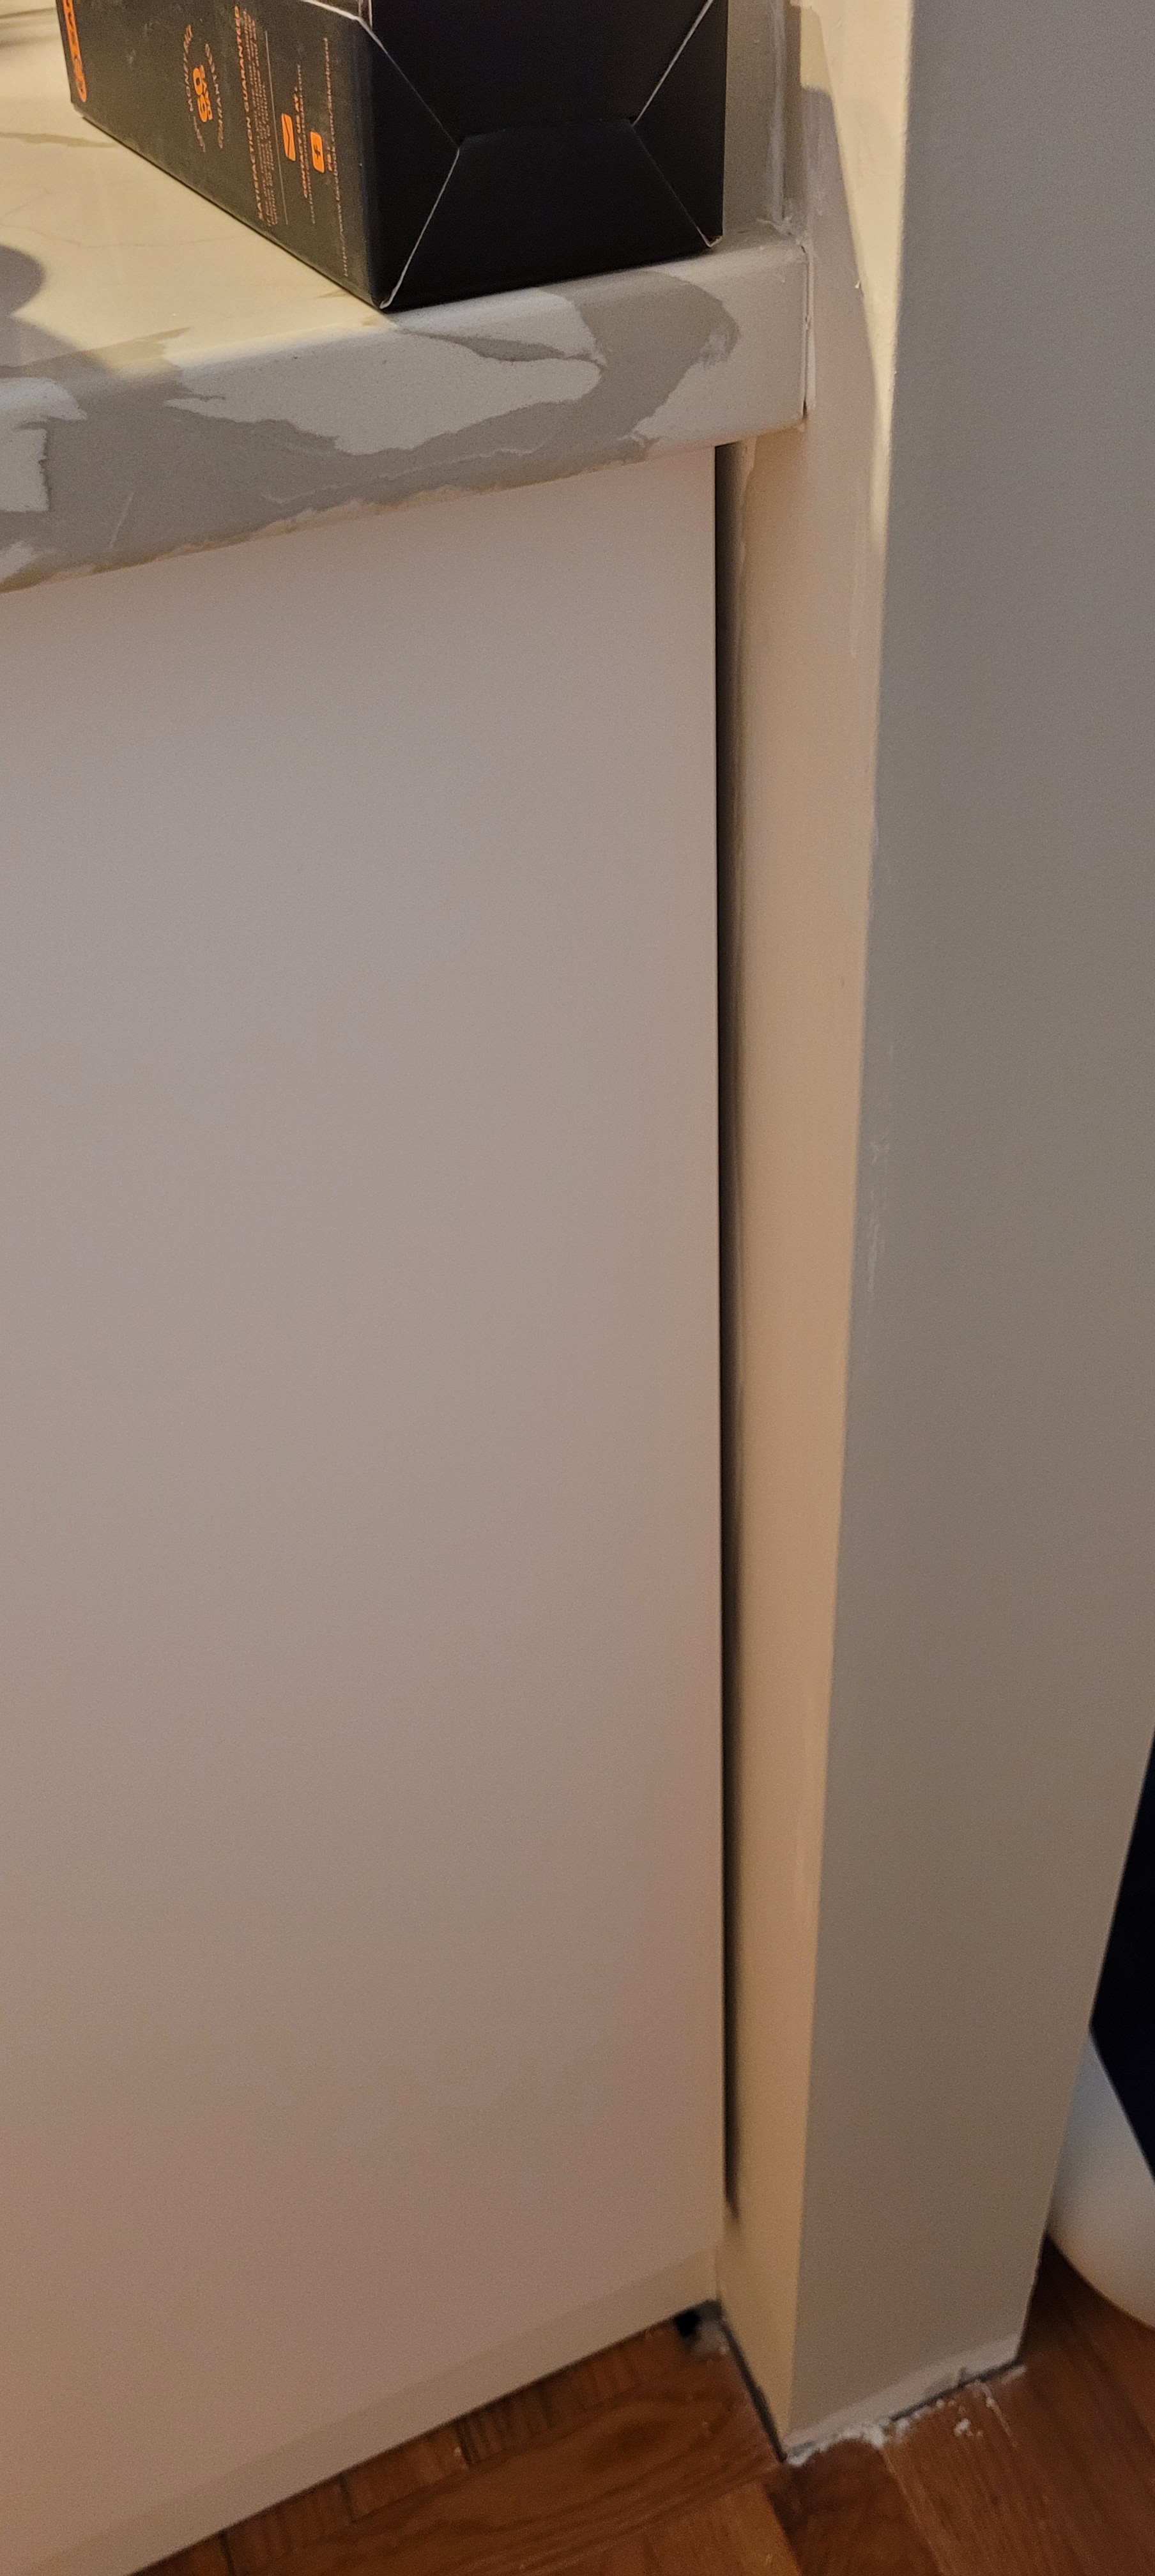
We finally finished sanding everything which is also an exercise in patience-building (one we would like never to repeat!) We are now in the final stages of caulking everything — where the backer board of the Billys meet the side walls, where the Billys meet the Havstas, where the trim meets the crown, and where the base molding meets the Havstas.
Not caulked Caulked
As soon as the caulk dries, we will apply an initial coat of shellac primer that must dry and cure for at least two to three days, before applying a second coat. The hardwood cabinets likely would not need that much attention, especially since we ultimately will be painting them white, but Ikea cabinets not made of hardwood — the Billys are some particle board mish-mash — must have a good shellac primer. This will keep the cabinets from easily scuffing and scratching with everyday use.
Once the shellac is fully cured, a step that will take at least the next four to five days, the whole thing will get two coats of Behr Premium White Matte — Scuff Defense (which the internet tells us is the closest match to the color cabinets we have in the rest of the kitchen). Note to Ikea: Here’s an idea for a money making endeavor. Sell paint to match your products!
Once the beast is done and dusted, we can confidently say we are finished. (Unless you count the punch list — boy, do we have a punch list…!) But, we think, if luck is on our side, we may have some before and after pictures to share by the end of the summer. I know you’ve heard it before, but this time we think it’s gonna happen 😊
**The project ‘year’ anniversary changes depending on our mood! It is true that our house became a storage locker for cabinets that were delivered last July. But we did not start pulling up the floors until September, so we are still on our game.
So many little bits to go, but we do see the light at the end of the…island, to coin a phrase.
We have a long punch list which we are s-l-o-w-l-y working through as we find time. Rather than tackle the last two big projects on our list — both of which will consume at least a weekend each — we are settling for scratching off some smaller items on the list, just to keep the train moving.
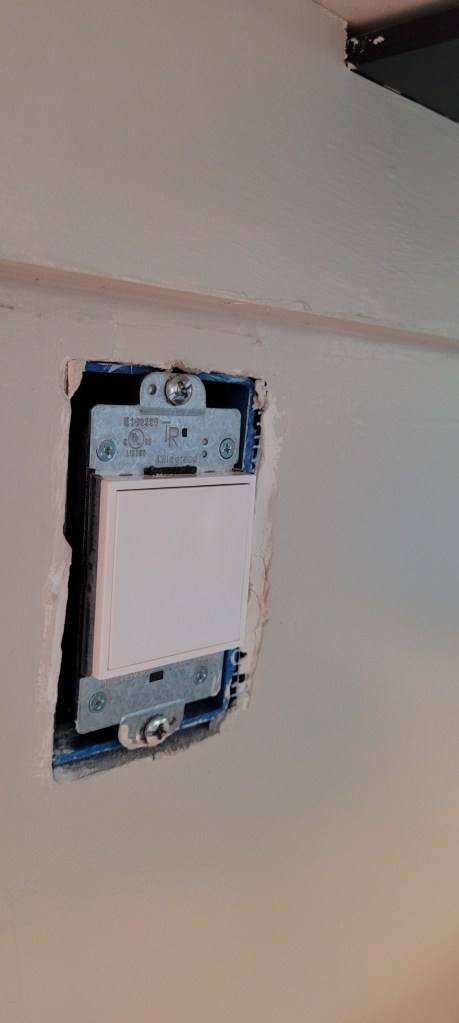
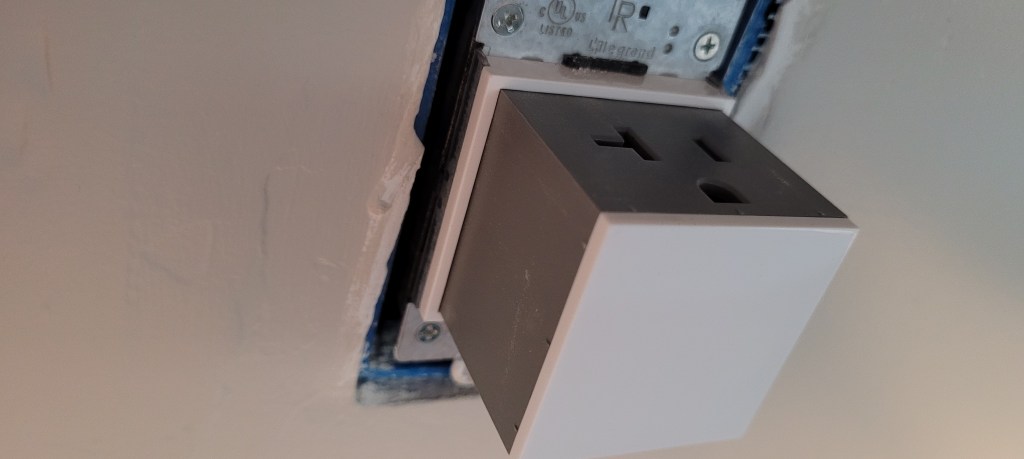
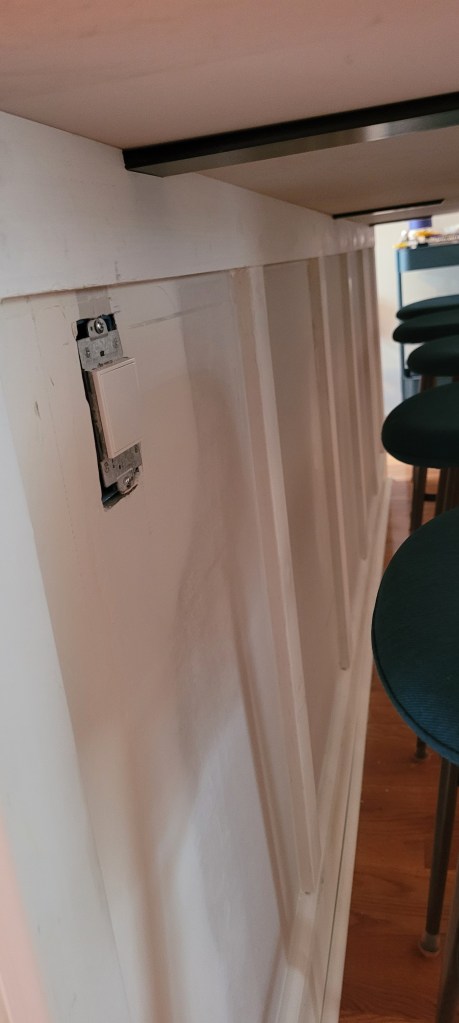
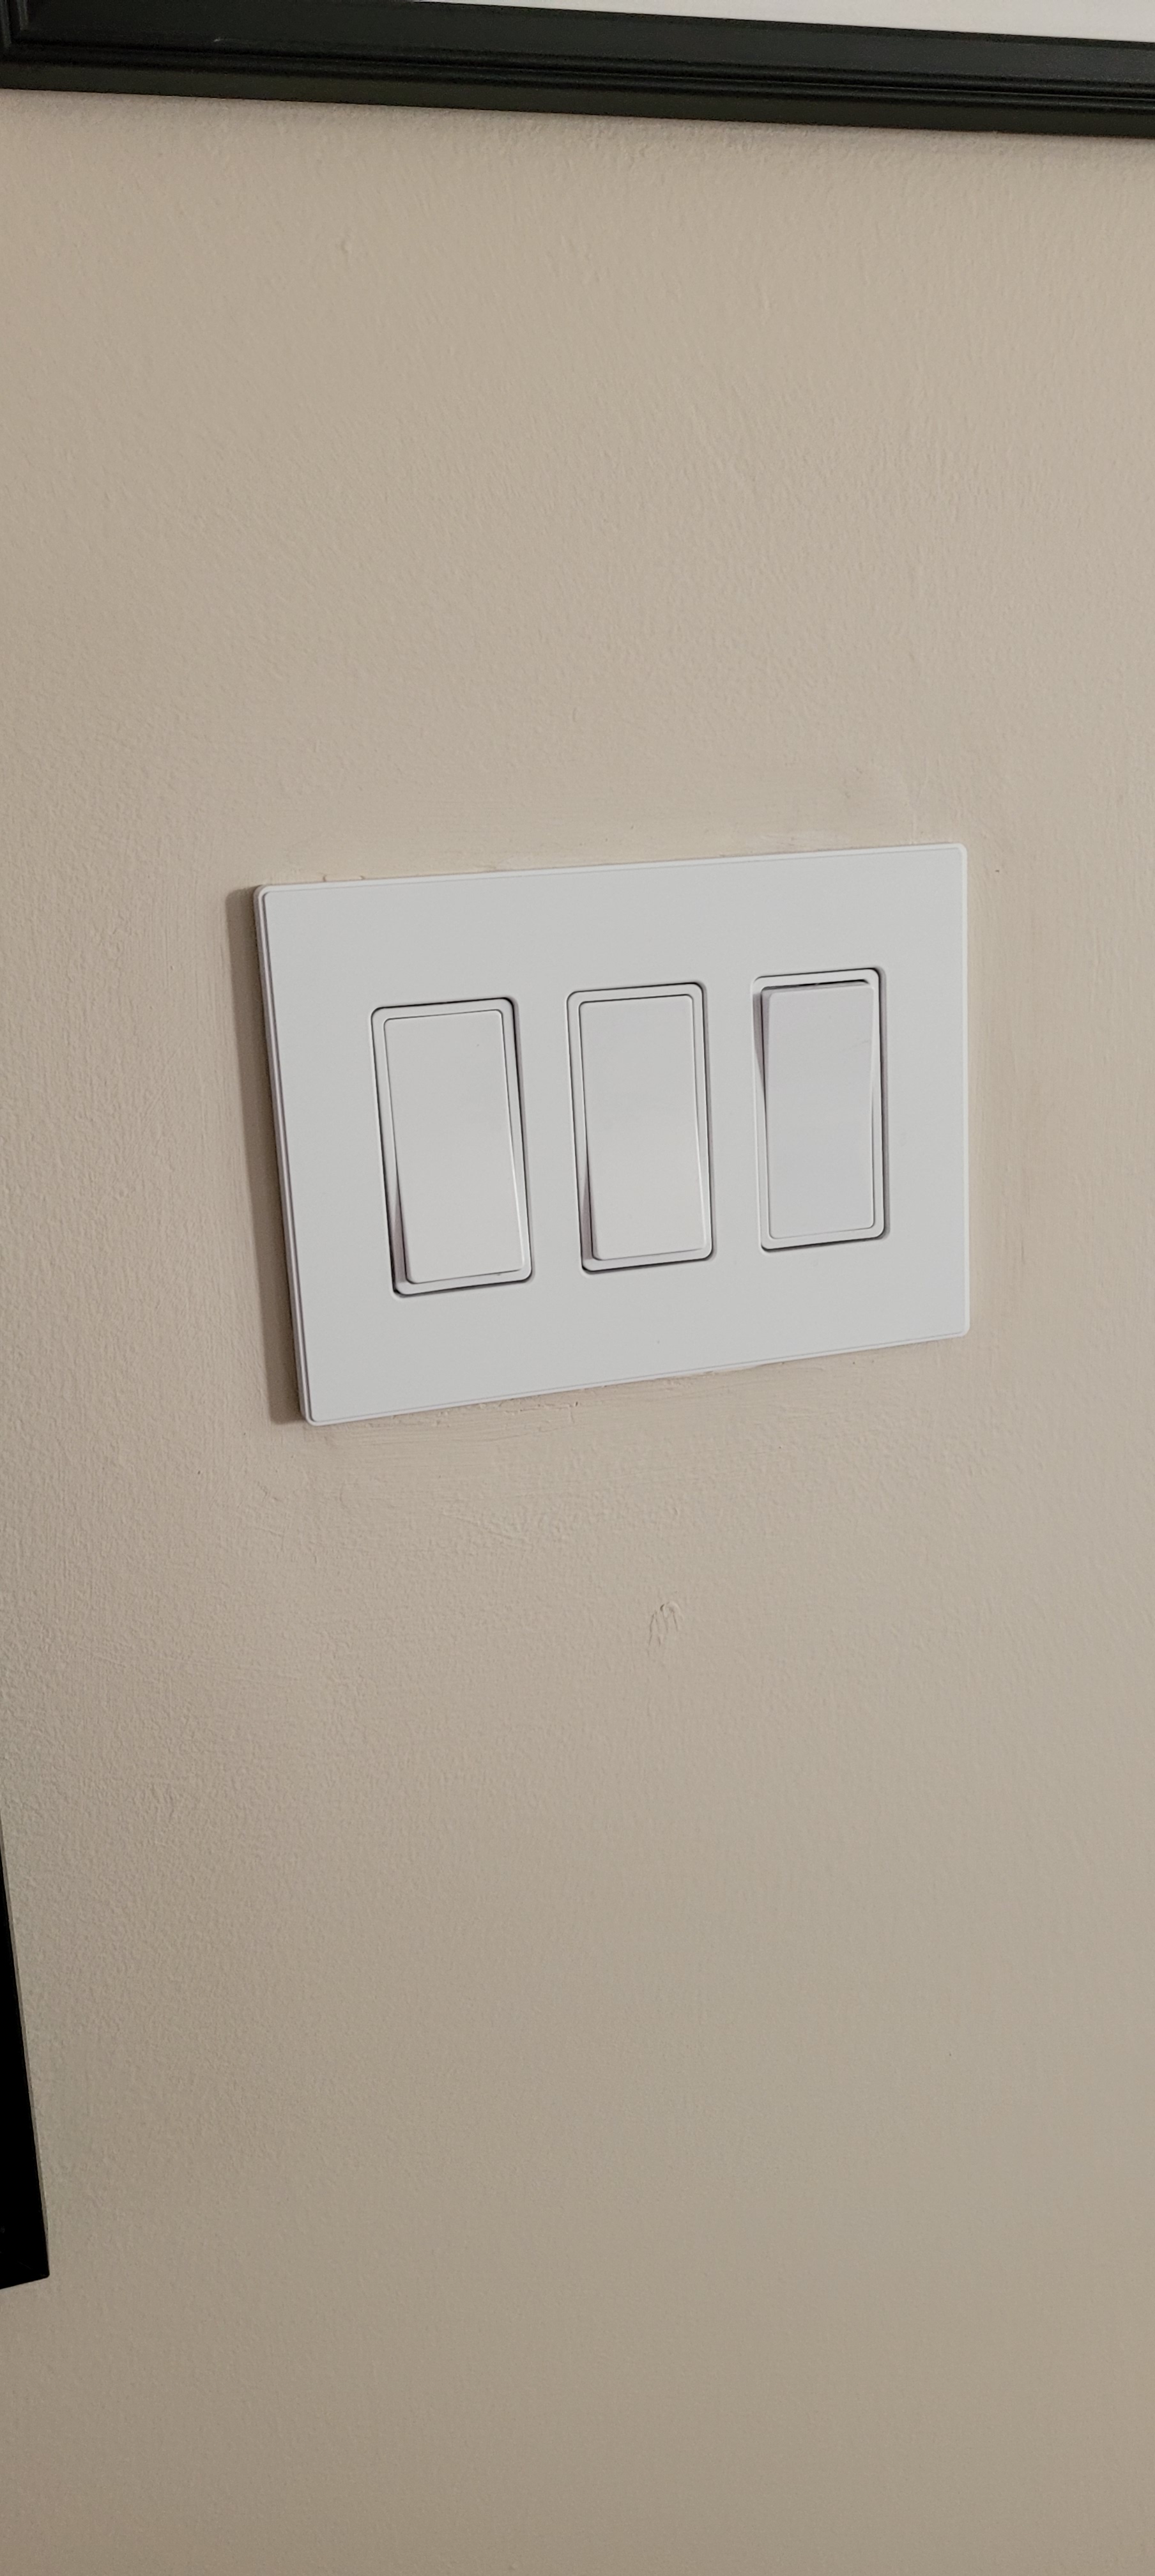
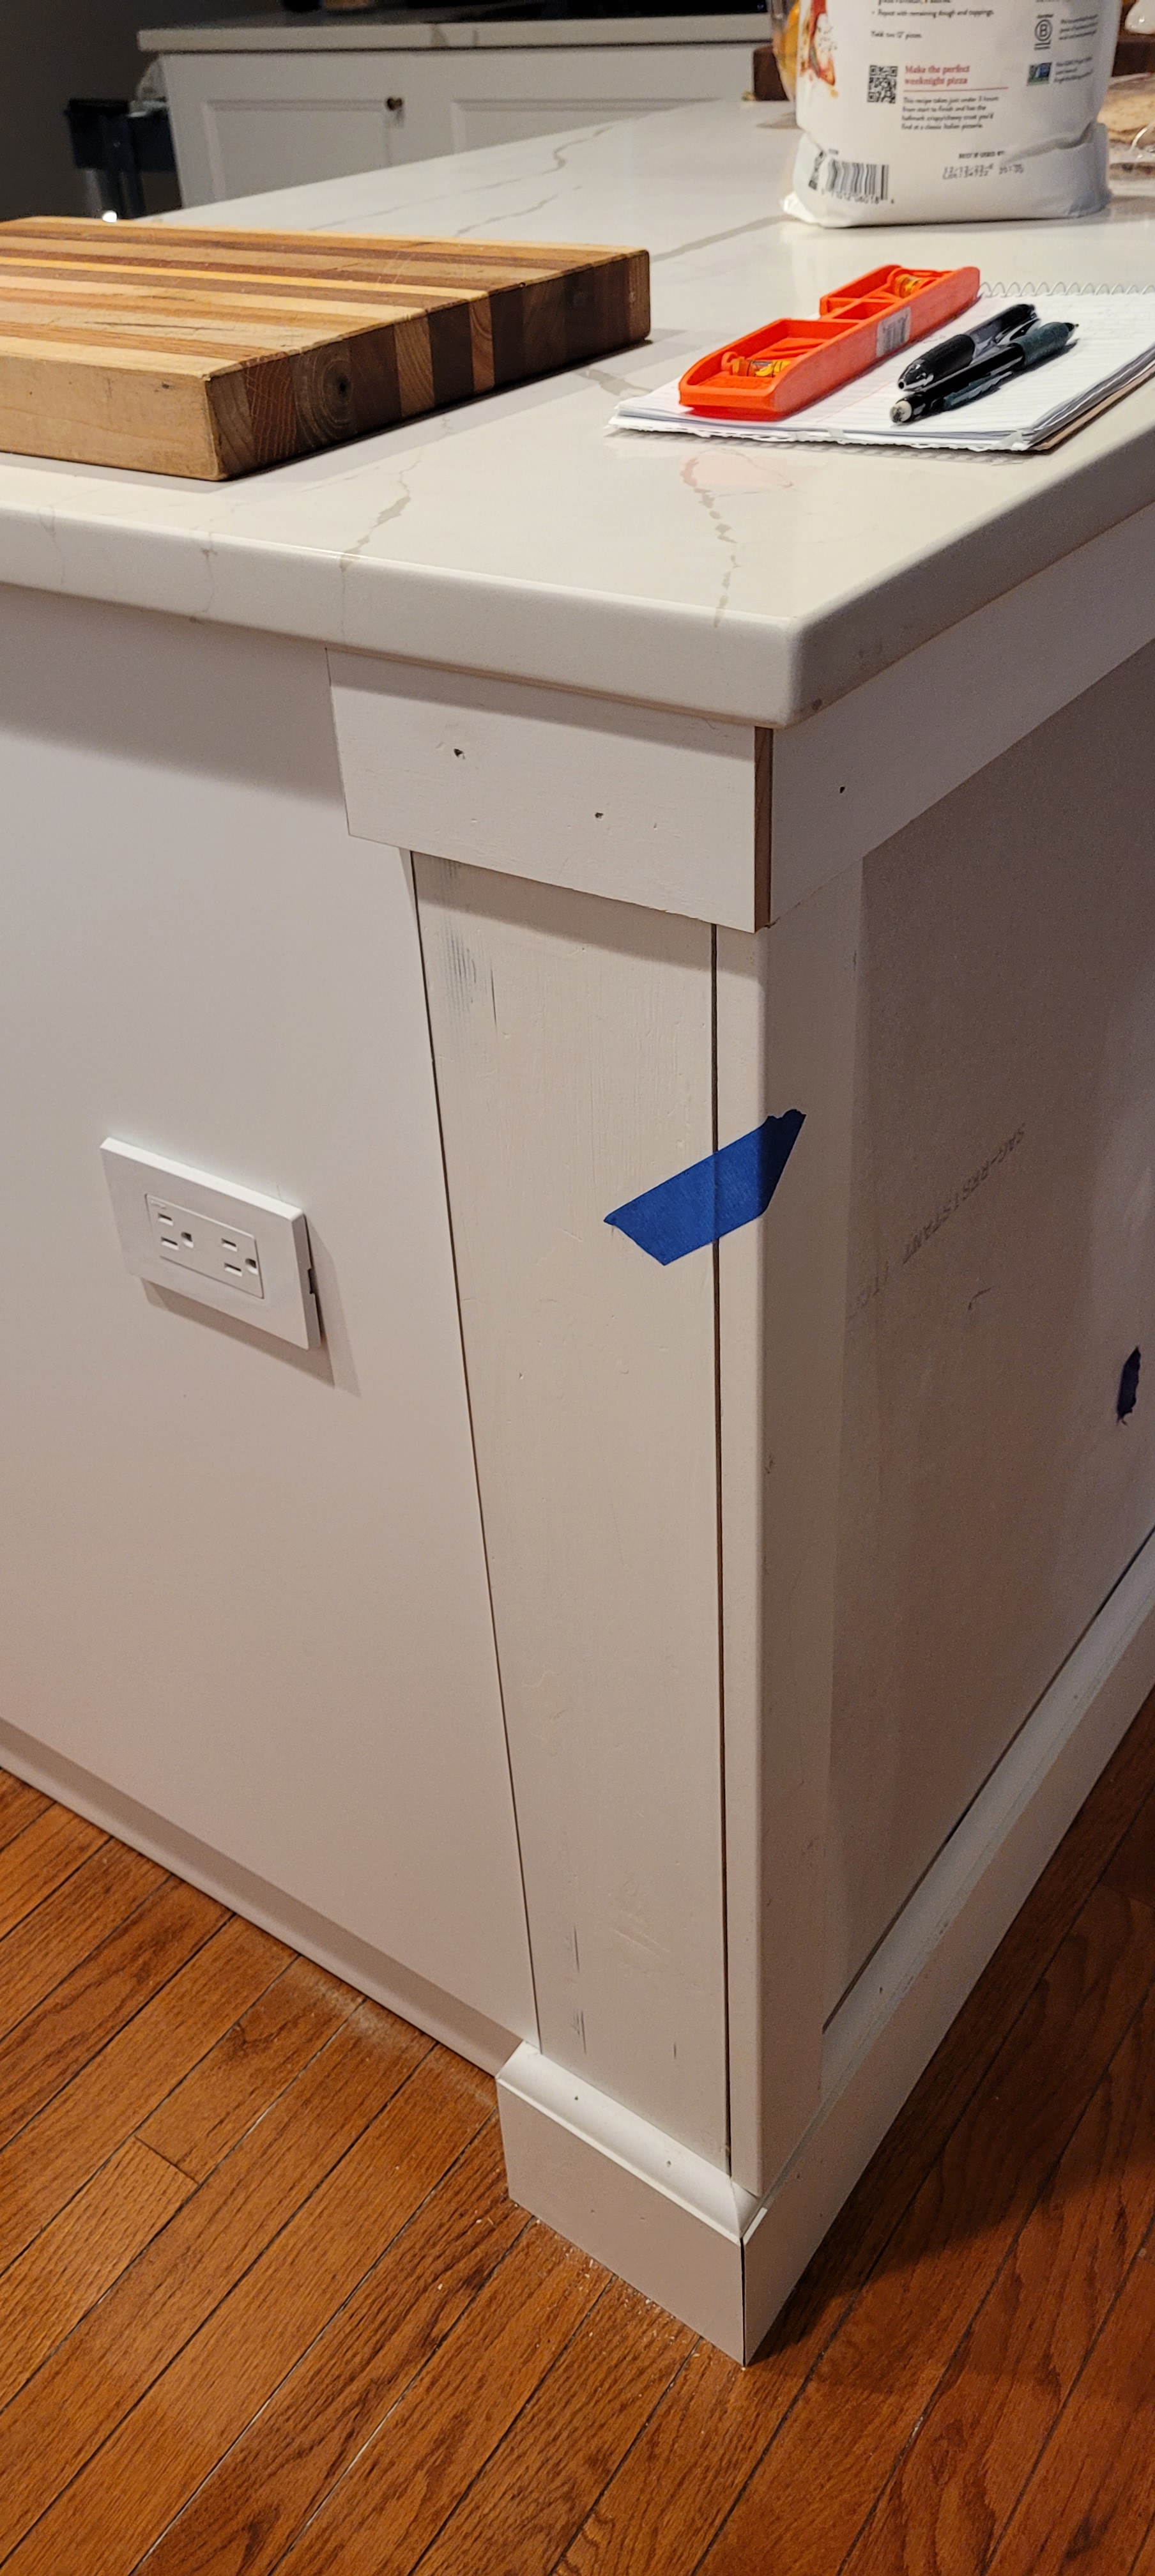
For example, in the “knee” cubby (the place where you put your knees when you are sitting at the island), we installed a swanky (and, if I’m being honest, a bit expensive) pop out electrical outlet.
The device was about $80 and came with a screwless cover to match the other outlets in our home. I reasoned that if one’s knees accidentally grazed on an open outlet, a guest might be in for a bit of a shock, so doing this pop out version seemed safer. We wanted at least one extra outlet on the outside of the island for things like plugging in a vacuum cleaner or a piece of equipment.
Given the price, we were dismayed to find out that the cover would not fit properly underneath the counter. It was too dang tall by about a 1/4 inch! #*&@!
Because it has only taken us 6+ months to install the thing, it was hardly returnable. So, we put our mind to fashioning a cover out of scrap wood. We *think* it will work perfectly, but the proof will be in the pudding. Just in the process of priming it tonight and then we will slap on a couple coats of the same paint we used on the island so it should disappear as much as possible once installed.
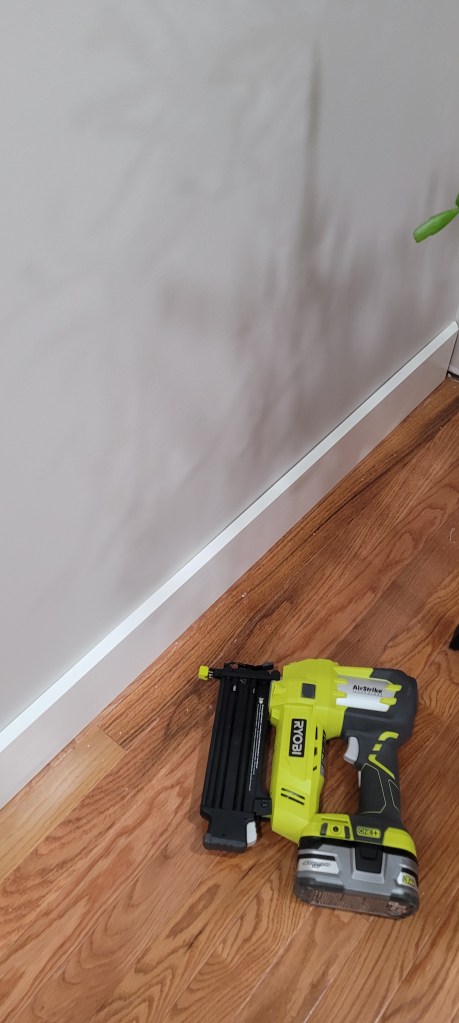
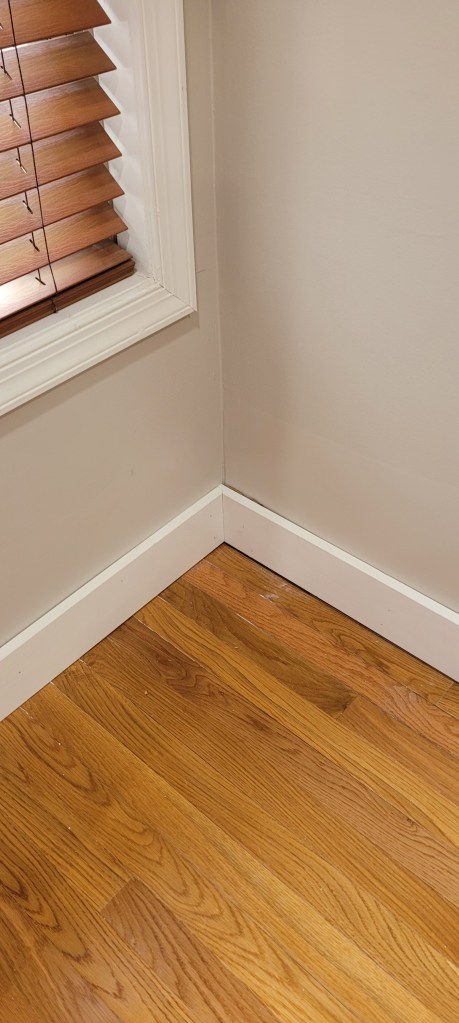
We also started building out the baseboards on the perimeter of the kitchen. You’ll remember that we are building the baseboards ourselves from scratch and slowly changing them out throughout the house. Our walls and our floors are ridiculously crooked, so caulk will be our best friend going forward.
These below still need to be caulked, primed, and painted, but we like the bulked up 6″ baseboards, a far cry from the previously puny ones we had before.
In preparation for tackling the monster/beast at the end of the kitchen, we started a few preliminary tasks. We had always planned on having a floor-to-ceiling bank of utility cabinets here, but — and I do feel a little bit guilty saying this — we already have plenty of storage space elsewhere in the kitchen, so we actually are going to do a decorative topper in what will look like a built-in piece when all is said and done. Here it is before it is trimmed out and “built in,” just to get an idea of what we’re thinking:
Just a mock up to get a feel for what these might look like. No trim or caulk or paint has been applied yet.
We had originally intended to paint these black, but between then and present day, our absolutely certain/nobody-was-going-to-talk-us-out-of-it/ positively-for-sure decision has wavered. We polled every guest that walked into our home over the past few months and the consensus was: Paint It White.
You’ll recall with the “stacked or off-set” tile poll we did, that I don’t do so well with community consensus! It just makes me want to do the opposite so dang bad…
But, in this case, the white has grown on me and actually adds symmetry to the pantry cabinets directly across from them on the other side of the kitchen. So, white it is!
We will not get away with not priming and painting them, however. We have matched our cabinet paint and will use that to give the whole kit and caboodle a new coat of white paint, although we have many moons to go before we get to that final step.
Today, we knocked out one of the small preparatory tasks which involved bolting the two cabinets together on the inside so that they could not separate down the line. In the next week or two, we will trim out all of the front facing connections, fill all of the shelving holes and sand them, caulk everything within an inch of its life, and then finally give it two to three coats of primer and another two coats of paint.
And, in those little bits of downtime (ha — what even is downtime?!) we’ll just be over here tackling an ever-growing punch list of small, but important tasks to round out the project. We hope to finish by the end of the June, because seriously, this timeline is getting embarrassingly l-o-n-g.
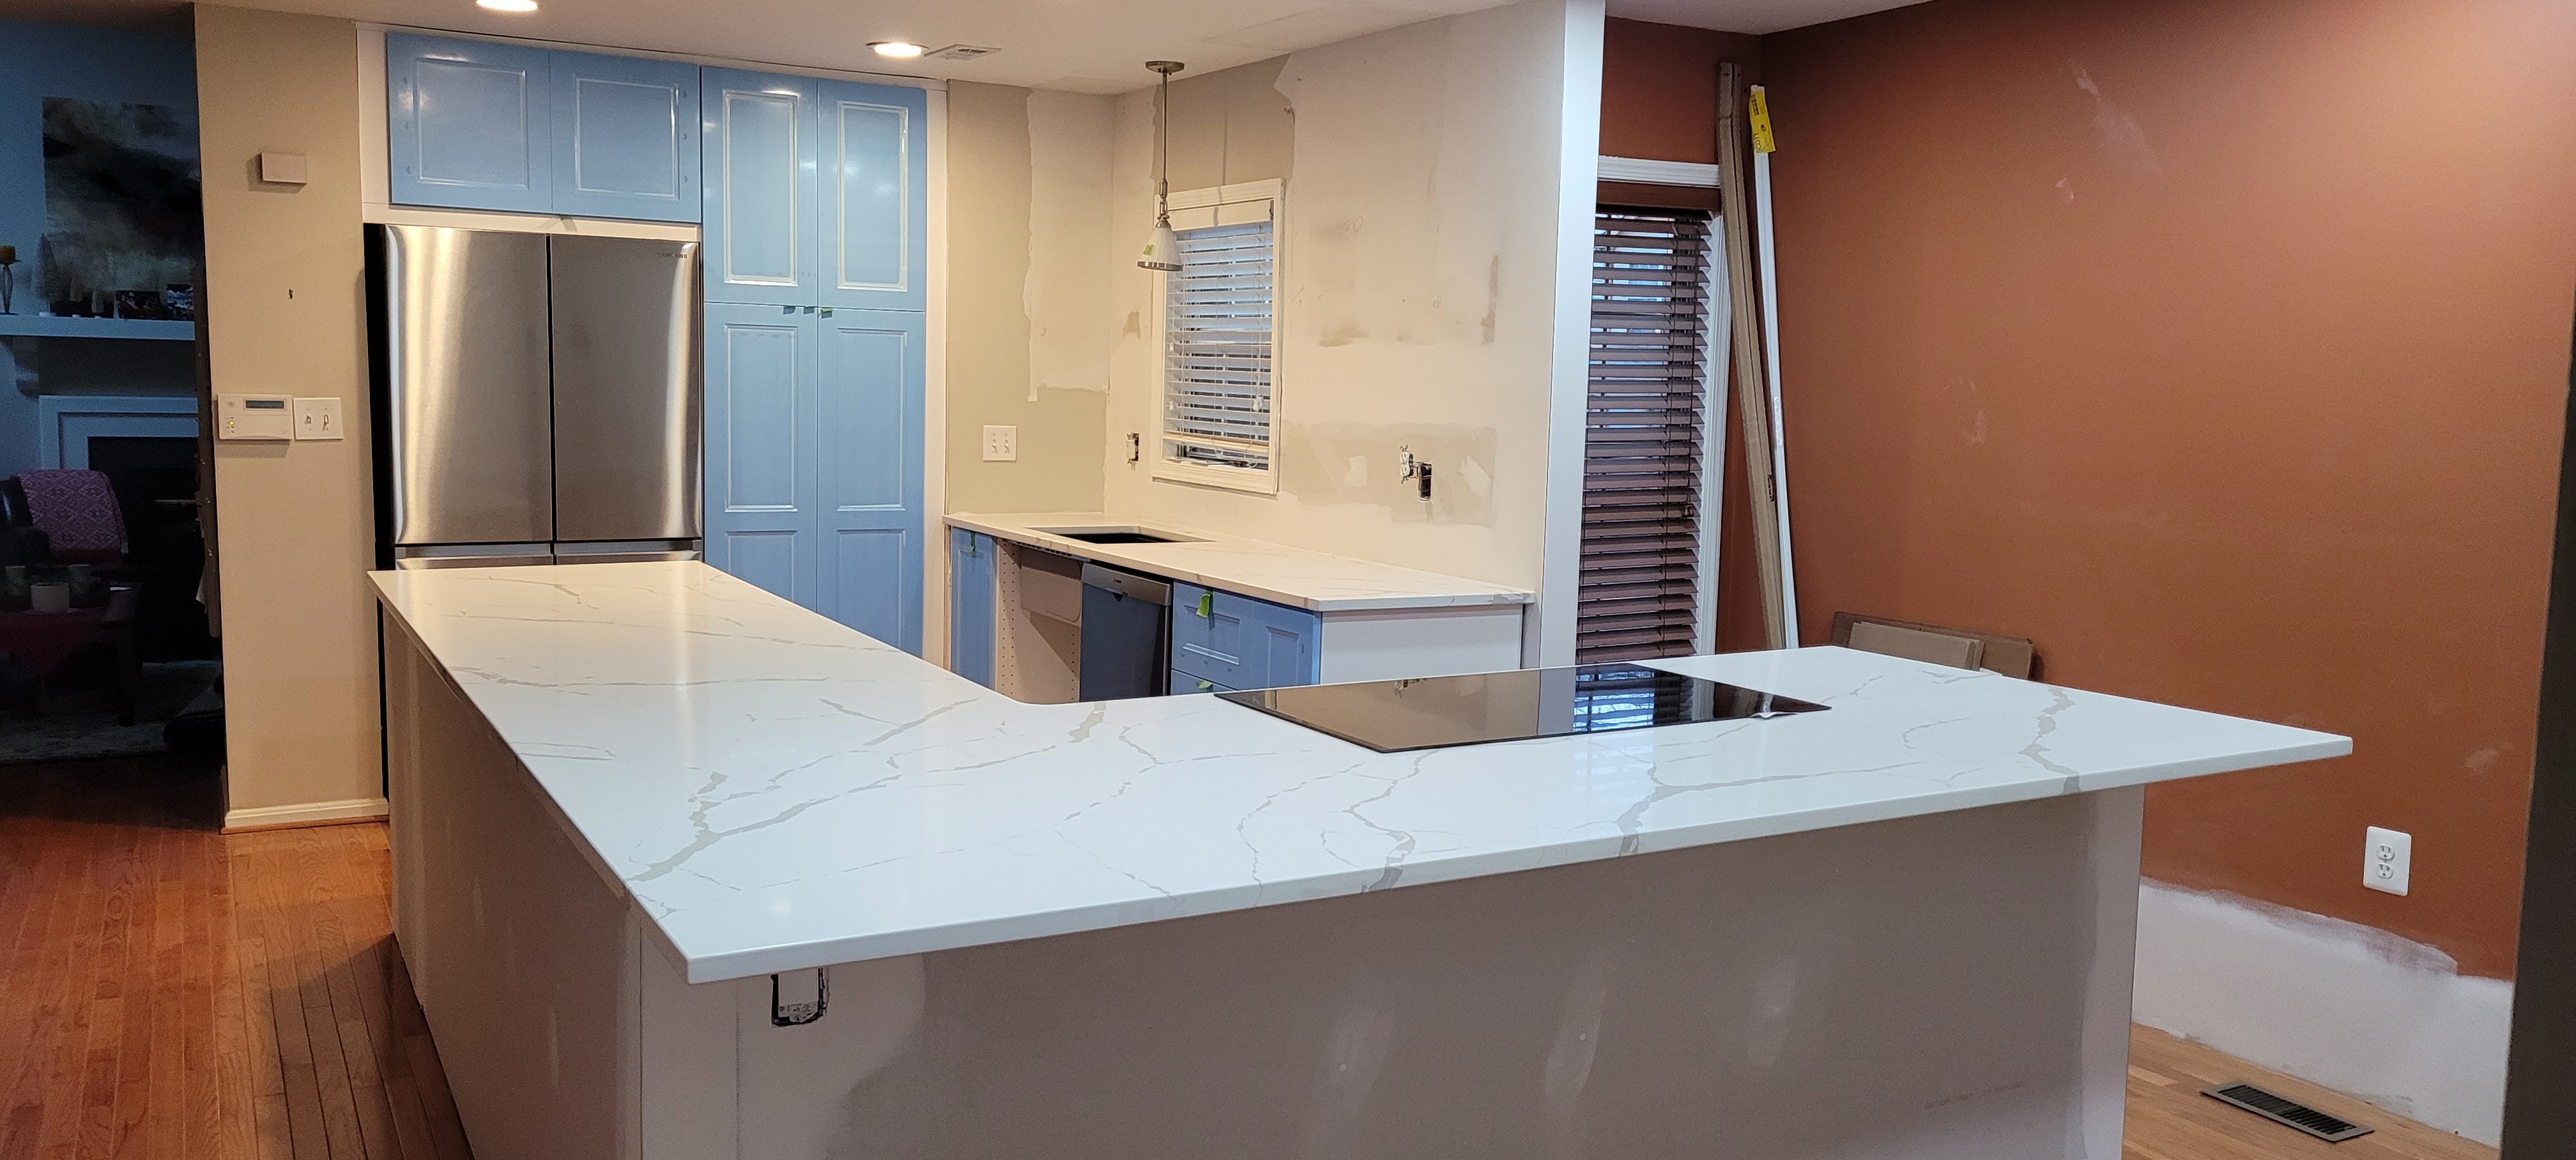
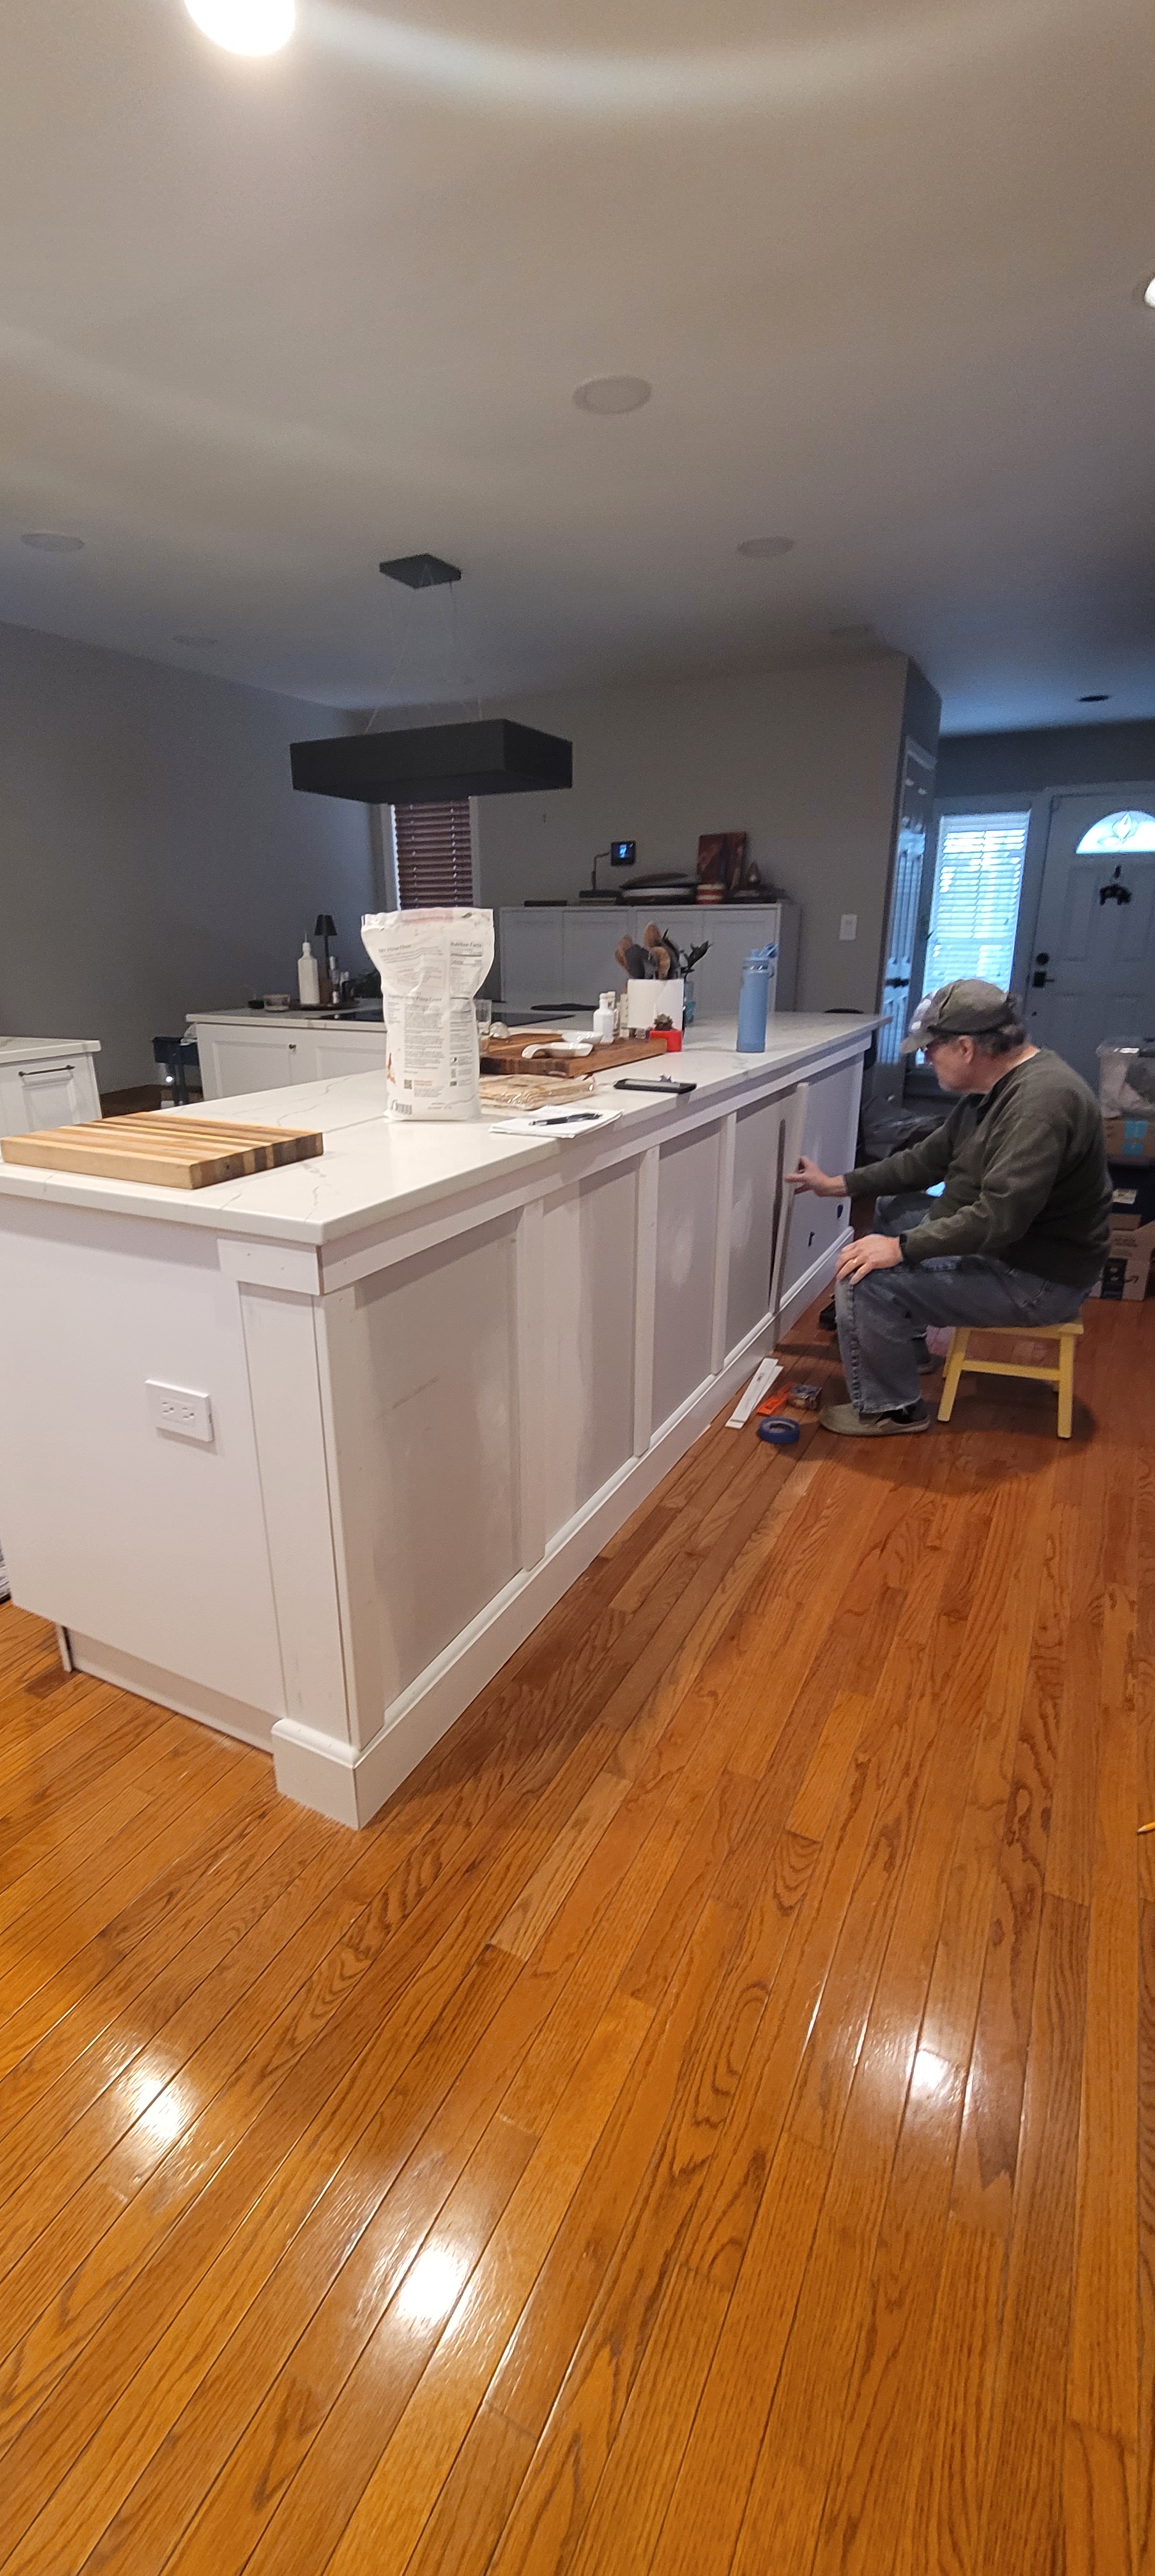
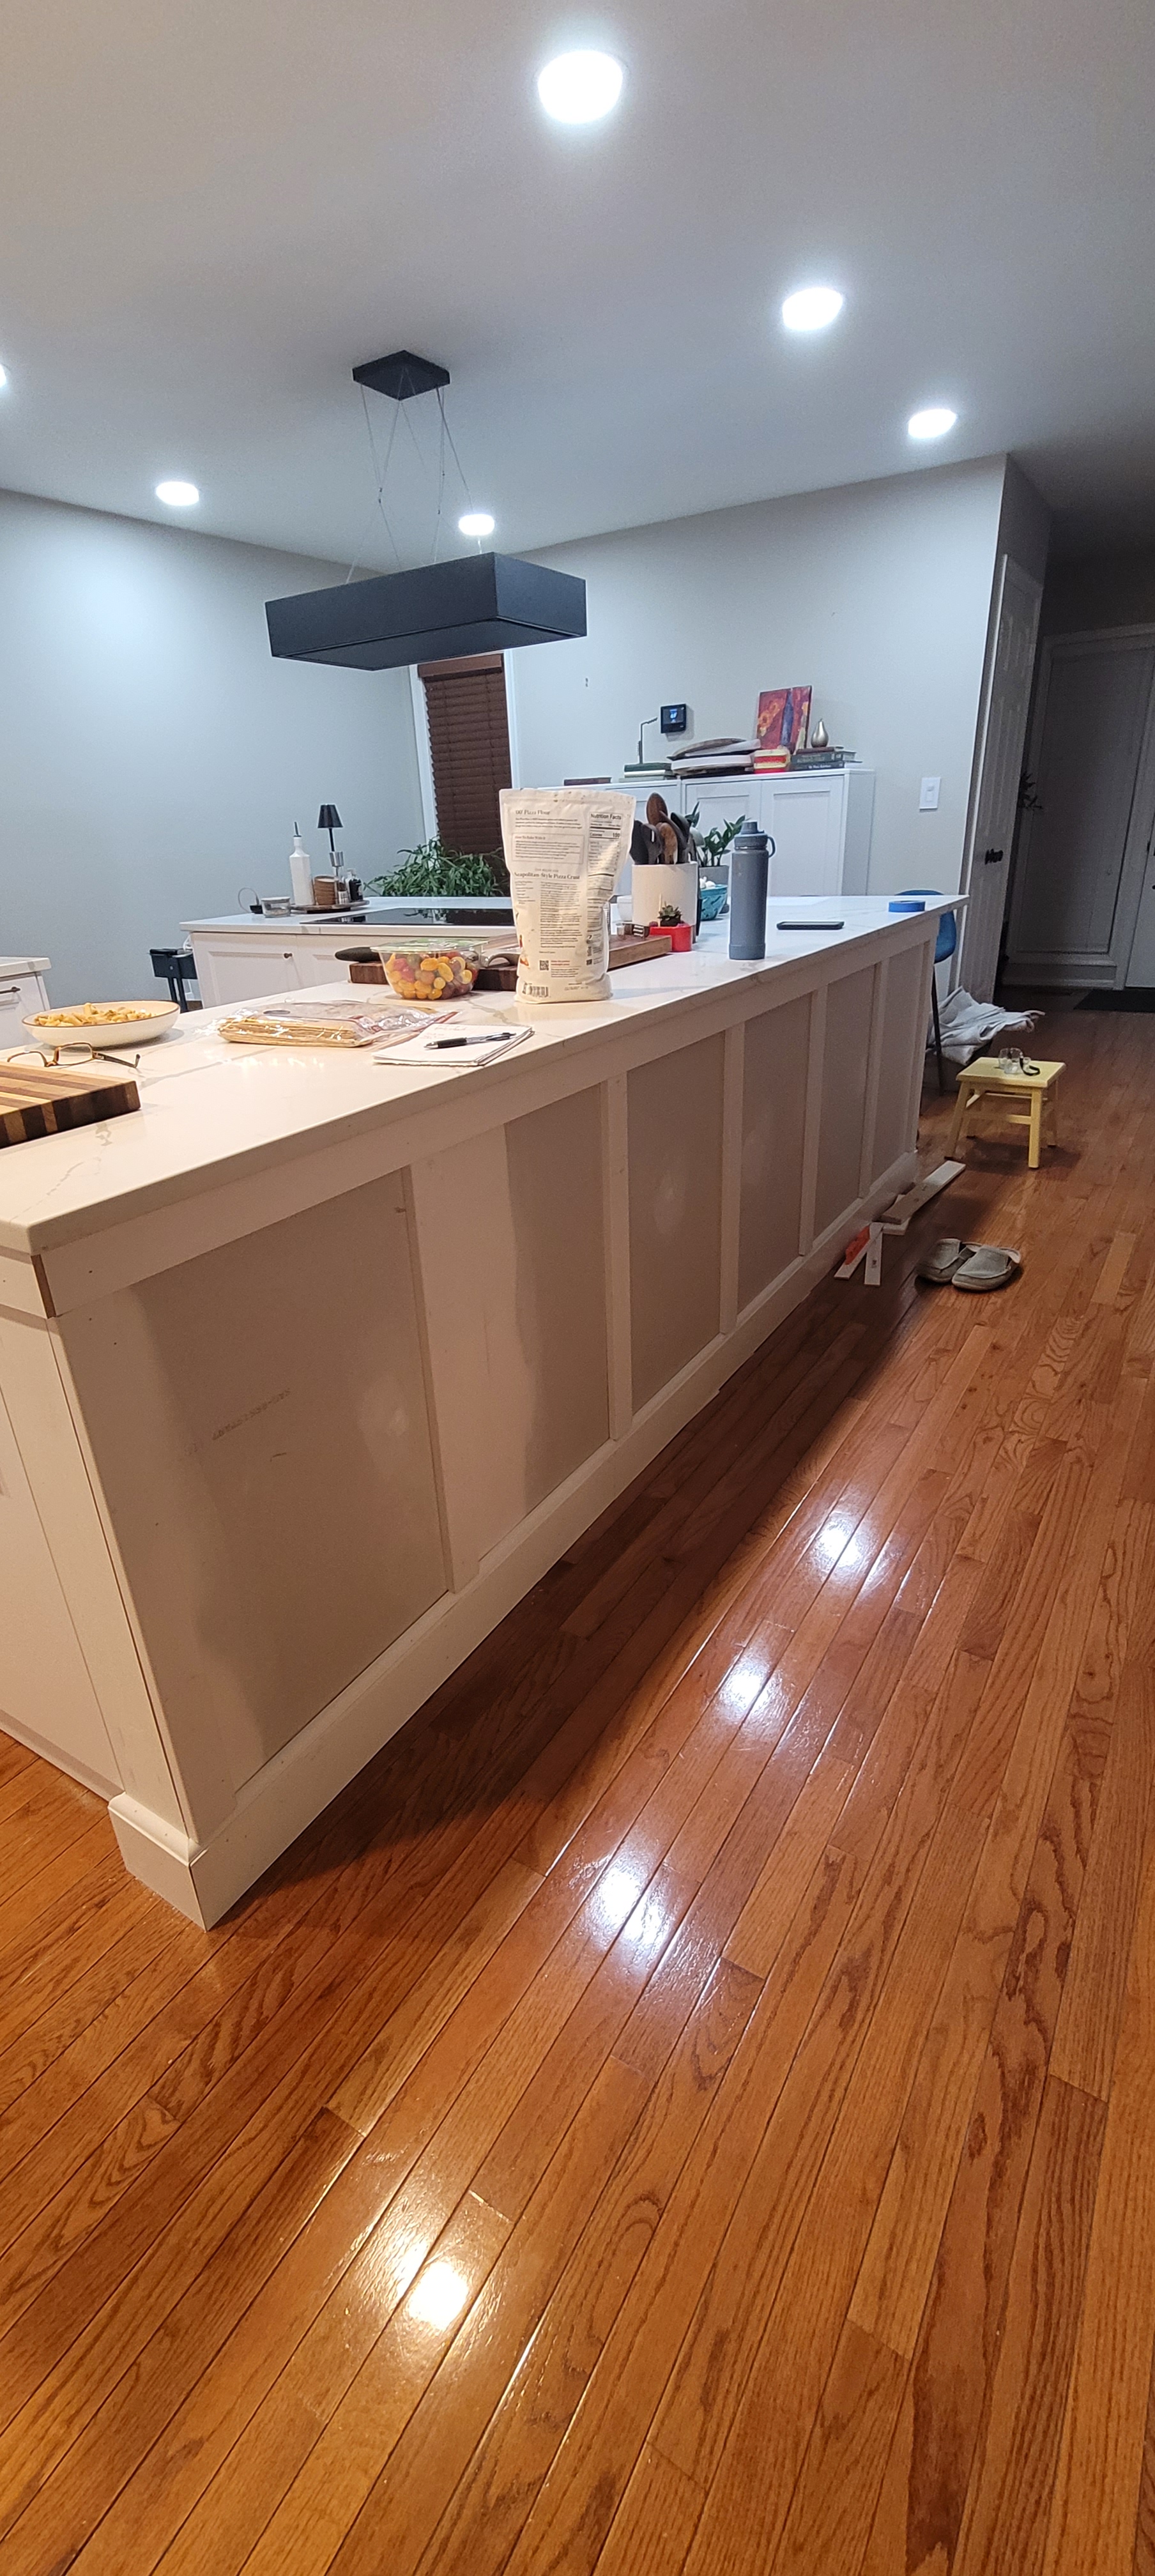
We can put a huge check mark next to this item on our punch list — this one was a long time coming. The contractor left us with a pony (knee) wall, counter tops, cabinets and appliances installed, but the back side of the massive island was ours to complete. Because it is front-facing to the rest of the house, we had to make sure it didn’t compete with all that was going on in the various spaces surrounding the island.
Where we started…
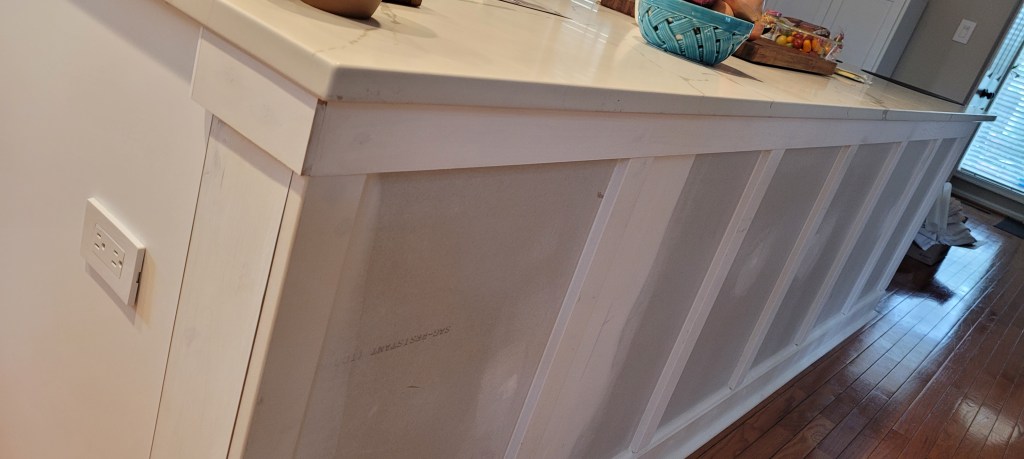
As we said in the previous post, we took a l-o-n-g time to consider our options. Adding some base moulding and applying cover panels was one option. Because we knew we would likely be toning down a lot of the colors in the kitchen by sticking with muted grays and greiges, we definitely wanted to add some texture. Enter board and batten.
Board and batten or boxing framing or even horizontal shiplap are common themes when it comes to islands, so we had a lot of options to consider, but they all play around the same theme. Since we are slowly changing the base moulding throughout the entire house — building them ourselves — we already knew we would use the “new” base moulding on the island, too. How to incorporate the battens and the rest of the framing was where we focused our planning.
Ultimately, we opted out of a full box trim because we thought the layers starting from the base moulding on up would produce too small of box panels and thus create a really busy look for this very open, but ultimately modest, space. Instead, we went with straight battens, ending at the base trim. There are so many tutorials for how to do proper board and batten online, and I think we watched every video we could find. We also had already done this before, so we kinda knew what we were getting ourselves into. We’ll try to pull together a tutorial one of these days and save it on the website.
Look at the intensity on that face 🙂
Finally, once all the bits were installed, we took to re-mudding parts of the panels because the original dry wall was, well, really messy. It is easy to blame the contractor, but honestly, they had a huge job on their hands and tidying up dry wall mud wasn’t their first priority, nor truly their responsibility. Remember, we hired them to do the electrical and the big stuff (like building pony walls), but we wanted to manage the rest ourselves, both to save cash and to create exactly what we wanted.
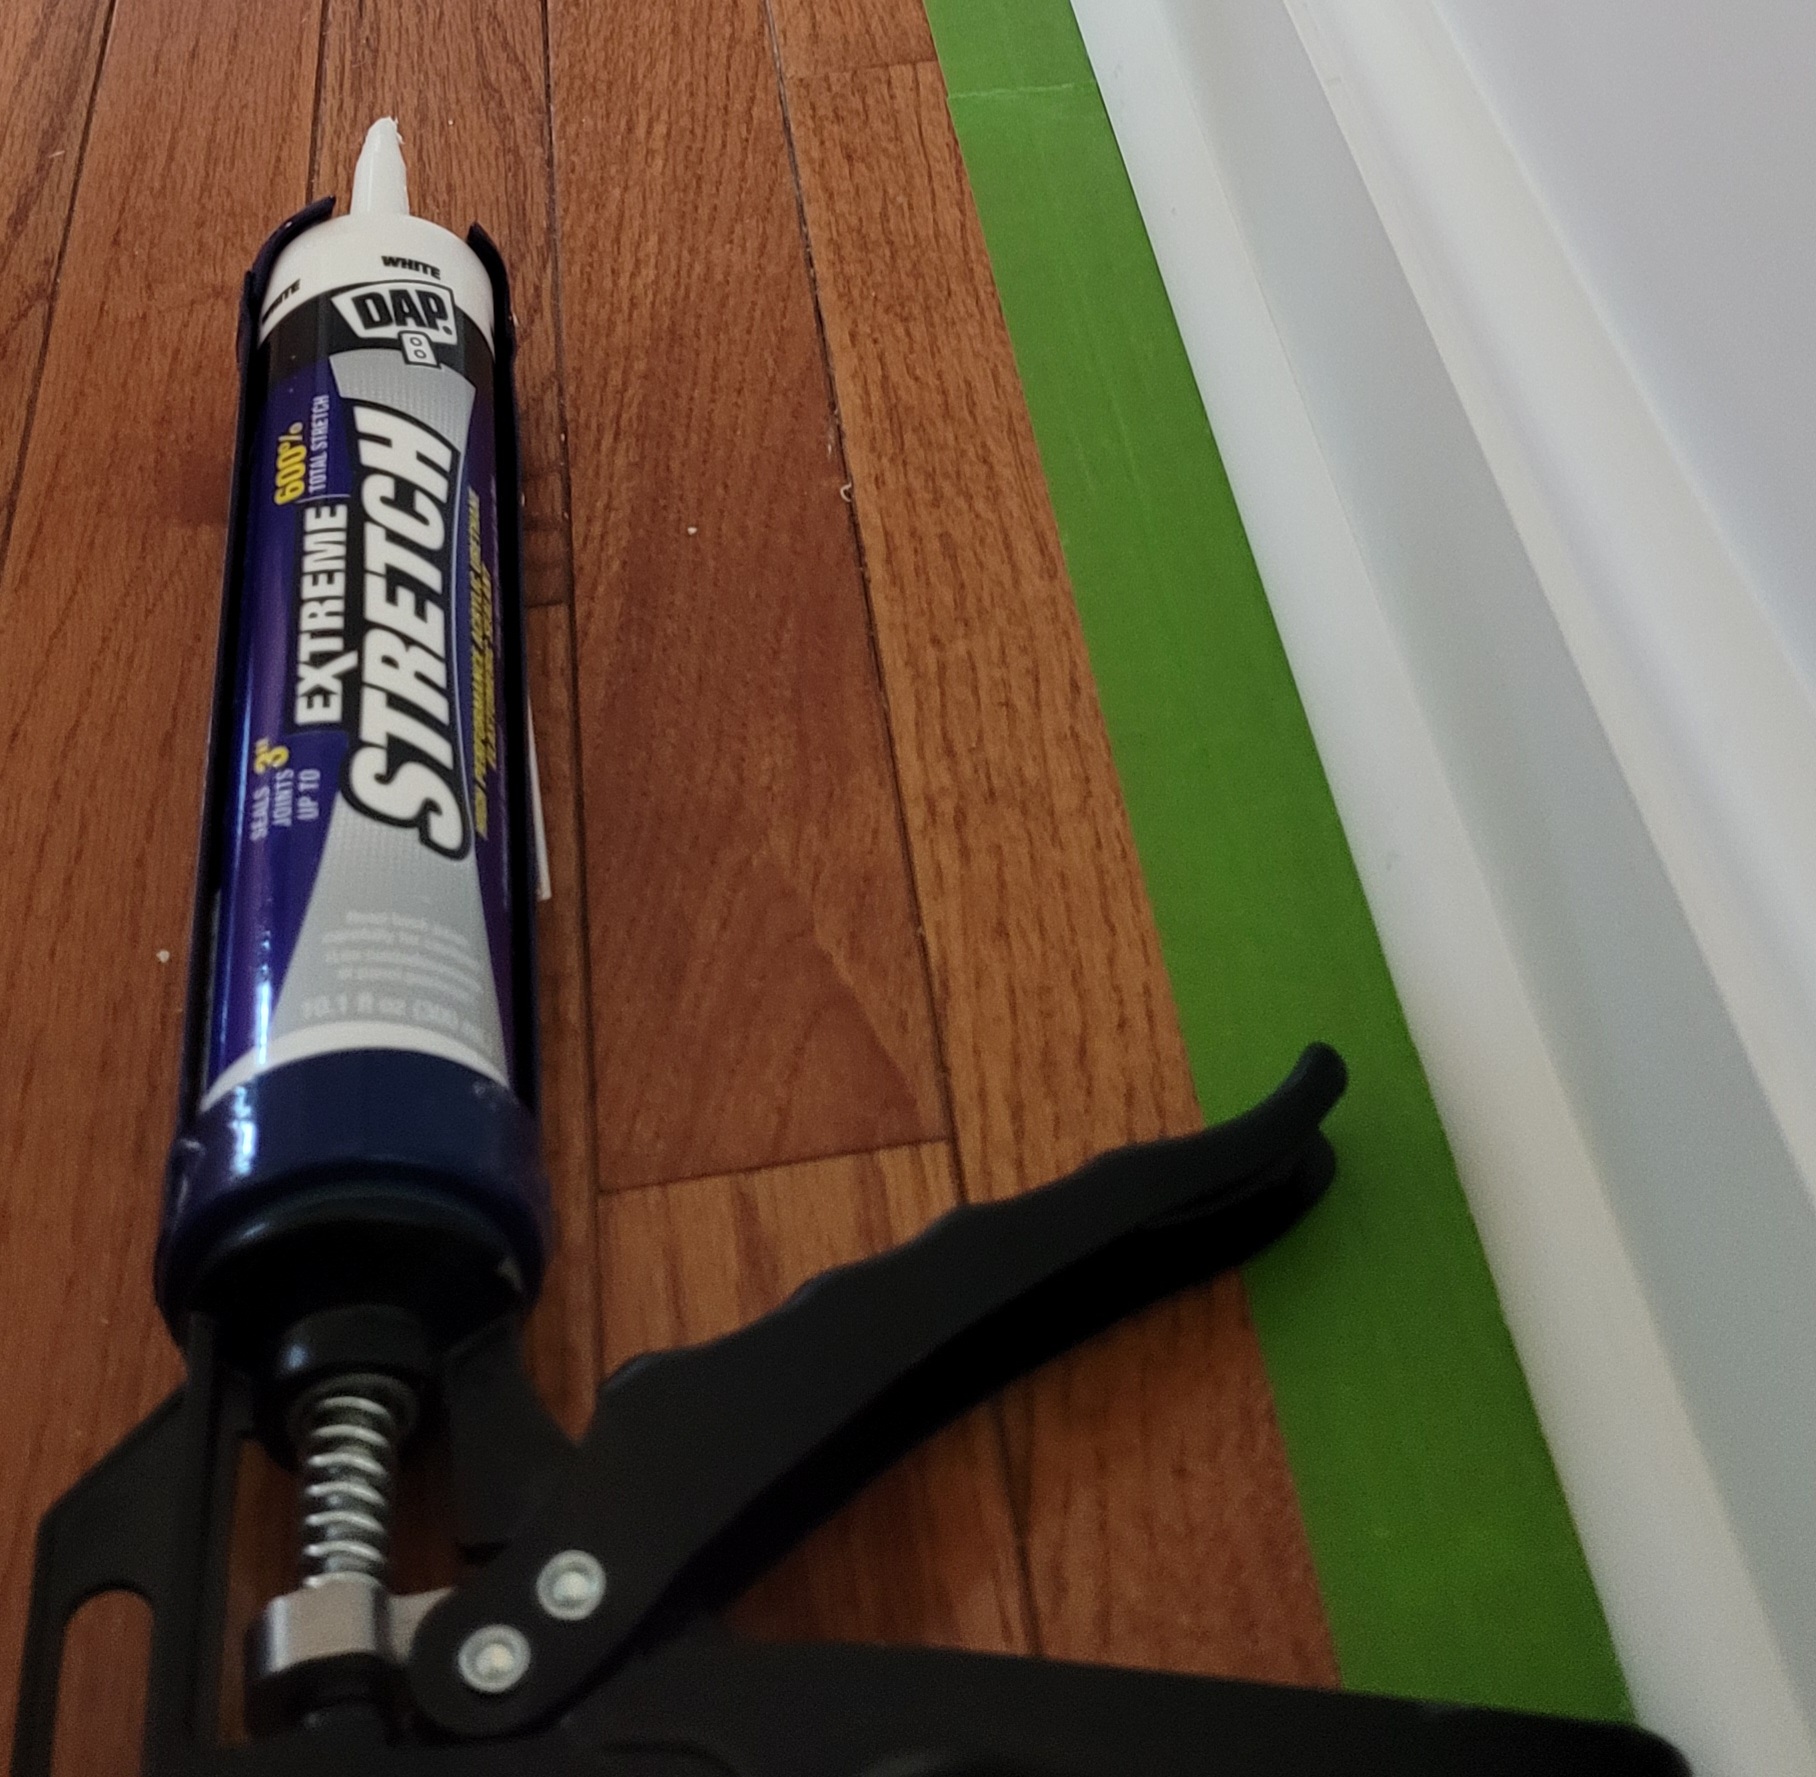
After all of the re-mudding, sanding, and nail hole-filling, we got to caulking. Caulking all of those seams makes for a more professional finished product, so the headache is well worth the time. In recent years, we have used Dap Extreme Stretch which is paintable and has never cracked nor shrunk on us.
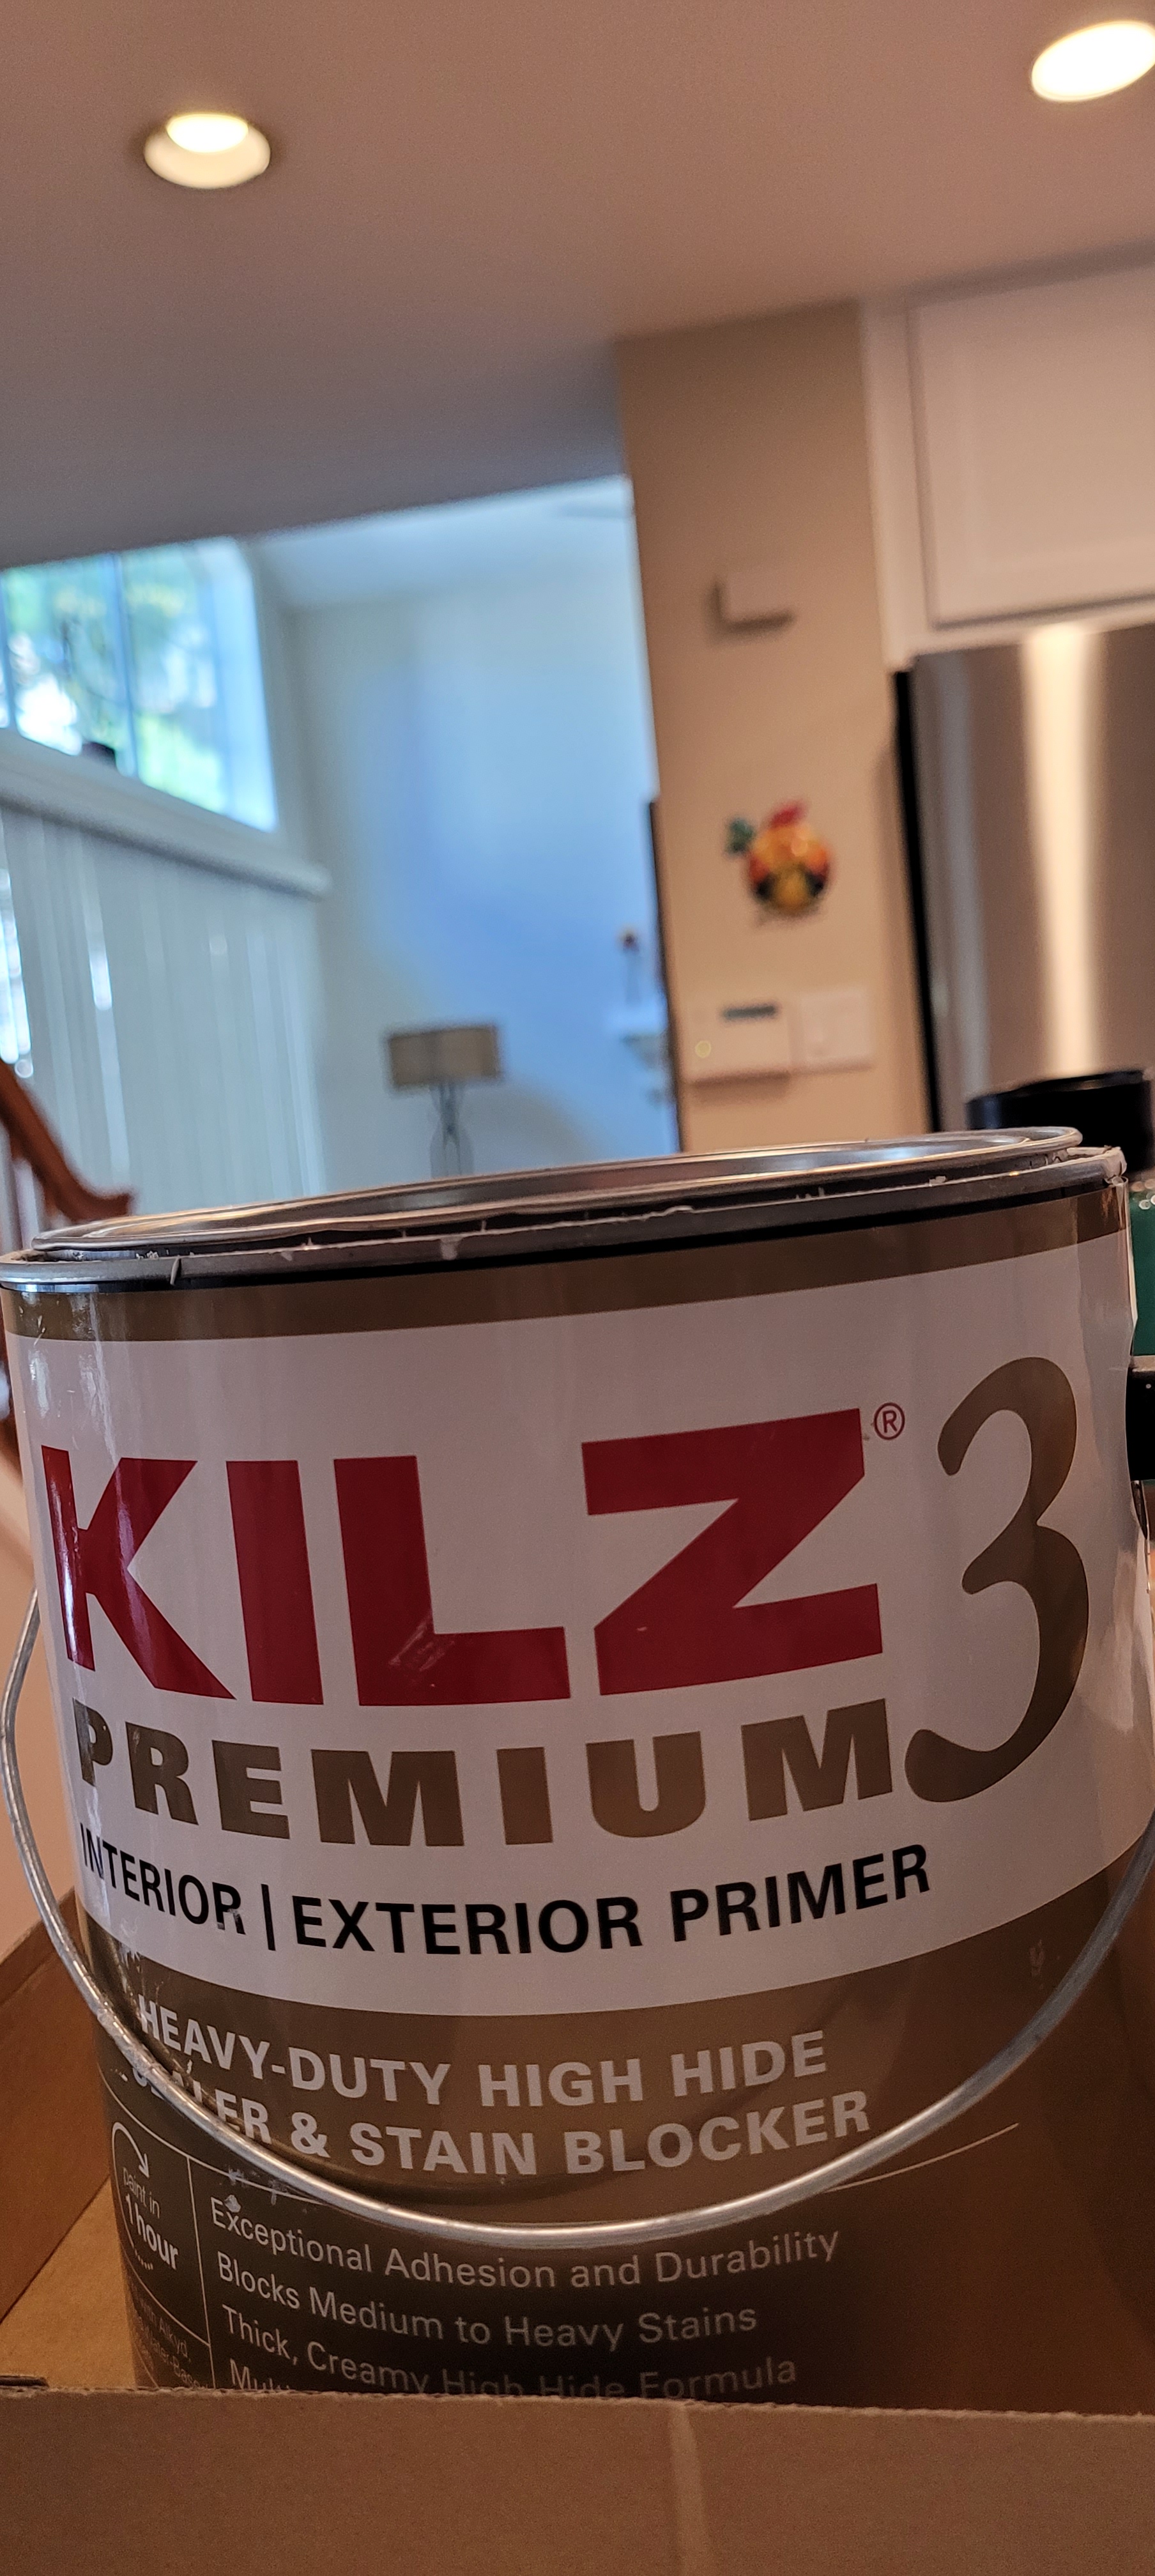
When the caulking trauma/drama was finally over and done with, we were able to apply the first coat of primer. Again, primer is necessary on bare drywall board, but it is also a must when you have applied wood filler, nail hole filler, and caulk — as those products can “flash” through to your finished wall. So, in an abundance of caution, we applied two full coats of Kilz 3 primer, sanding in between each coat for good adherence.
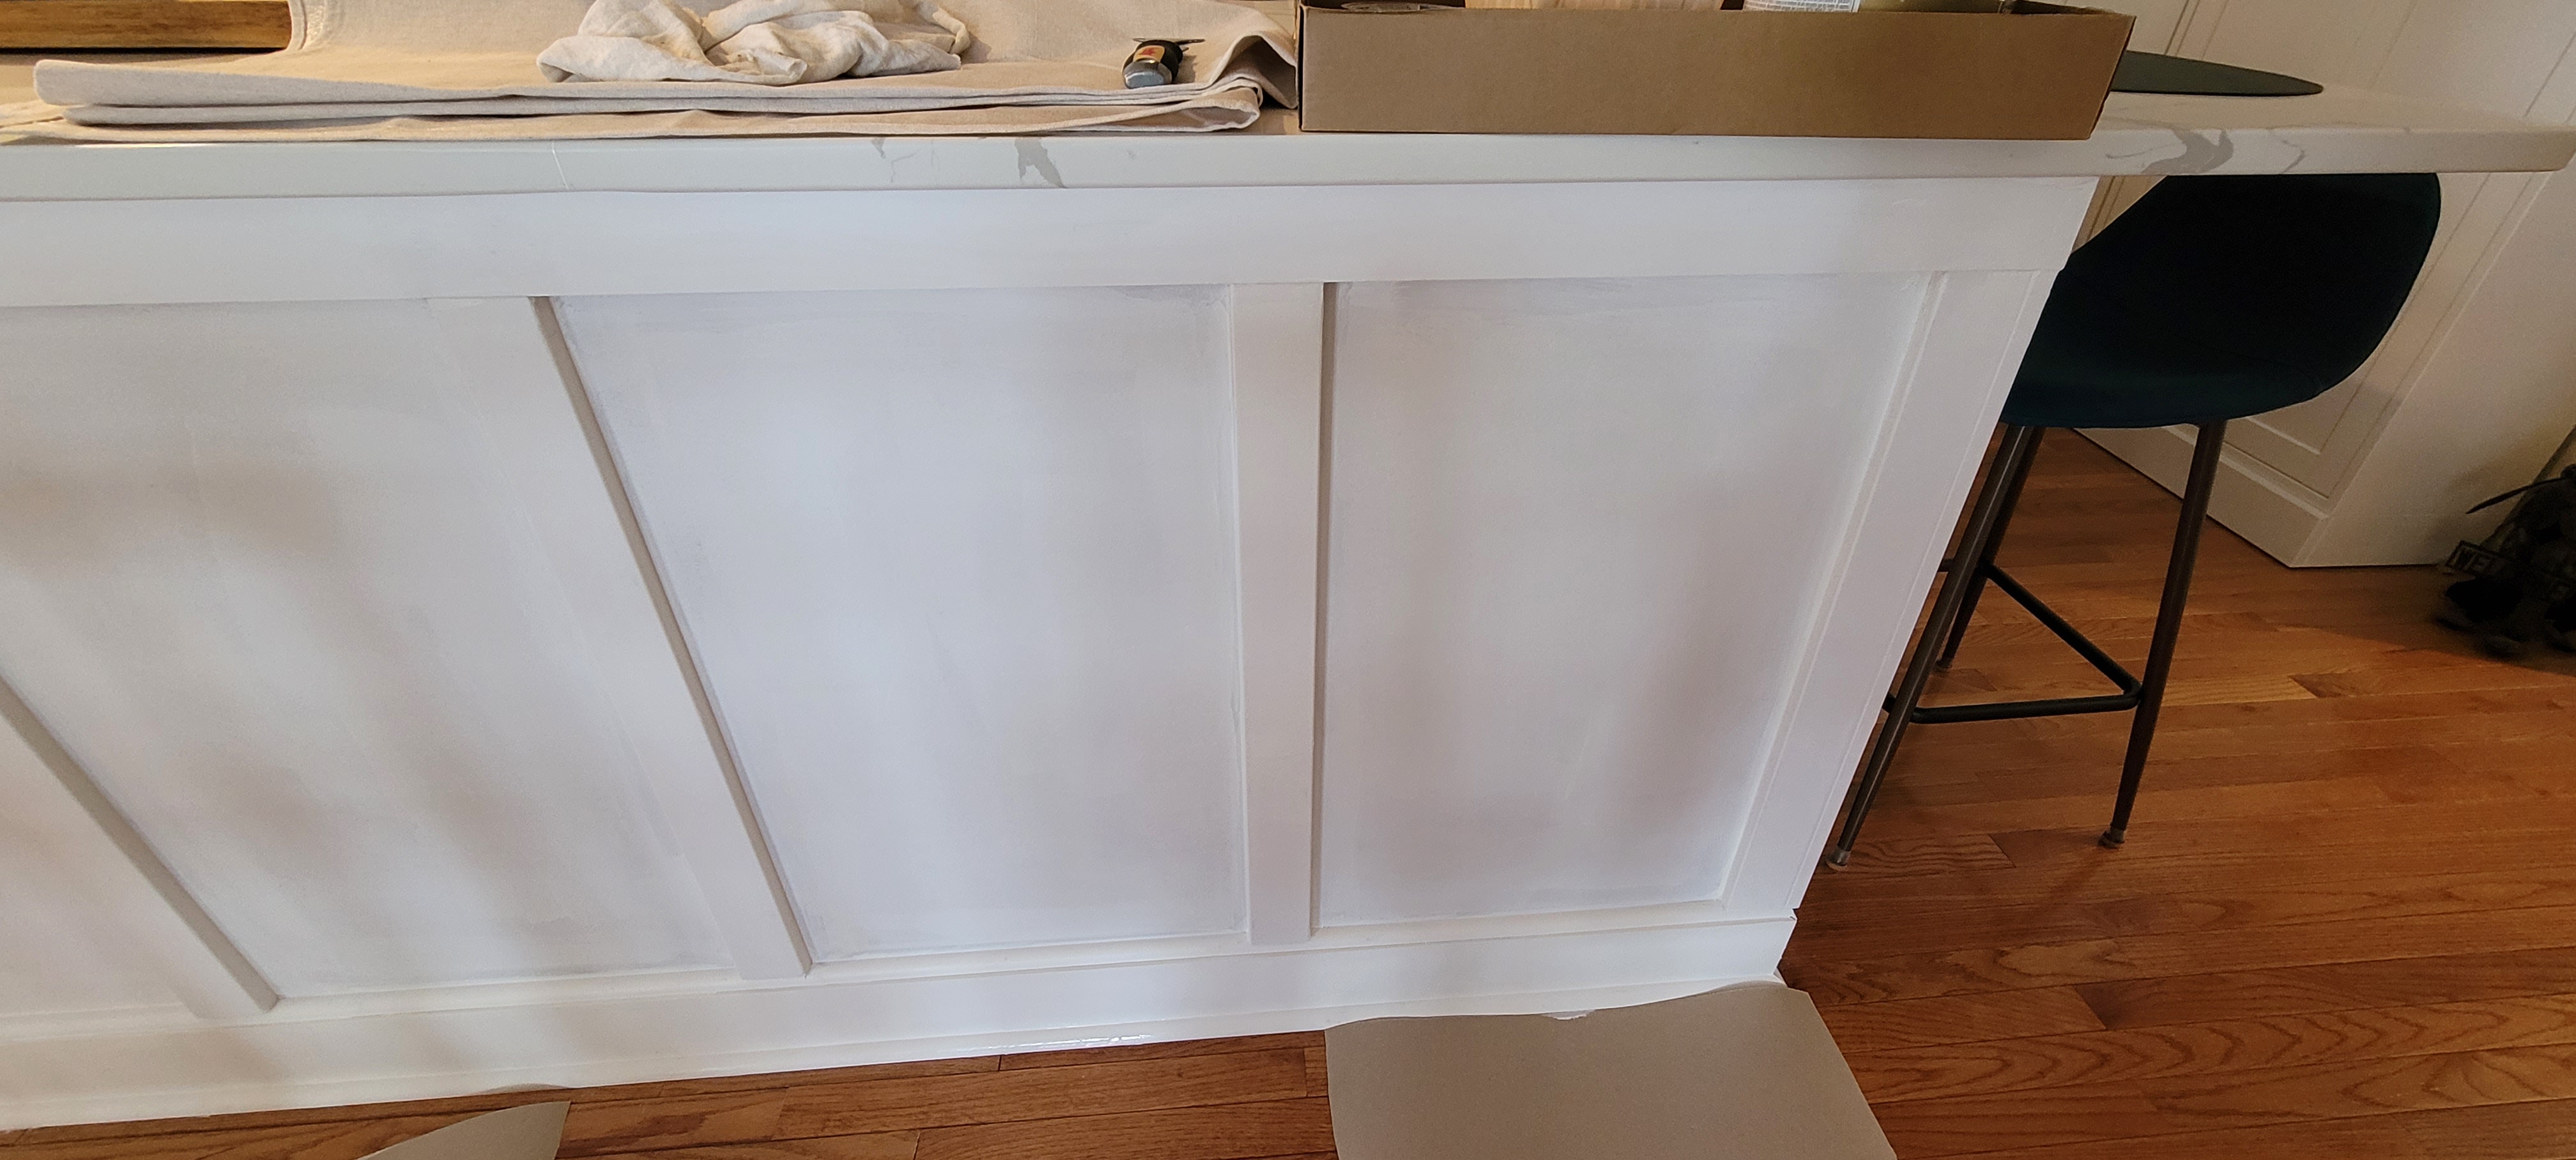
With priming behind us, we were able to start painting. FINALLY! We went with our whole house paint color (we have a complete open concept on our main floor, meaning that all the wall color is the same. Ours is Benjamin Moore’s Edgecomb Gray.) The big dilemma was which sheen to go with since we had decided to paint both the trim and the walls in the same color. Normally, our trim would be in a semi-gloss finish, but our walls have always been flat or matte. We decided to strike a pose right down the middle and went with a satin. It worked! Just enough shine to add some light and reflective value, but not enough to look weird.
We have never been lucky enough for one coat to do the job. But, were a little surprised to see that the second coat didn’t quite do the trick, either.
We waited a full four hours between coats (we think it is more durable when each coat has a chance to fully dry), and ended up, late last night, adding a third coat. Which was, indeed, the charm.
We still need to add some scribe to this baby on the end caps, and be gentle with it for the next four weeks (the prescribed “cure” time), but we are glad to have this major hurdle scaled and cleared!
Next up, this monster needs to get trimmed out, built in, primed, and painted. Story of our reno lives 🙂
It is true, we took a bit of a break. Life got in the way in the form of a surgery, job turmoil (looking at you, you fickle tech industry), a terrible flu, and a couple of weeks back in Ireland to restore, renew, and re-energize.
I’m not sure about the energized part, but with an 80%-done kitchen, over a year of hard labor in the books, and a wall still full of construction bits and bobs, we know it’s time to get on the stick and wrap this baby up.
Despite the overall break, we have been working, albeit slowly and hodgepodgey (yes, I would like credit for coining that word.)
A little dab here, a little dab there, and tiny bits of things are getting done. We’ll make one big push beginning in May, and if our timeline is right, and no more hurdles rise up, we should be posting some before and after pictures before the summer months arrive.
We thought board and batten was going to be a quick and easy (and entirely palatable) answer to our, “what to do with the outside wall of an 11 ft by nearly 9 ft island?” question. The palatable part was a no-brainer. After all, we have done this before and we’ve liked board and batten. And, better yet, as experienced board and batteners (!), we figured a good weekend would finish the job.
(Insert a big fat HA! to that grand plan.)
You’ll remember, here’s where we started:
Nothing went right on this task. The pony wall was crooked, there were so many waves and divots and seams that the correcting part can be fully blamed for our fleeing the country for a couple weeks. If we never have to do that again, it will be too soon. The correcting part, not the fleeing the country part…
But we did press on, and I believe in the last update, progress was made with laying the battens.
But then, as these projects so often do, we got stumped on a small thing. How to finish out the ends so that this doesn’t look like an amateur job. If I told you it took us weeks of contemplation and nailing one piece after another of finished molding before ripping it off and starting anew, you would think we were crazy. So, I won’t tell you that’s what we did…
We still need to add scribe after the painting is finished, but we settled on a simple and clean finish for the end pieces. We just couldn’t stomach the options any longer, figuring getting something done is better than getting nothing done and we can always rip it out down the road if we don’t like it.
But, the task that neither one of us enjoys is the wood filling and caulking. A necessary part for a clean, professional look, and given that we have a lot of bumps and divots, all the help we can get to smooth things out, is necessary.
So for the past two weeks, we have been nail-setting popped nails, wood-filling nail holes, caulking all of the seams (and there are many), and finally, sanding. Did I mention we sanded? We sanded and sanded and sanded.
Caulking those seams really makes a difference and now we are proceeding to the ridiculous looking, but equally necessary, task of closing our eyes and feeling up our island. The island may enjoy the process, but us? Not so much. Still, it helps us pinpoint exactly what still needs to be…sanded.
Next task is to prime the whole kit and caboodle. Twice, actually. That’s the easy part — although, every time I say, “that’s the easy part” that little voice inside says, “hold my beer…”
If it was not obvious, we took a wee little break from kitchen reno to have a think (and a drink). As sometimes happens, we need to get away from the day-to-day conundrum when we find ourselves paralyzed with indecision and downright panic!
What had us in delay-delay-delay mode were two issues: the open shelving disaster/dilemma and how to finish out a very nook-and-crannyish massive island (11 ft by 8.5 ft), so we did what all good DIY-ers do. We took a break and worked on something else.
Not for nothing, but long walks with the newest edition to our family, via our son, our beloved grand-pup, Teague, will cure whatever ails ya.
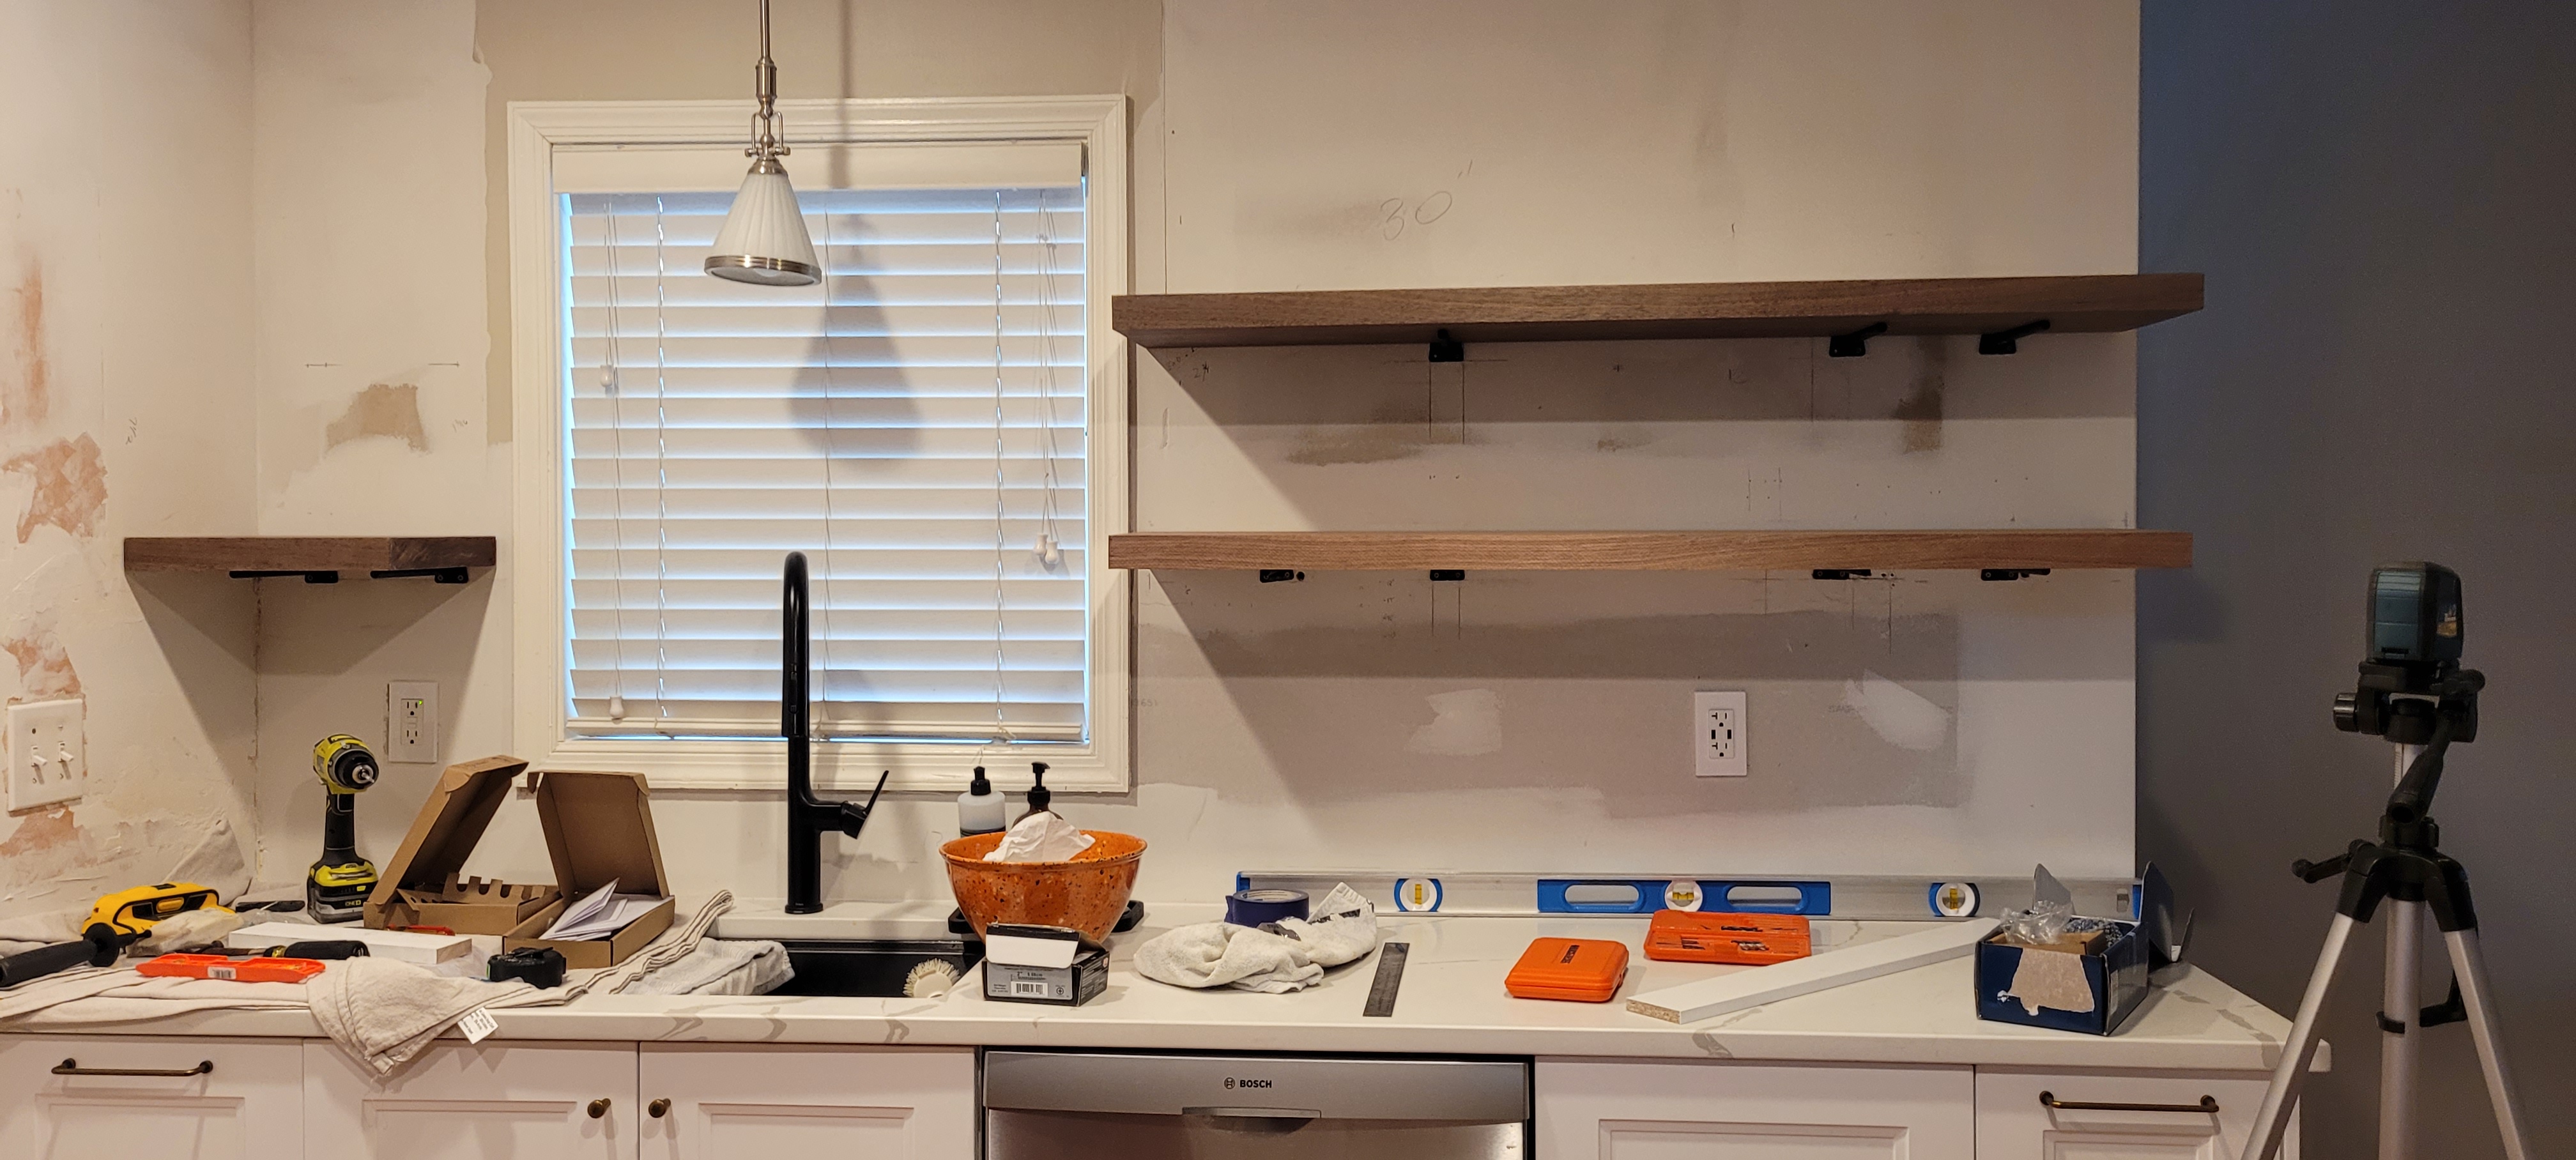
First, though, a quick overview of where things took a turn on the freaking shelving front.
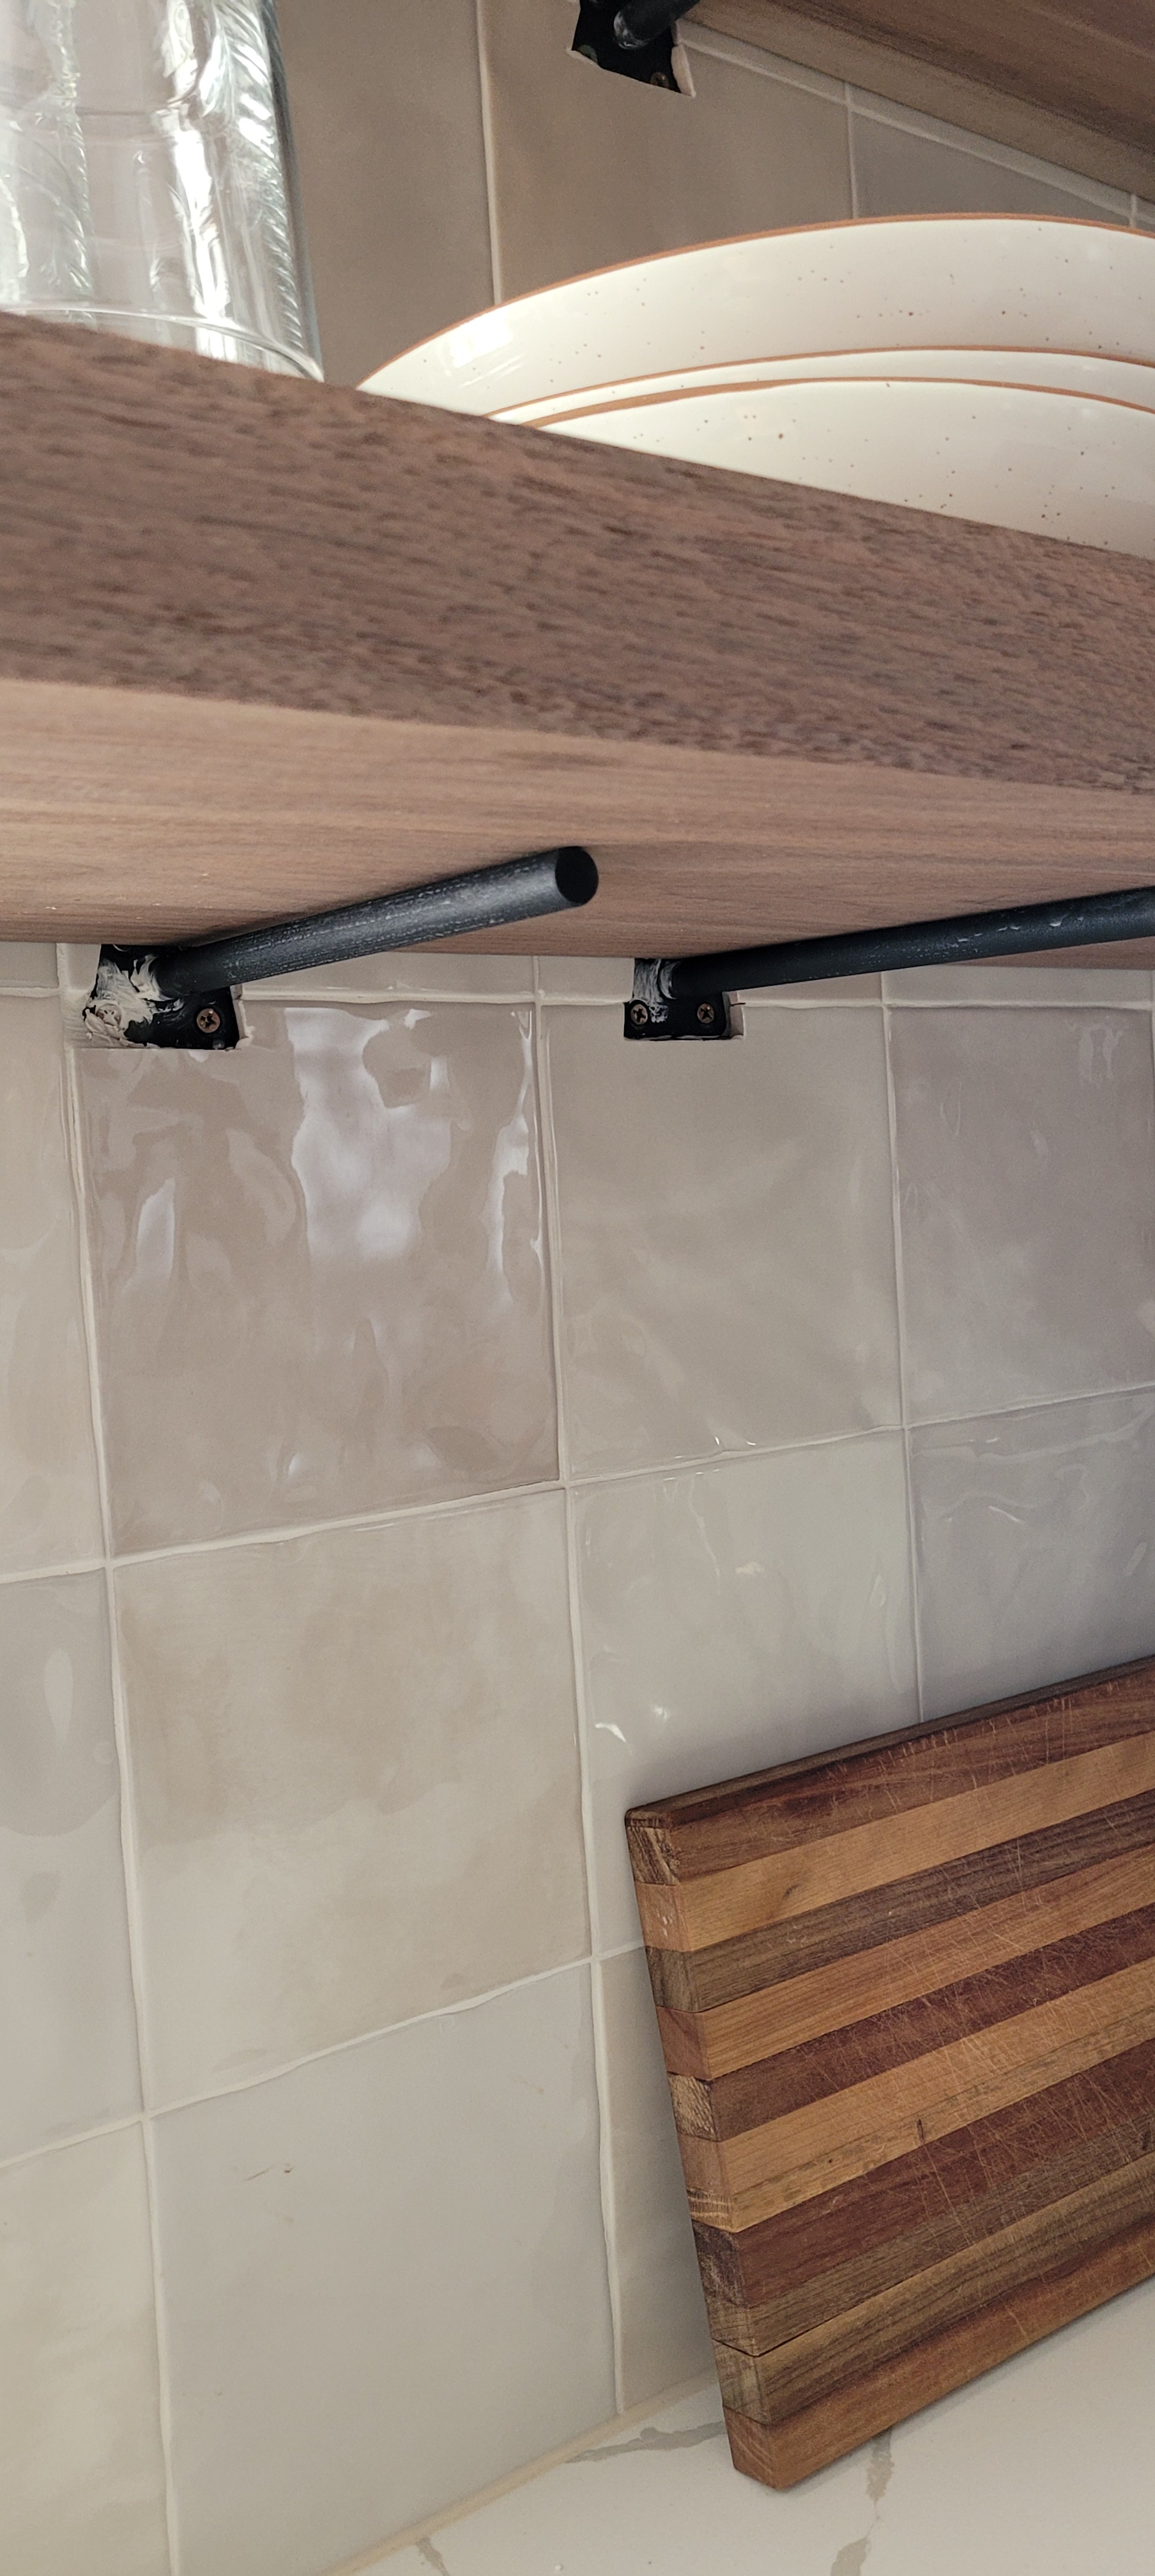
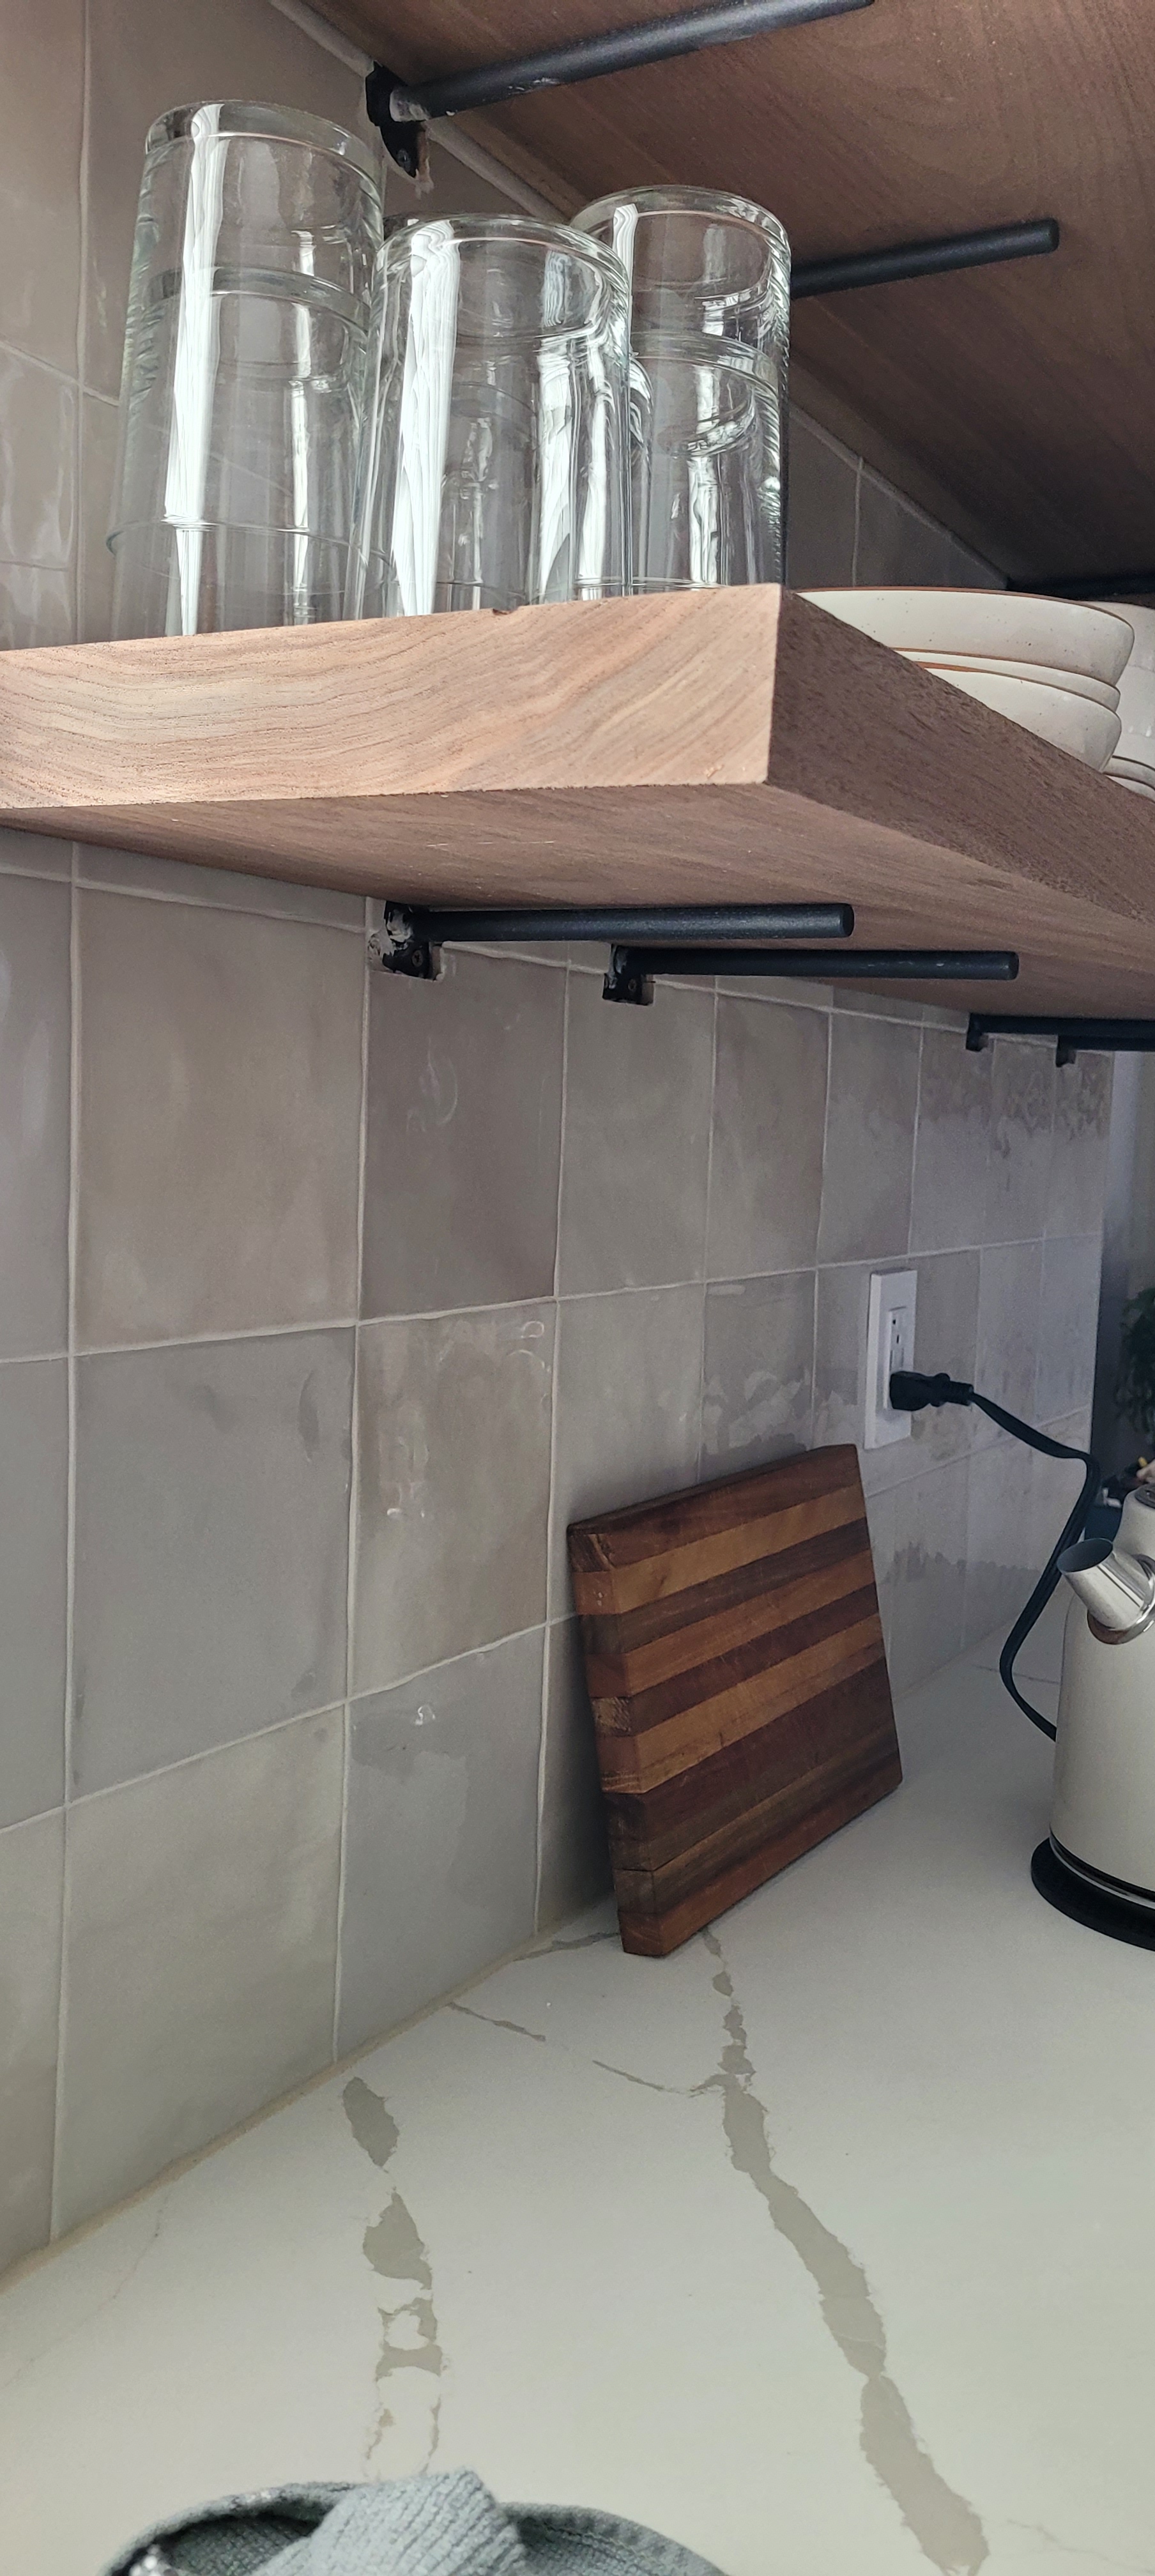
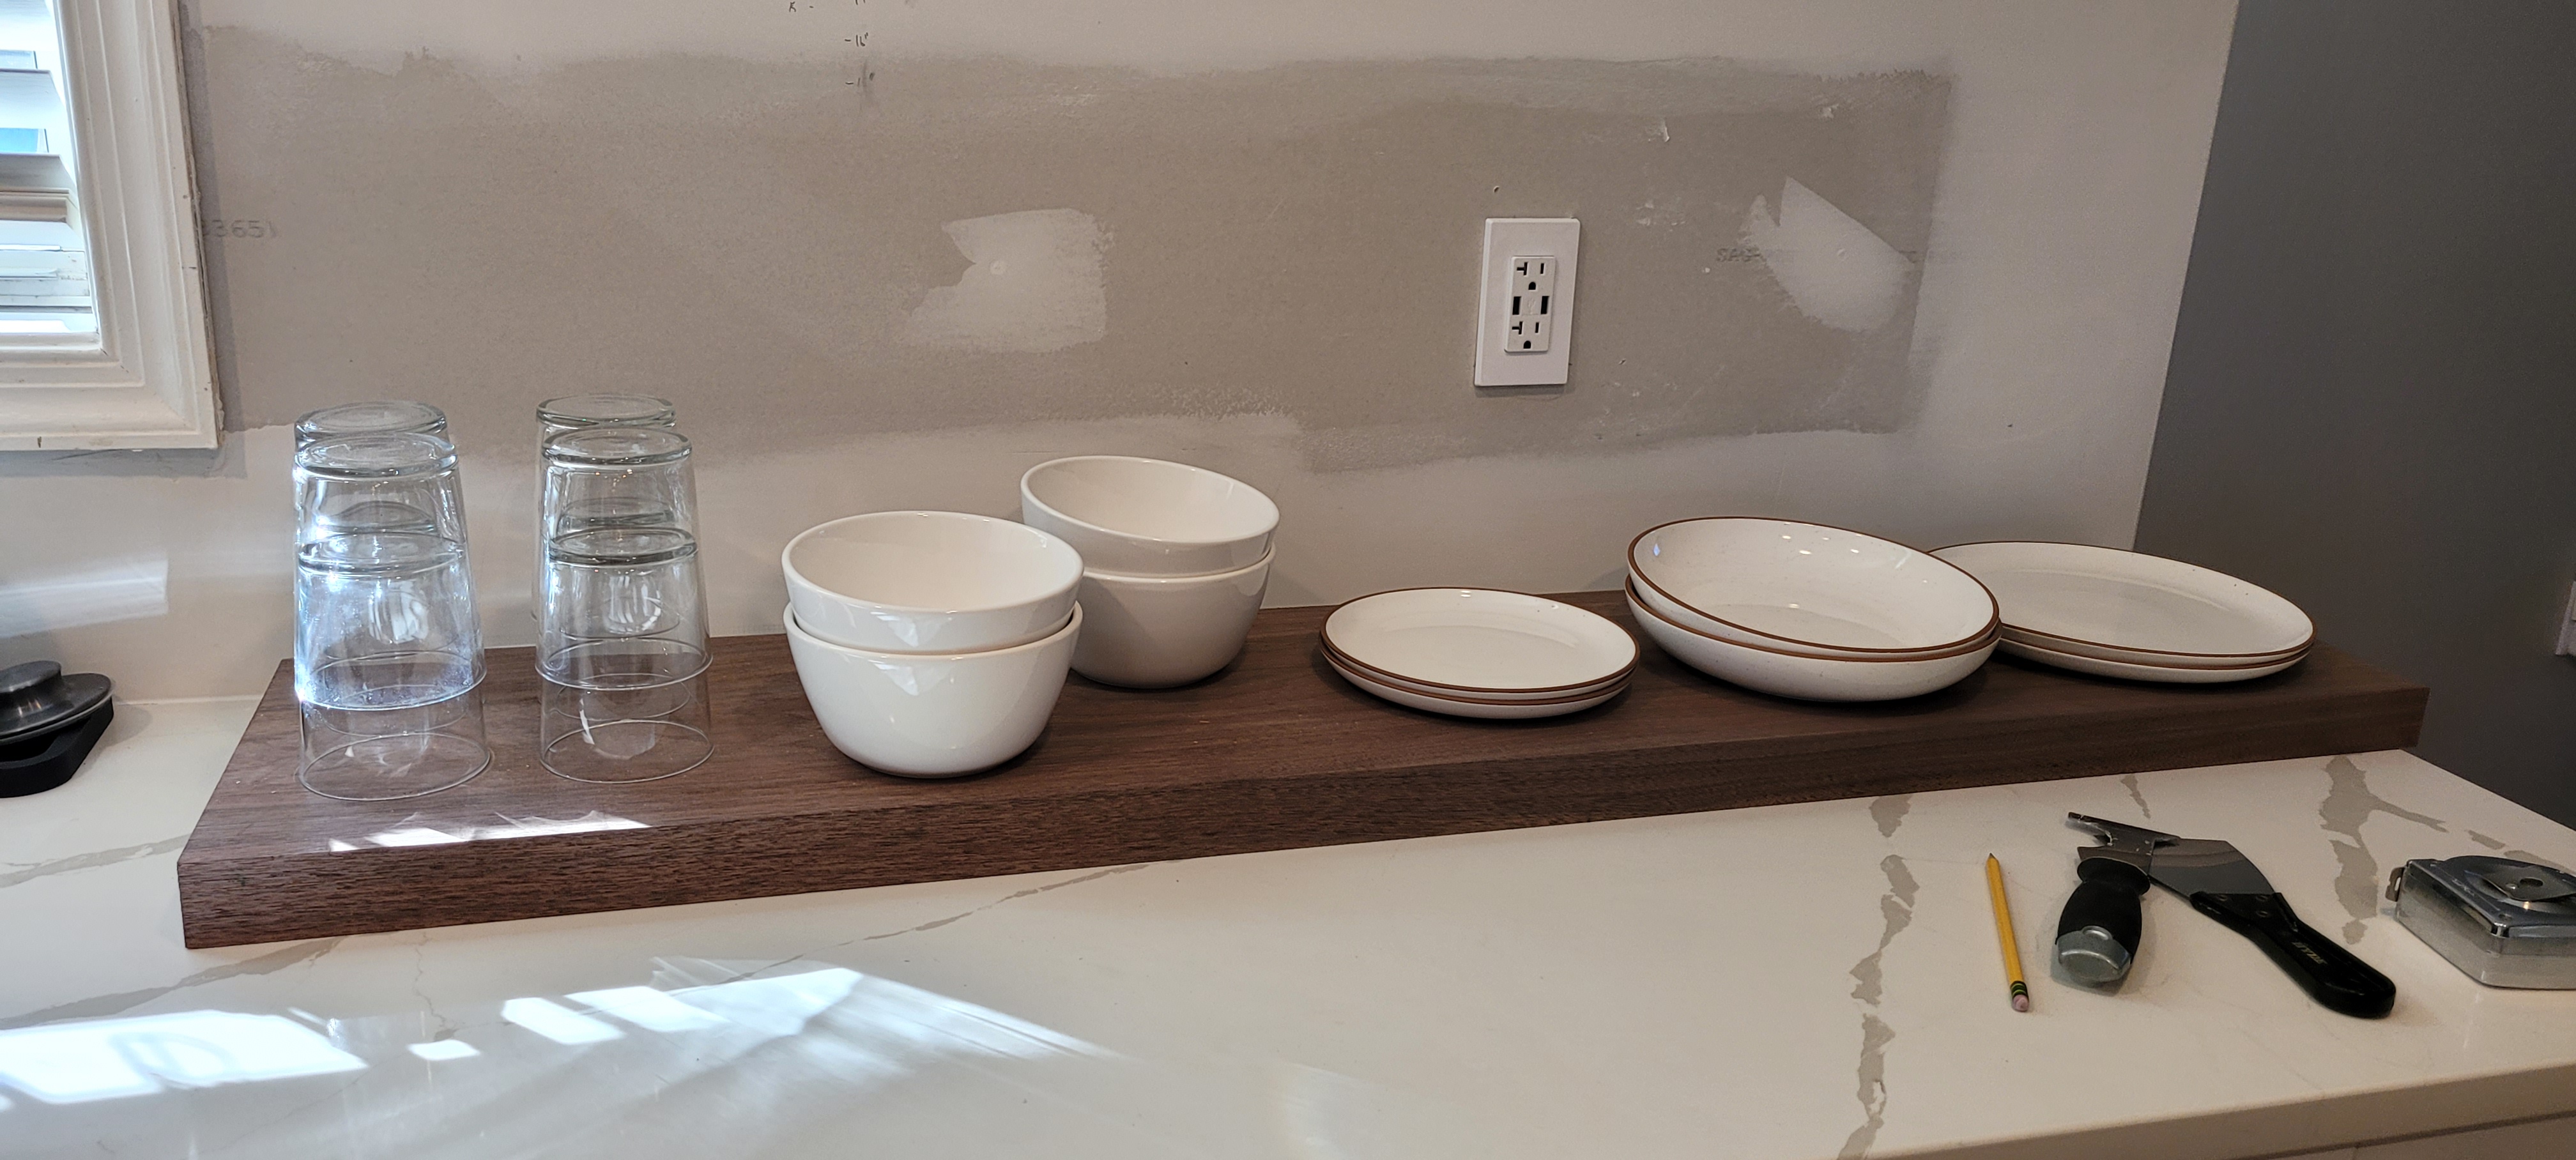
You’ll see in the photos below, the (VERY) hard walnut wood shelves are show-stopping gorgeous. But, the system that we chose, after exhaustive research (and reading every review possible), was causing problems for us and our gloriously new stacked tile wall.
The idea for these shelves was to drill holes in the back of them at the exact point where the protruding posts are, using the jig that the company sold us to make it easy. When all is said and done, the shelves would “seamlessly” slide onto the posts.
That did not happen.
We may not be the sharpest knives in the drawer, but we knew enough to practice on dummy shelving first. We know the posts are level, from one post to another, and even along their length, from front to back — dead level. Where we are running into a problem is that each one is angled ever-so-slightly to the left or right and that causes problems when one has drilled a straight, 90 degree hole.
The obvious choice is to drill the holes larger, to accommodate any annoying angles. We are going to try that before we move on to Plan D (or is it E — who knows, at this point?!) We also have purchased enough large-scale drills to build a small skyscraper.
After many late night conversations, tape measure pulls, and being attached to our level like it is an appendage, we have tabled the decision-making, for now. The shelves sitting on top of the posts provide the necessary storage to get on with our day, even if it also provides a bird’s eye view into how the open-shelving sausage is made.
Instead, we finished lots of caulking and we switched out all of our outlet and light switch covers to these nifty screwless rockers for a nice clean look. Screw-in outlets are so 2022, after all 🙂 We also installed an Alexa-enabled switch for our over-head pocket lighting, so we don’t have to walk around the entire island to turn the lights off or on. A major upgrade for us.
We also finished out all the base moulding in the kitchen and island. That is an easy, but time-consuming task, so glad to have it behind us.
Eagle eyes will be able to see how we resolved the island trim issues in the photo above (and, if you are really on top of things, the title of this post might have given you a clue, too!)
We had always assumed we would do box trim on the island. But, there are so many bump-outs and angles that it was becoming waaaaay too busy and psychedelic for our taste. Instead, we opted for…you guessed it…a much simpler hybrid board-and-batten trim that looks way better than the box trim. Less fussy, more in keeping with the clean style of the kitchen and dining room, and the rest of the house, as well.
So, this week, we are priming everything and then we’ll get to painting the island and finishing up the toe kick on all the trim. And with that, the entire island will be FINISHED.
Following that mini-milestone, we go on holiday for a week. Anything to get out of making some decisions on those stinkin’ shelves, I tell ya.
With apologies to Frank, we thought the lyrics to “My Way” sum up perfectly the frustrating situation in which we currently find ourselves in this kitchen renovation. Forgive the alteration…
Regrets, we’ve had a few (and some mistakes, too) But then again, too few to mention (oh, I think this multi-worded blog post would beg to differ) We did what we had to do (or paid someone else — looking at you ceiling paint) And saw it through without exemption
We planned each charted course (sometimes) Each careful step along the byway And more, much more than this We did it (sort of) our way
Yes, there were times, I’m sure you knew When we bit off more than we could chew (hello floor removal) But through it all, when there was doubt We ate it up and spit it out (or wept ourselves silly) We faced it all and we stood tall (and also curled in a ball) And did it our way
In case this sounds like the big reveal of our brand spanking new kitchen, keep your powder dry because we have miles to go before we put this thing to bed.
We are in a brain freeze/holding pattern/pulling-hair-out/counter-head-bang conundrum with these d-a-m-n floating shelves. More on that later — maybe the hivemind out there can come up with some suggestions for how we might solve this debacle because we are fearful all that pretty tile may be a thing of the past if we do not figure this out.
For now, though, it might be fun (ha!) to revisit some of the regrets we have — we always have an “I wish we woulda done this” list and this project is no exception.
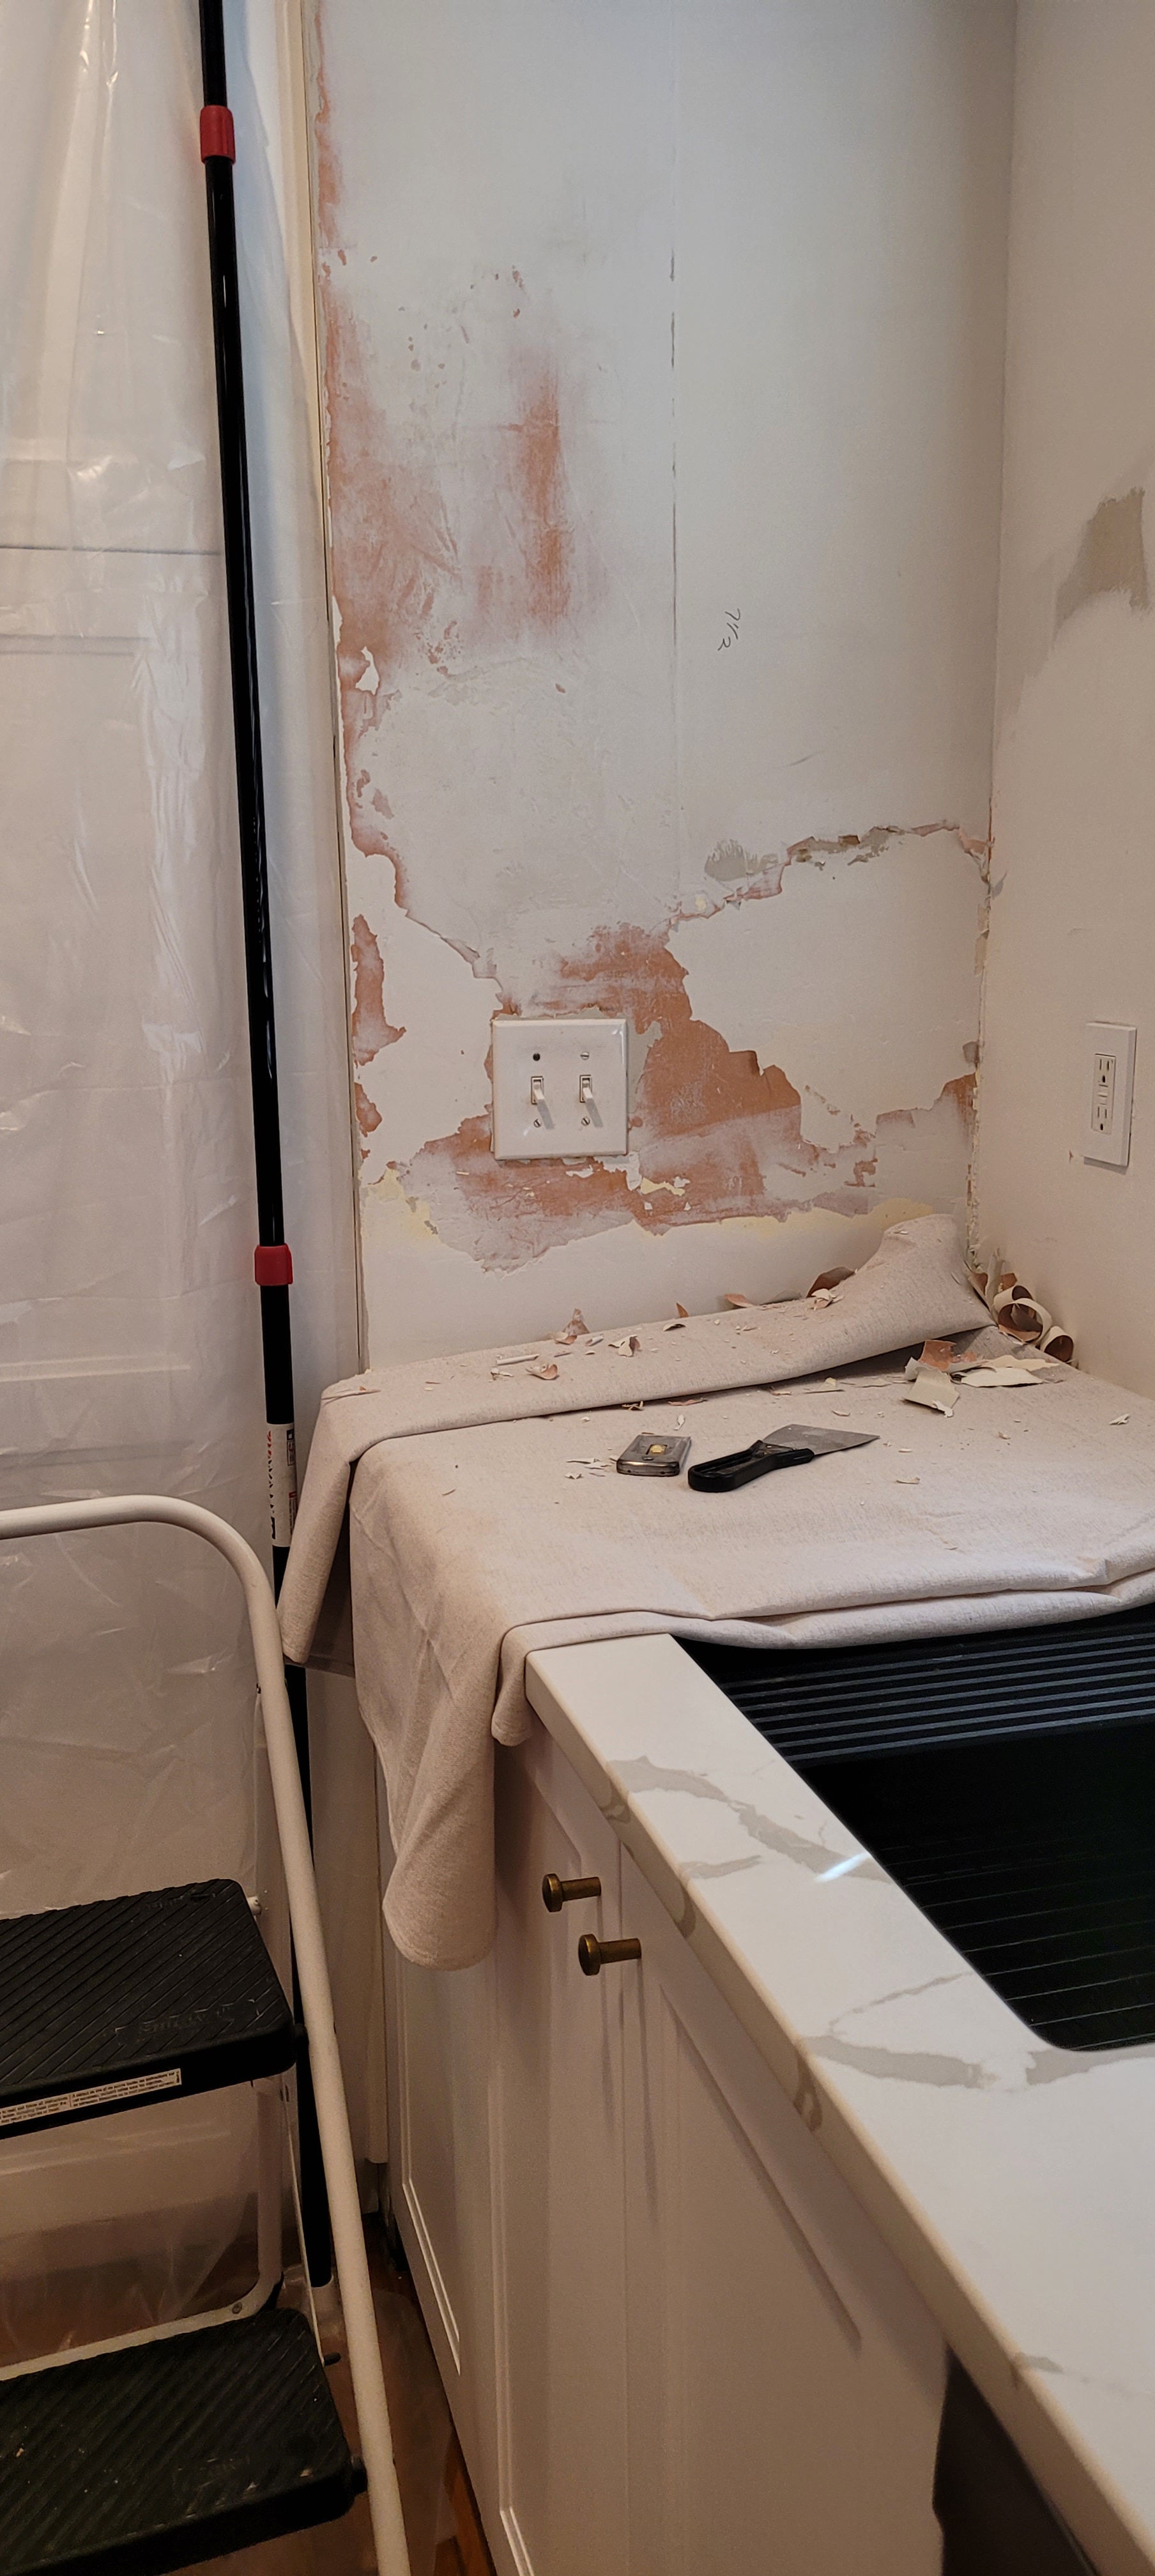
When we had the tile installed, there were gaps between the tile and the wall on the visible side of the Schluter edge. We thought the tile guy would have taken care of it, but the tile guy said that was the paint guy’s job. Little did he know, we were the paint guy! So, while we wait for our brain cells to kick into high shelf-installing gear, I’m in caulking mode. Below the countertop will go some scribe for those big gaps, but the rest has to be caulked. So much caulking.
2) The range hood. We wished we would have hung our fancy-schmancy range hood ourselves. Granted, it is an unusual piece of equipment that came all the way from Italy (those wacky Italians) and the reason we love it is because it looks like an art installation. We needed a range hood — venting to the outside presented a sturdy challenge, permits, and an HOA approval.
A ceiling vent was our first choice, but the rafters and support beams in the ceiling meant framing it in just the right place would be difficult and chancy. When we saw this Futuro Futuro (it’s so nice, they named it twice!) we fell in love with the unique look and were sold when we learned the filter needed changed once every five year (five years!) and pendant lighting, to boot.
Anyway, upon installation the contractor got lost in all the cables and cords that make up the art installation part of the thing, criss-crossing cables, marring our brand-new ceiling and hanging the damn thing an inch off center. We will be fixing it ourselves, but we ain’t happy about it.
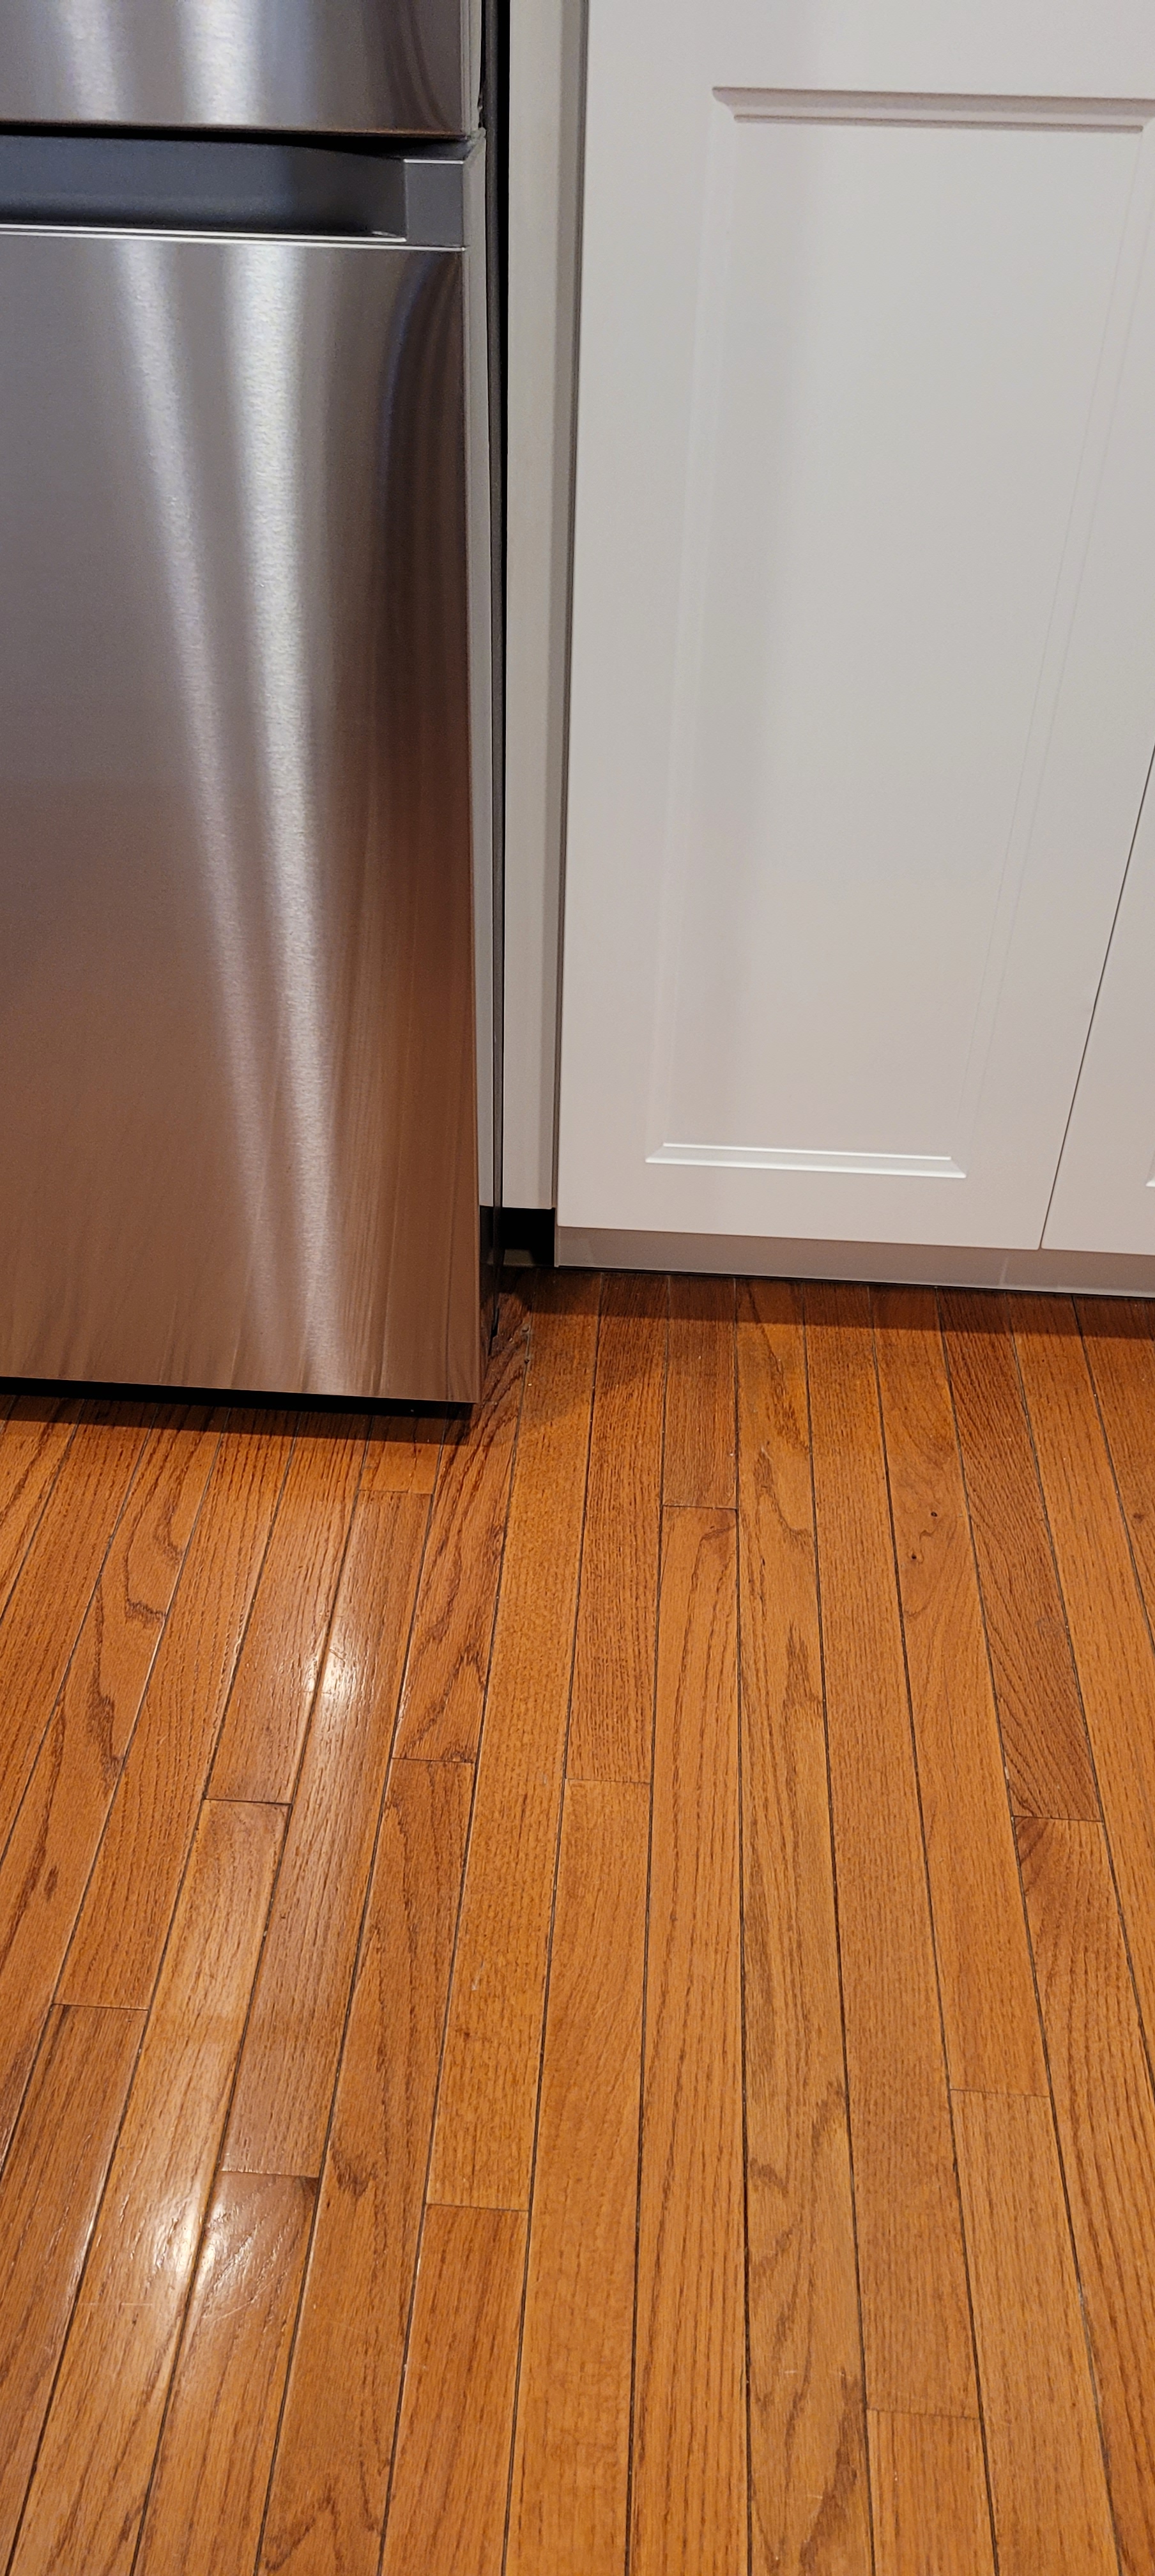
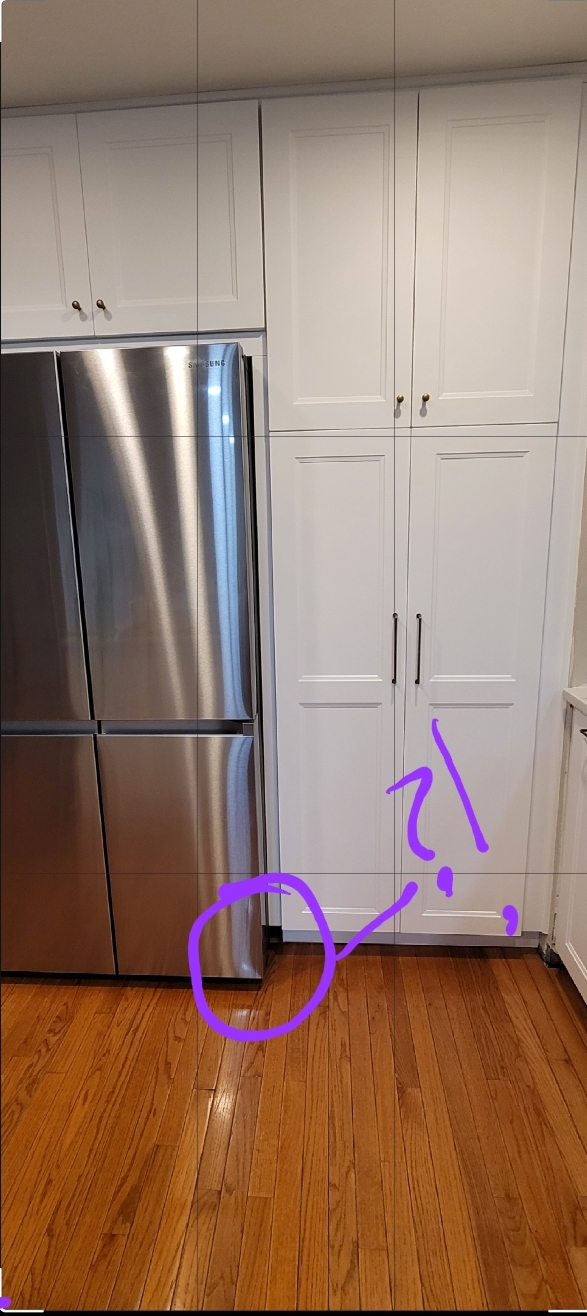
3) The pantry wall. We were on site every single day. If you have been through a renovation with a contractor, you know the questions come at you fast and furious. And what you get when you think things are obvious and need no explanation (the fridge center seam should align with the upper cabinet seam!) is this:
Yes, we will be taking out the pantry wall cabinets for repositioning and redoing the trim, but we aren’t happy about that, either.
Could we go back to the contractor for a redo? Yes, but it is complicated by the fact that the same people will be doing the re-work and they thought this looked just fine.
Let me say, we have worked with this contractor before, several times, and would do so again, in a heartbeat. They got way more right than wrong. The important bits are done correctly and to code (plumbing and electrical). It is just the aesthetics that graced the wrong side of the goal-posts and we knew better than to leave that part up to someone else.
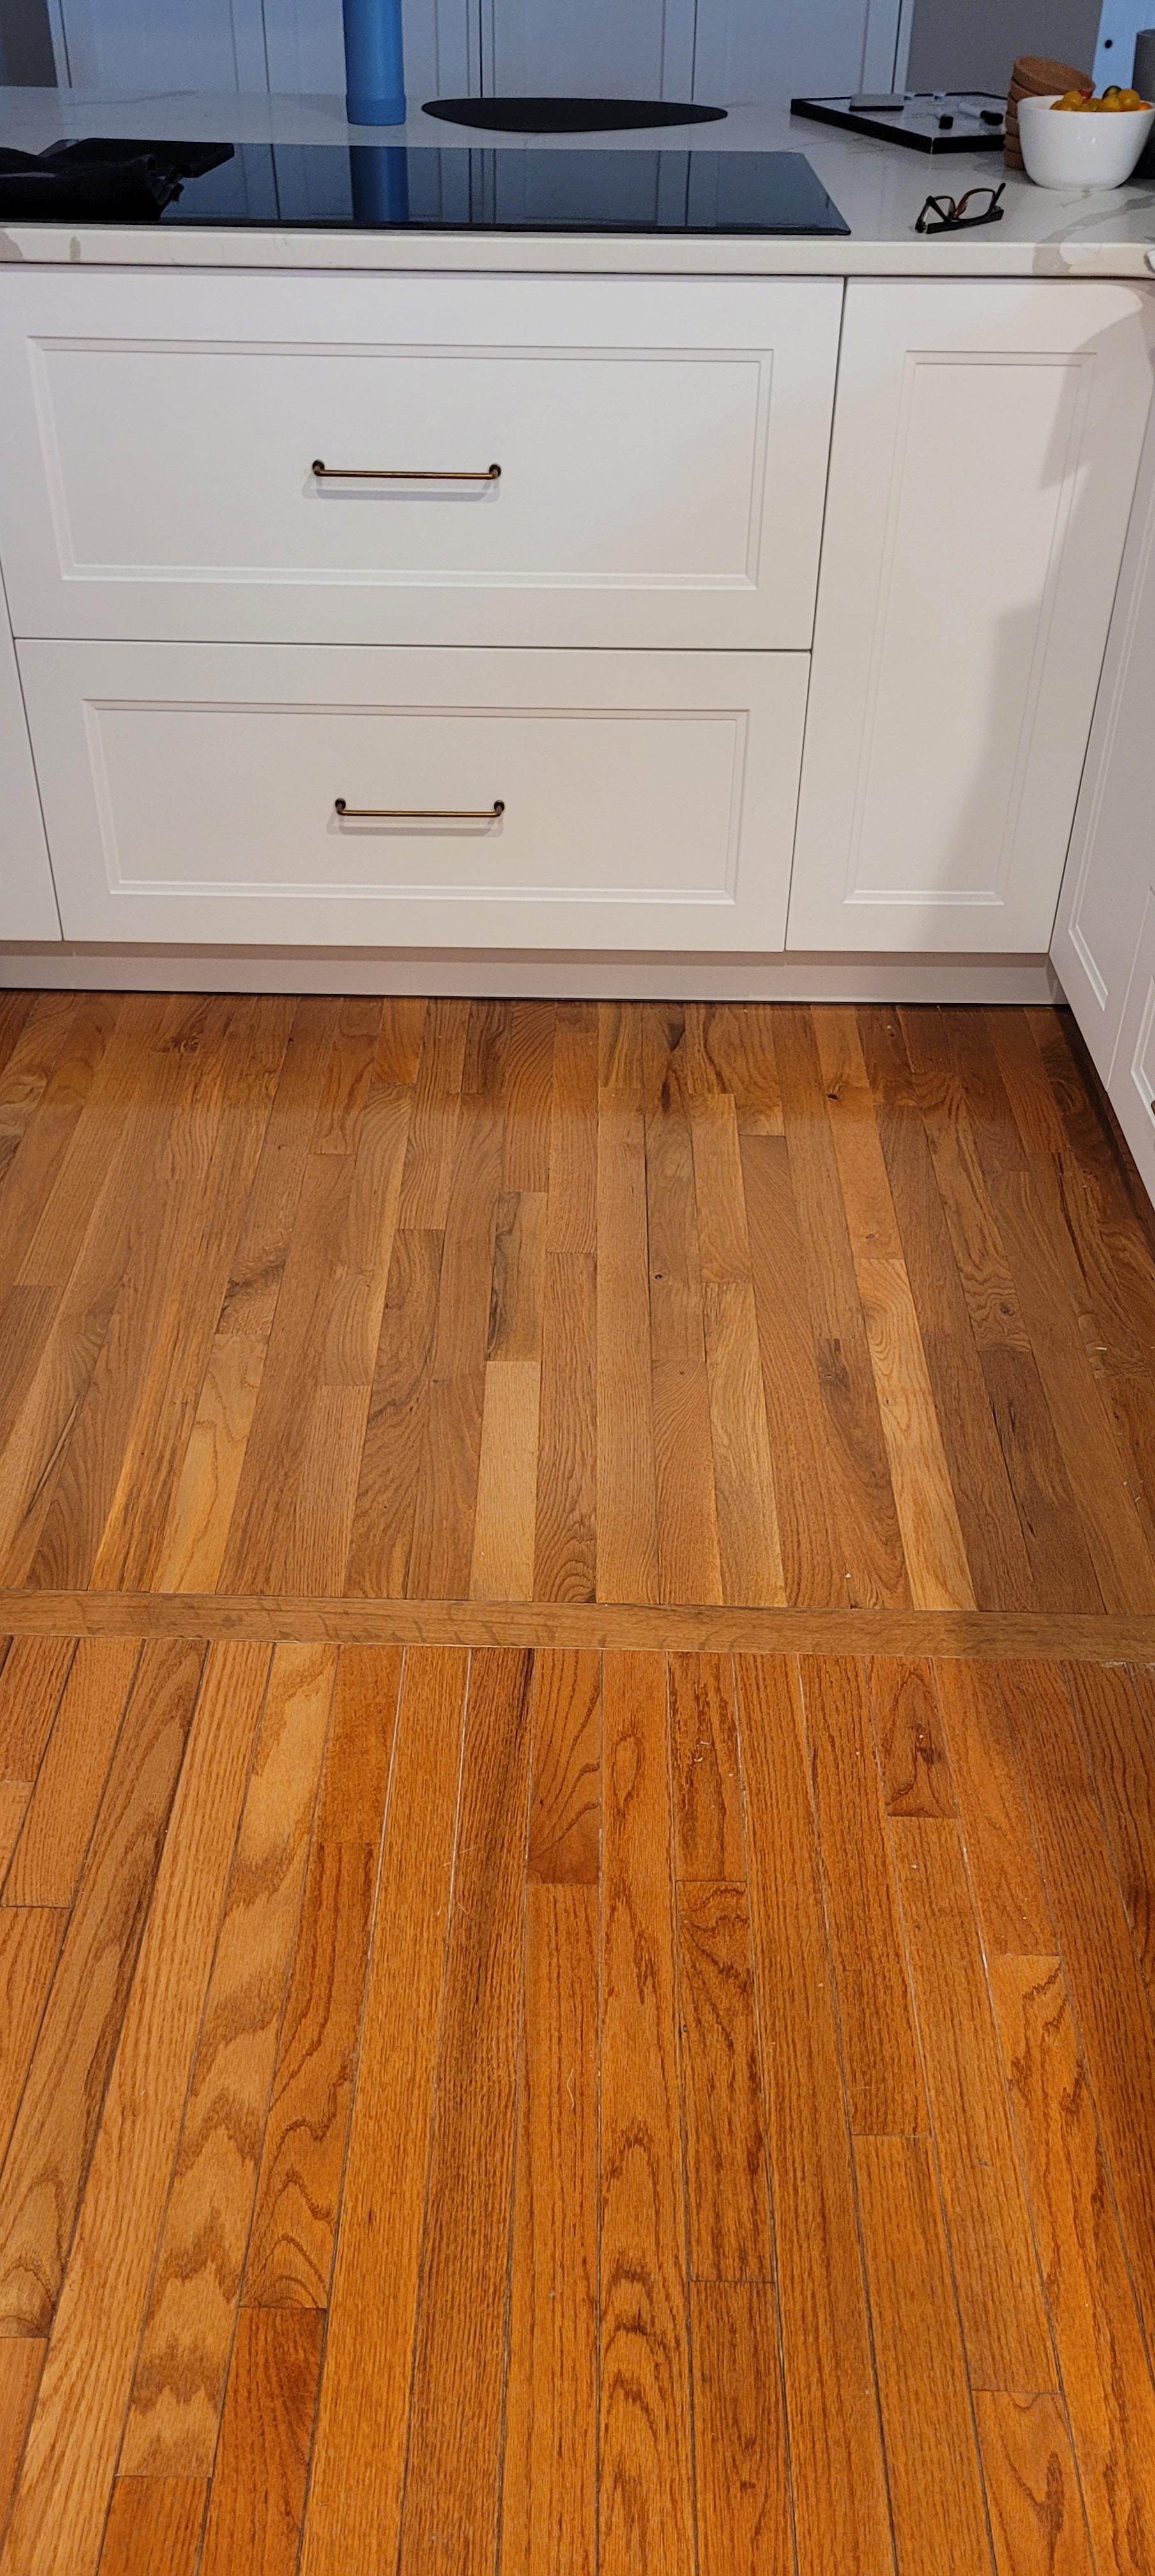
4) The floor. This one is all on us. We had to go back 28 years to get the original model name/number for our current flooring. Would we have liked to have changed the oak floors to something else? Yes, but with an open-concept main floor and the same hardwoods throughout all three levels, that was a big budget NOPE. We needed to replace the hardwoods we removed from the dining room with the same make/model in the new kitchen since we would be marrying the two floors together.
Thus began the detective dance. We finally found Bruce Oak hardwoods in Butterscotch (weirdly not ‘Gunstock’ as most of the other homes in our neighborhood used.)
We waited a long time for the wood to arrive and when it did, we brought the boxes into the house to acclimate. We doublechecked the model number and color code on each and every box.
You know what we didn’t do? We didn’t open any of the boxes ahead of time to look at a dang piece of wood. In fact, it never even occurred to us that the color would be so dramatically different even though it is the same product.
On that fateful day, with flooring guys in their knee pads looking to us to make a spur-of-the-moment call on what to do, we asked them to lay as much of the brand new flooring under the island as possible (sigh.)
Insult to injury came when they said they could not “lace” the two floors together. I think it coulda been done and I regret not nudging a little more forcefully. I can only say we were still in shock at seeing the two different colors side by side to pay much attention to the HORI-FLIPPING-ZONTAL line that is now in the galley part of our kitchen.
It is not impossible to fix, but I’ve ordered a swanky washable runner that will look lovely in the meantime. That will have to do, peanut, that will have to do.
None of the above regrets are irreversible, but all will take a little sweat equity to fix.
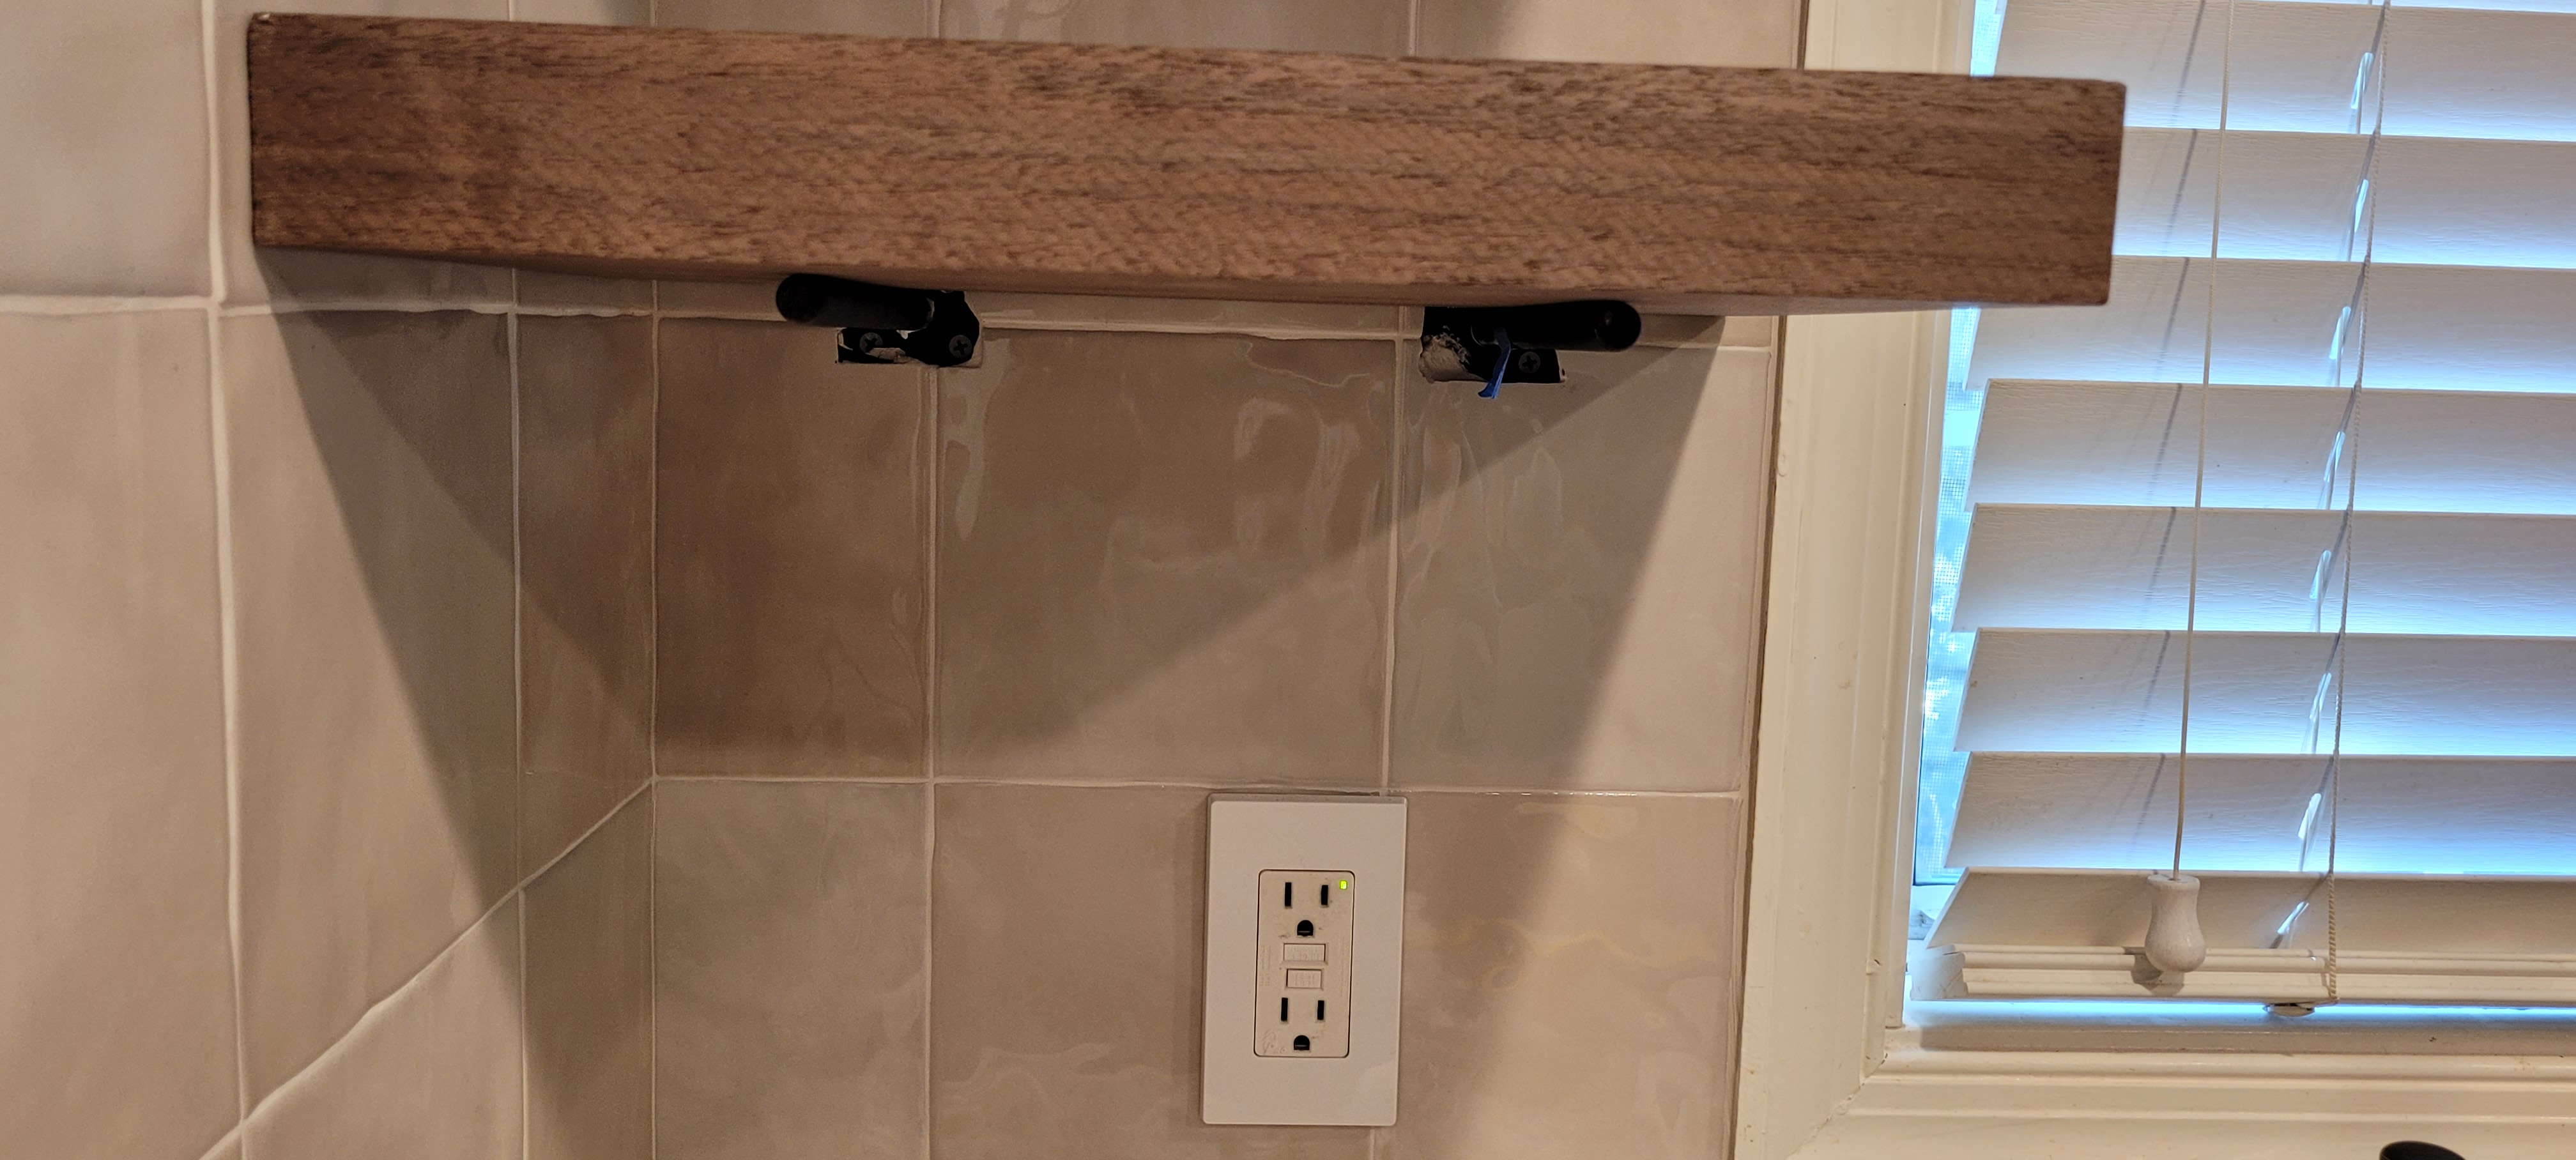
The shelves are a whole different story and deserve their own feature post titled BIG FAT FLIPPING FLOATING SHELF HEADACHE.
The short version — we installed the posts onto which the shelves will slide before the tile was installed. That was smart — everyone said so, from the post-seller guy (?!), to the gazillions of pros we peppered with questions.
The posts that went in were as level as the day is long. The tilers tiled around them and we were to do the next part — drilling the holes in the back of our 2.5″ shelves — on our own. It was supposed to be time-consuming, but easy, especially since we purchased a drilling jig from the same post-making company. We (smartly) used a scrap piece of wood first to practice.
The holes, even with the jig, are not straight enough to slide onto the posts. Or maybe the posts aren’t straight enough to slide into the holes. Either way, nothing is sliding anywhere.
We thought hard, and came up with what we thought was an ingenious fix — making the holes a little bit larger to accommodate any crookedness from the posts. Hard NOPE.
And worse, the larger drill bit wasn’t long enough to go 8″ into our 11″ shelves. So, we ordered an extender for the drill bit. But the extender didn’t fit our drill.
Now we are in the process of ordering our third drill bit and our fears are growing that we may have to damage our brand new tile to reposition the posts or just scrap the ‘hole’ kit and kaboodle, and start fresh.
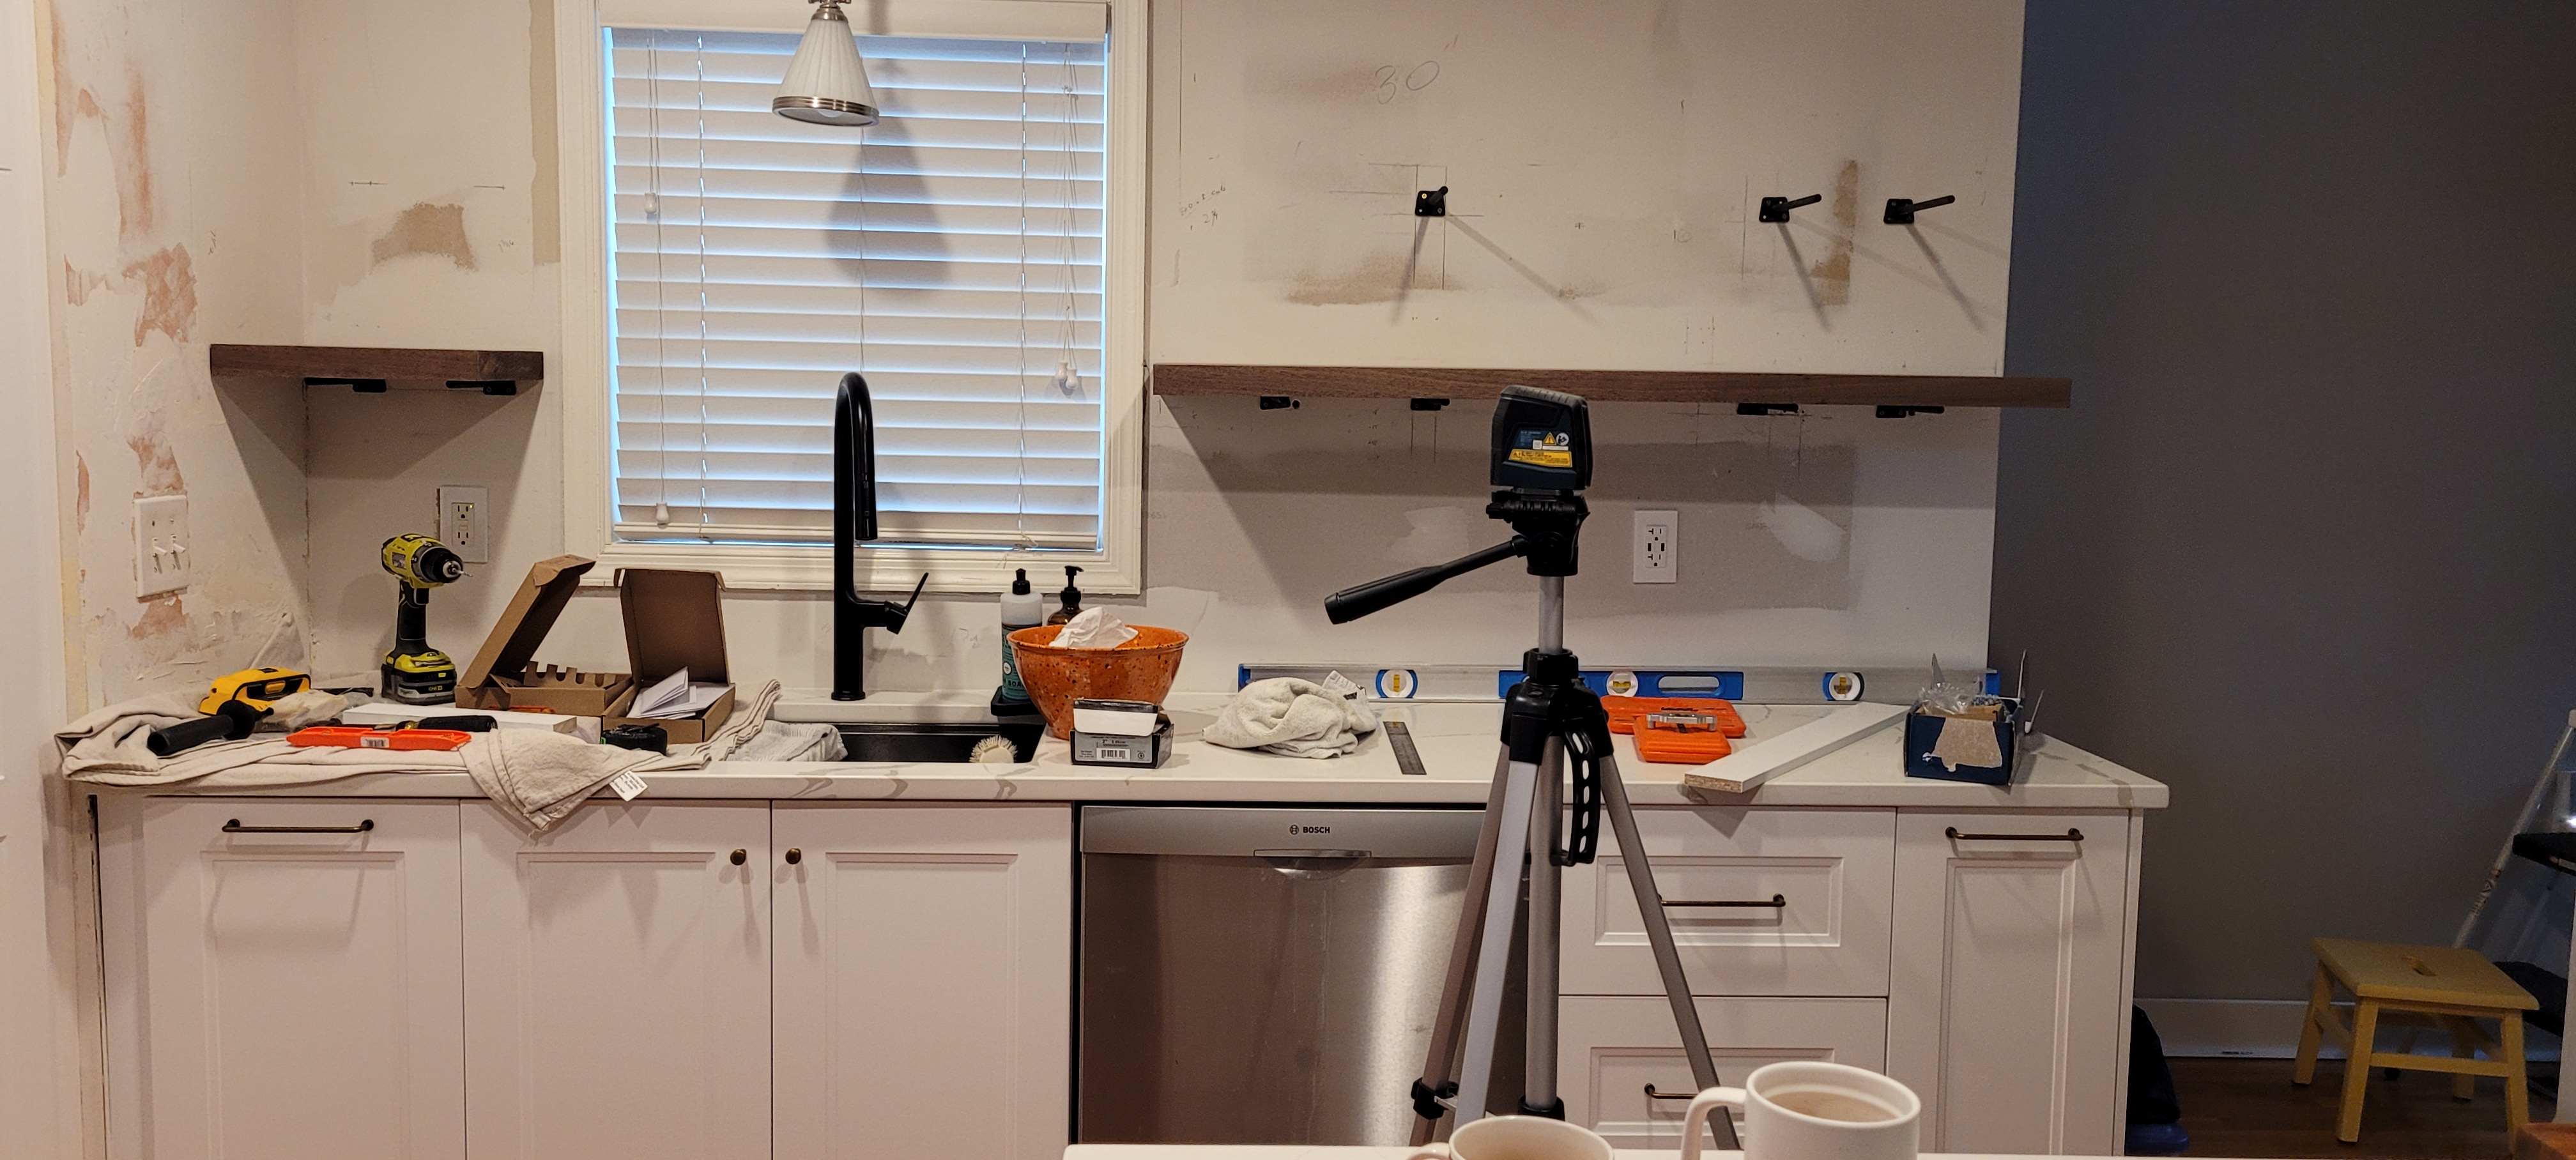
With the happy interruption of a pup visit from the cutest puppy ever, we are now scrambling to get the posts for the floating shelves installed before the tile guy comes early this week. With Andrew’s help, they were able to get three out of four posts installed with the last destined to be up by the time the Cowboys lose later today.
There is absolutely no room for error (on the shelf installation — the Cowboys are another story — also, Fly Eagles Fly!), so the amount of measuring devices currently littering our counters could land a space shuttle.
The next terrifying step is to drill holes in our precious walnut wood in exactly the right spots so that they slide seamlessly onto the posts, hence the floating shelf effect. Except that these are going to be strong enough to hold an overweight fullback during the off season.
Once the tiling goes on, we’re going to start taking down the pantry wall trim that the contractor installed incorrectly and doing it right. Yay
A big kitchen update covering a lot of ground ahead. We can finally see the light at the end of the tunnel, but it is the size of a pin head. We think we should be much farther along, but we keep running into unexpected issues that were not on our bingo card.
We are not novices to DIY or home renovation, and we were really hands on with our contractor — I like to think in a not-very-annoying way, probably because we sorta/kinda understand the complexity of some of our requests and we really appreciate our contractor allowing us to do some of the reno ourselves to reduce our costs. In doing the budget, now over a year ago, and talking with our contractor about what itemized projects within the kitchen reno would cost if we had his crew do them, we estimate, overall, by doing some of the stuff ourselves, we have saved somewhere in the neighborhood of $20,000. Not chump change, for sure, but if you count time as money, that savings goes way down, of course. Still, in a large kitchen reno, one that tripled the footprint, we were able to apply those savings to premium appliances and custom tile and trim work.
First, the good stuff:
After a week of meticulous measuring and hole-drilling trepidation, THE CABINET HARDWARE IS FINALLY INSTALLED and it is straight as an arrow. Of all the things, these old-soul beauties have to be our favorite, even if the installation of 23 handles took years off our lives. It was one of those jobs we just had to do ourselves and, although it took forever-and-a-day, totally worth it to have it done and dusted perfectly.
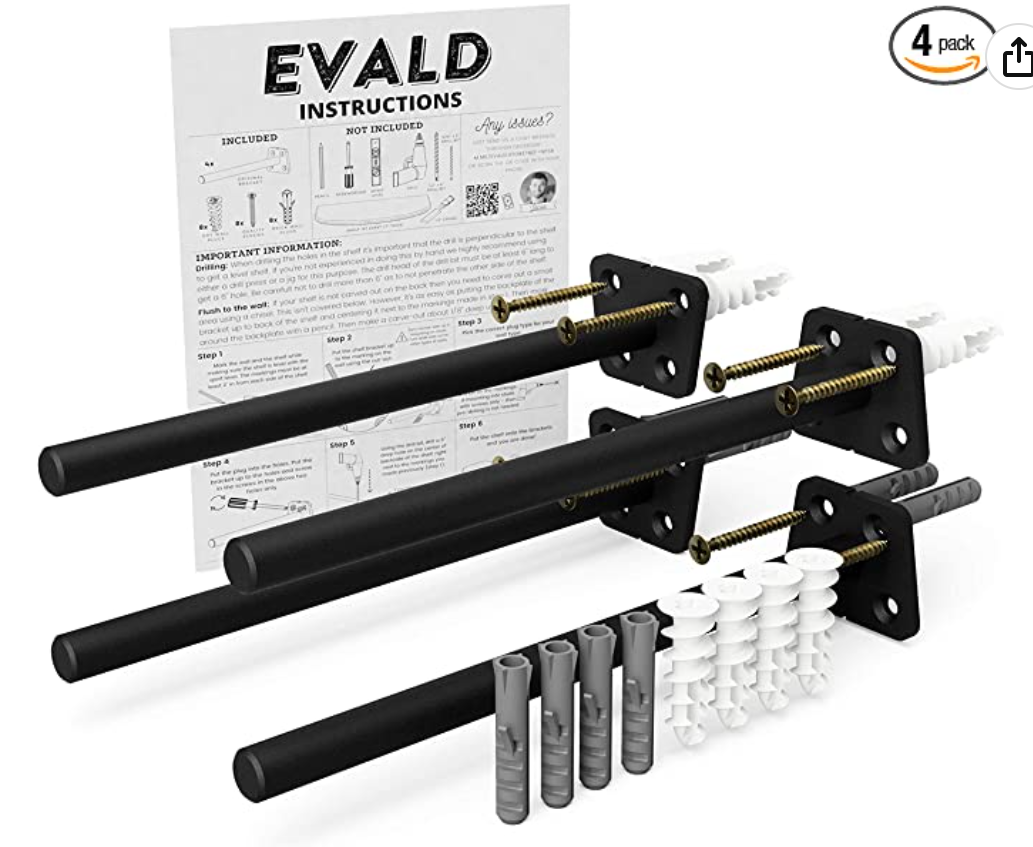
We are also making progress on installing the support posts for the floating shelves. It is a p-r-o-c-e-s-s, lemme tell ya. There is fancy-schmancy company out there that does a whole floating shelf system we had our eye on — until the price tag came to well over $600 A SHELF, which just wasn’t in the budget.
Instead, we opted to purchase these highly reviewed floating shelf posts, each having a weight capacity of 100 pounds (we’ll be installing four on each long shelf). The walnut wood is heavier than you might imagine and we are keen to over-support rather than under-support since they will be loaded down with dishes, glasses, and other kitchen bits.
The downside to these posts is that they must be installed individually (rather than being welded onto one long bar like the expensive kind is.) These are about $32 apiece, and so, in the end, if you count the wood we fetched from a mill in Pennsylvania, each shelf will run about $130 each (versus the aforementioned $600/ea), so once again, our labor is where the money saving comes in.
Having crowed about the money savings, the fact is, we still have to install the dang things. And they need to be dead-on level. And we are drilling into studs. All of it is hive-inducing, but when we opened the wall up to get at the electrical many moons ago, one of us had the foresight to lay a piece of cardboard over the opening and trace a template of every single stud. That would be my contribution to the project, I’ll have you know. I’m nothing if not a fore-thinker 🙂
After the posts are installed on the wall, we still have to drill holes in the back of our swanky new wood, another terrifying process, but thankfully, the mill gave us a few scrap pieces on which to practice before we do it for realz!
The Bad
Not everything is perfect on this project. As I said, we keep running into work-arounds, some expected, some surprises, and some downright confounding.
At the end of our wet wall, there is a two-foot “bump-out” that simply needed painting. A simple job I could knock out in an hour. Unfortunately, I was so busy looking down at the sparkly new handles on the cabinets that I forgot to look up at the damage to the wall when the cabinets were ripped out. Chipped old paint needed to be scraped. And once we started that, we realized the former homeowner or the original builder must have built up a crooked wall with plaster and that, too, has dinner-plate sized chips in it. WAY too much to sand out. Nope, in order to have a nice smooth wall, we would need to patch and repair, sand, sand again, sand a third time, and then start a skim coat. I’ve always said dry wall workers are the artists of the construction world. Even our contractor hires out a pro to get a perfect look. Tapering in mud is a skillset neither of us have, that’s for sure.
But, we already spent over $1,000 having a ceiling repaired and painted — money unbudgeted for, but well spent. So, hiring someone to do this one small, but very central, wall was just out of the question. Thankfully, we have a solution — stay tuned for a future update 🙂
Another issue that popped up — choosing our base trim. We simply could not find the cabinet bead trim piece for the baseboards we had our hearts set on, so we scrapped the whole plan and reconsidered. Because the base trim in the entire house is going to be changed, little by little, and because we want to make sure we can get whatever we choose well into the future when we get around to changing the rest of the house, we need to build trim from pieces that are readily available and fairly simple and clean-looking.
Because we had planned to do board and batten in our master bath during the 2020 renovation, but scrapped those plans at the last flipping moment, I had insisted we could use all that trim at some point, for something down the line. Welp, that something is going to be our new base trim 🙂 We’ll be doing a 5″ x 1″ with a quarter round topper. Simple, but impactful at about 6″ high. Following the rule of thumb that base trim should be roughly 7% of the height of a room ceiling, or in our case, roughly 7 inches, we are pretty darn close.
Depending on how much gapping we have between the new floor and the base, we will likely also add a shor moulding at the floor level, so lots of visual impact. We had to purchase another batch of quarter round, which brings total bill for doing all the base trim in the new kitchen, hallway, and the entire 11.5 ft x 8.5 ft island will be roughly $75. Not bad, I tell you. Not bad at all.
The Utterly Intolerable
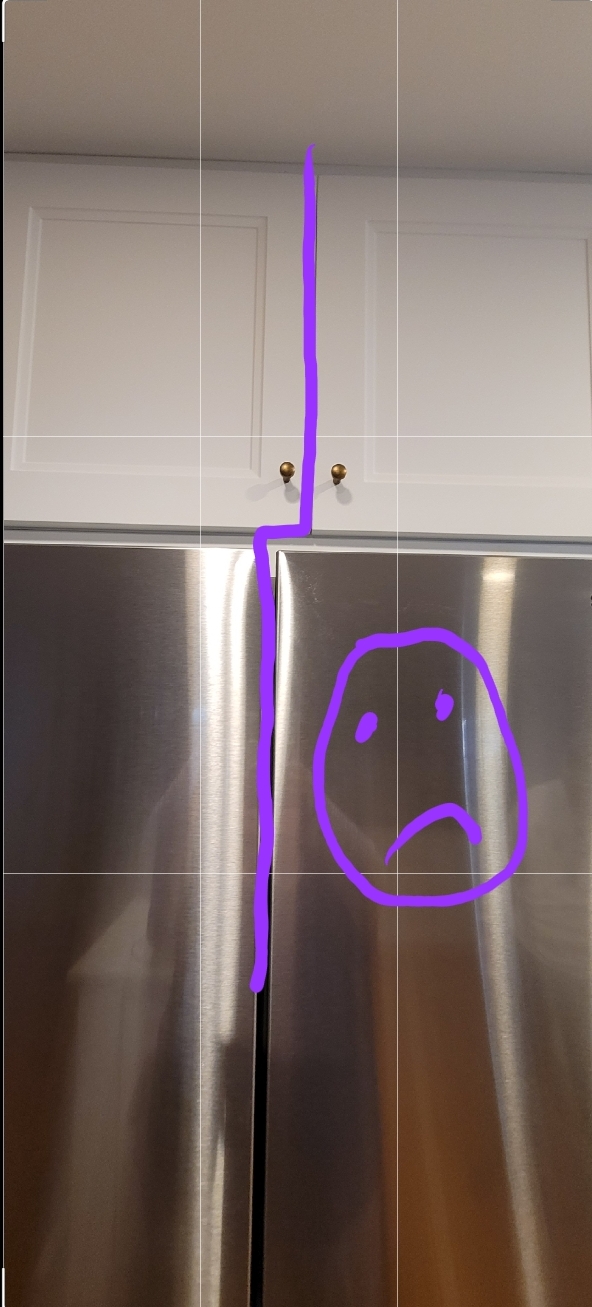
I’m not into zodiac woo-woo, but I am a libra, and whatever the woo-woo sites tell you about each zodiac sign, one thing is certain — libras need balance in scale, texture, and symmetry. How this happened on our pantry/fridge wall is beyond me (see the purple line to pinpoint the exact spots my head explodes…)
I can only say that our old-school contractor was probably not a libra.
More bewildering, we were on site every. single. day. We missed it and we missed the trim at the bottom not hitting the ground. This was an easy install and we could have done it ourselves (and, in retrospect, should have.) I think the lessons we are learning is that when it comes to the meticulous stuff (okay, picky stuff), those are the jobs we should just opt to handle ourselves – even if it takes weeks longer than a pro could do it.
Unfortunately, we will have to rip out ALL of the trim, rehang the cabinets on that side to re-install properly. It will be one of the last things on the punch list and something neither of us is looking forward to.
As we barrel toward the finish line, the main tasks remaining are installing the floating shelves, finishing out the tile work, installing the baseboards, installing all new electrical outlets, and doing all the box trim on the island. We also have to finish the utility cabinets on the other side of the room which will involve assembling, trimming, priming, and painting. Fun times ahead, but our patience has worn thin and we are focused on getting this done by the one year mark (in just three weeks.)
The pin prick of light at the end of the tunnel is taunting us.